Krita/Tutorial 4B
Tutorial: Pixel Brushes II
Brush shape dynamics
We've finally reached dynamics! Hurrah! Now, there are Way too many different combinations, and I don't have a tablet to show them all anyway, but I will list the most interesting settings that I know of.
Common settings
All dynamics will usually allow you to set the dynamics to one of 14 different settings.
Of these, 7 are tablet settings, some only available to more advanced tablets: , , , , , and . Since I'm tablet-less, I won't describe them here (I don't even know what most of these are D: ).
This, however, leaves a whole 7 options that even us mouse-users can play around with! These are:
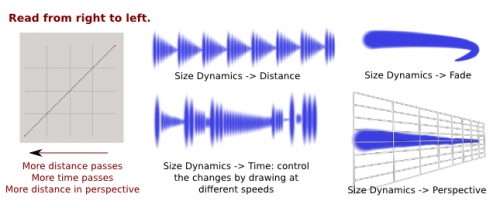
- speed of drawing
- the direction of your brush

I think it was set up this way so you can fade your lines without having to reverse the curve.
- the distance you've drawn so far, but more used for repeating patterns
- The level of dynamics is dependent on the amount of time passed. This means if you're drawing at different speeds, repeating patterns won't come out in a regular way.
- like Distance, but more intended for overall, non-repeating behaviour (technically the same though). You can have both Distance and Fade at the same time!
- this applies when you have a perspective assistant on, and your brush's "assistant" option is on. Also see the first part of my Brush tutorial for assistants.
- basically "random" or "jitter"

You will also have access to the two following options:
- : allows you to set the dynamics using the curve. Otherwise, the brush will only take any absolute values defined. Basically, just keep it on.
- : by default all the settings will share the same curve. Turn it off for some more variety.

As I address various dynamics I may also address a few examples of tweaking curves.
Opacity
By default, the setting for Opacity dynamics is activated for tablet users: the harder you press, the higher the opacity. For mouse users, you can set the dynamics to Speed.

The and settings at the top are synchronized with the ones on the top toolbar. Remember that you can use these, as well as vary the spacing, to control the base opacity of a brush.
Tip: To make smoother transitions, draw using the "Draw dynamically" mode on the left bar.

I'll admit that I don't often use Opacity dynamics with a mouse because:
- It's easier to fiddle with Opacity/Flow/Airbrush mode and pass over the same area again
- I prefer color smudge brushes for shading. This will depend on your style however.
Size
On the other hand, I use Size dynamics all the time! Uses include:
- Size changes to defined shapes (such as chains)
- Varying size of texture / folliage
- Repeating patterns
- Random size
- Perspective of course
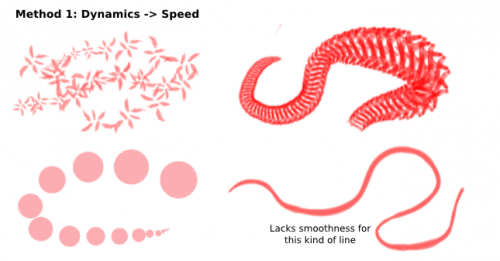
Let's start with the one thing that mouse users wish to be able to do, that tablet users can do easily: increasing then decreasing the stroke's size. I actually use 3 different settings, two of which use the pixel brush:
| Brush engine | Size Dynamics | Use for | Pros | Cons |
|---|---|---|---|---|
| Pixel brush | Speed | Objects, textures, rough lines | Vary size multiple times by varying speed | Transitions less smooth for thin, generic lines, difficult to quickly decrease size for short strokes |
| Pixel brush | Time | Short, generic strokes | Fast, can vary length a bit with speed | Timing is an issue for longer strokes, strokes are generic |
| Curve brush | Speed | Long, complex strokes | Super smooth, vary width relatively easily | Lacks the extra options/brush tips of pixel brushes |
Tip: Again, to make smoother transitions, use the "Draw dynamically" mode.
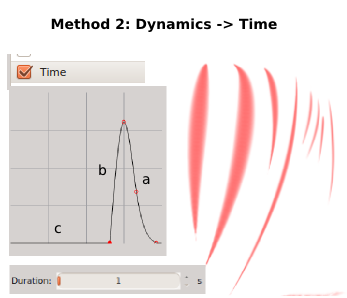
Whoa, for Method 2, that's that scary-looking curve? It's simple actually.
Remember, for , , and , you read the curve for Right to Left:
a. Increase smoothly to maximum size
b. Then decrease again
c. Stay 0.
The reason for c. is because Krita doesn't allow a duration under 1 second, actually quite a long time for short strokes.
With this setting, the whole curve is drawn within about 0.33 seconds. Vary this duration a bit to suit your own needs.
Tip: Method 2 is a function of time, so you have the following options to vary the length of the stroke:
- Just draw faster/slower
- Zoom in or out, so a smaller/bigger length is covered during that time.
- If you're drawing with dynamic mode like I do, varying the "drag" value will also change the speed at which the curve is drawn: lower it for faster drawing.
This ability to vary length is the advantage this setup has over .
The rest is just adjusting the brush size with Ctrl + drag.
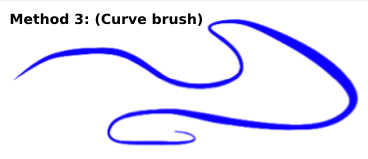
I won't cover Method 3 in detail here since it's the wrong section, but it basically involves:
- Using the Curve brush
- Set to something in the range 5~20
- Set to 0
So? What about the other settings?
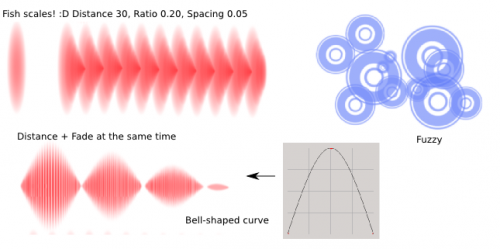
Fun stuff! When using Distance and Fade at the same time, don't forget to uncheck .
Spacing
For the most part, Spacing scales proportionally with brush size. This is a good thing because you won't end up with absurd densities when you scale up. You can add spacing dynamics though, the spacing dynamic will vary between 0 and the default spacing of your brush.

Moving on.
Mirror
If you need to flip your brush around, you can do so easily by checking the corresponding box at the top of the Mirror dynamic section.

It is actually pretty hard to synchronize distance and mirroring, by the way, so unless you just want random mirroring, I suggest making a custom animated brush. I just use the checkboxes otherwise, and ignore the options for dynamics.
Softness and Sharpness
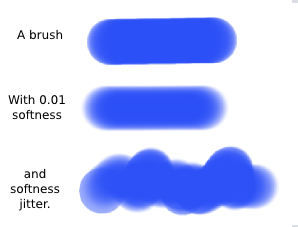
Softness
Softness basically takes a hard brush and makes it softer. It only seems to work with two types of brushes:
It doesn't seem to work with anything else.
Sharpness
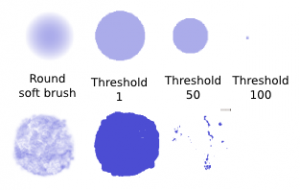
So Sharpness does the opposite of Softness, right? Not exactly, here's what it does:
- It takes the threshold value, and basically eliminates all the grey values below the threshold.
- Then, it takes the remaining areas, and make it a uniform value.
None of the dynamics seem to work. Weird.
Rotation
Along with Size dynamics, Rotation dynamics is probably one of those you'll use most, if only for the handy .
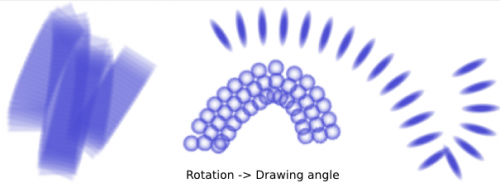
Many of the predefined brushes have built-in rotation, but angle is still very handy, and saves you the trouble of having to create multiple frames for custom brushes.
By the way, for custom brushes, make sure they're facing to the left.
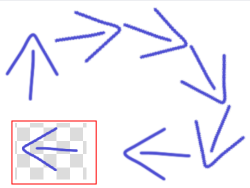
Another thing that's very nice with Rotation is to create controlled or unexpected patterns:

See the one on the bottom-right? I got that one from Aldy's brush set. The behaviour of the brush absolutely baffled me, and it turned out to be a simple autobrush with 0.02 spacing and set at 50 px. Weird eh? Not that we're complaining. Vary the brush tip, the spacing and the distance for all sorts of frill effects.
Finally, is a whole lot of fun, especially in combination with other dynamics. Examples include:
- Random line styles
- Texture-like effects
- Or just to rotate some static images
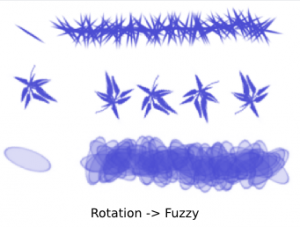
Explore different settings, and don't forget to tweak spacing to adjust the effect.
Scatter

- This first thing you'll want to do is lower the default, maximum value of 5.0 to something more reasonable, like 0.5.
- The second thing you may want to do is adjust the spacing, as that affects the number of copies being scattered (the less the spacing, the more the copies).
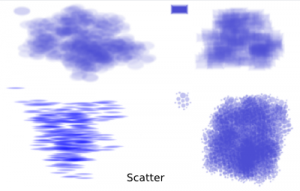
Well, that's it. You don't really need to set the curve dynamics. Scatter away. Wee!
Color Source, Color Dynamics and Patterns
Color Source
A paintbrush usually just picks up a color and drops it on the canvas. Krita's pixel brush actually allows you to choose from 6 sources:
- : the foreground color
- : color from the gradient. It will usually just use the first color, unless you've added dynamics.
- U: weird option, ignore it?
- : also weird option, ignore it?
- : You brush the pattern onto the canvas. In this option the pattern is "static": it's like you're slowly revealing a layer with a pattern on it rather than painting a pattern.
- : Your brush will pick up a bit of pattern and repeat that.
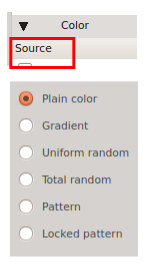
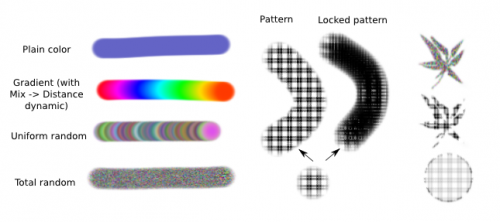
You can access gradients and patterns from the top toolbar.

Krita also allows you to make custom gradients and custom patterns. Since the location of my last explanation of custom gradients isn't obvious (it's in the layers management tutorial), I'm repeating it here:
Custom gradients
- In the drop-down, click .
- The black arrows represent control points with the colors left or right.
- The white arrows just determine the speed of transition.
- To add a new segment, click a segment, right-click and choose
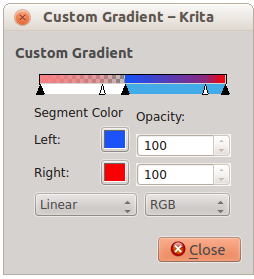
- Note: Each segment has independent and values (shown in the example). This means you can easily create "abrupt" transitions.
- If you don't want abrupt transitions, click the color button, copy the html value, open the color of the next segment, and paste the value in.
Custom patterns
To make a custom pattern:
- Scribble your pattern on a new layer
- Open the tab in the Patterns drop-down.
- .
- Click to get a preview.
- Krita will automatically take only the visible areas, cutting away excess transparent areas.
- Click
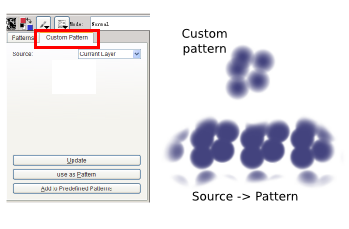
Now switch to your brush with "Pattern" as source and draw away.
Color dynamics
The following dynamics only work with:
- or
Darken and HSV
- makes your color a bit darker, I haven't found another use for it
- , and take your base color and vary its HSV value
To illustrate what they do, I have activated the following dynamics:
- Distance: 300 pixels, no repeat
- Two curve settings: full range, and smaller changes around the center value
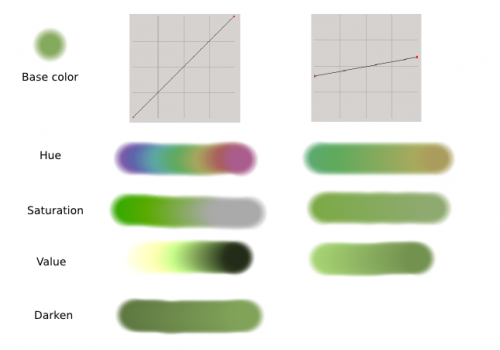
just darkens your color.
With HSV, the center value corresponds to your base color. If you vary , then and won't change, but the hue will, etc. In theory this allows you to create small to large variations in HSV value.
However there's a much easier way of doing this: with .
Mix
- With , will use the range of colors between your foreground and background colors.
- With , will use the range of colors of the gradient.
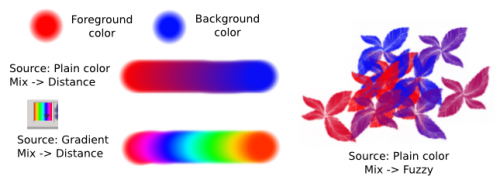
This makes it very easy to have brushes with varying shades of color.
If, for example, you want to make leaves with varying shades of green, you just have to have two green shades as foreground and background colors, and turn on .
Texture -> Pattern
The last option left in brush dynamics is . To illustrate what it does, I took a plain round brush and turned on the option.

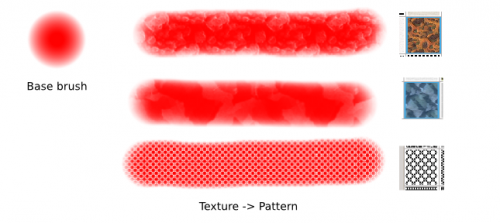
Some options include:
- : The size of your pattern
- /: As you can see, the patterns are fixed. You can use these options to nudge them a bit horizontally or vertically.
- OffsetStrengthOffset: Well, I'm not sure what it does mathematically, but here's a visual example:
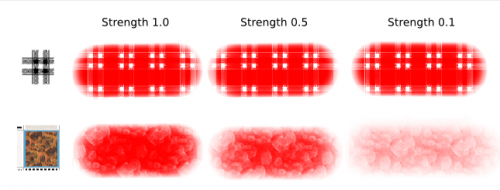
As you can see, Strength doesn't do anything in particular to clear-cut patterns, but you'll see a difference when you're using images with lots of different values.
Finally we have . To demonstrate this, I made a pattern of my own:
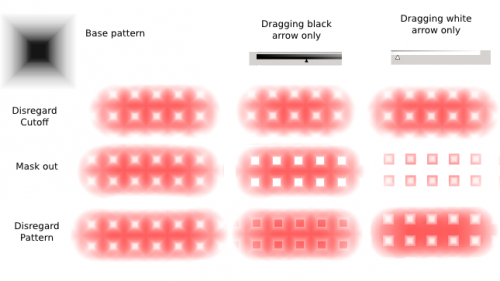
As you can see:
- <menuchoice>Mask out: Areas below or above a certain threshold won't get painted over
- : Areas below or above a certain threshold get painted over
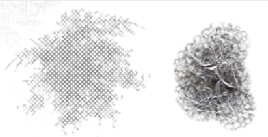
If you want, you can make a brush with a texture-like predefined brush tip, turn source to Pattern and add . I can't guarantee the results, but it makes for some interesting effects.
Combos
We've had an overview of nearly all of the features of Krita's pixel brush now, so before we end this tutorial, here are some combos to try out, from the possibly useful to the outright silly. These were made with mouse users in mind.
Rather than confuse you with all the exact values to use, I grouped them up in a file to download.
Experiment around to come up with your own combos!
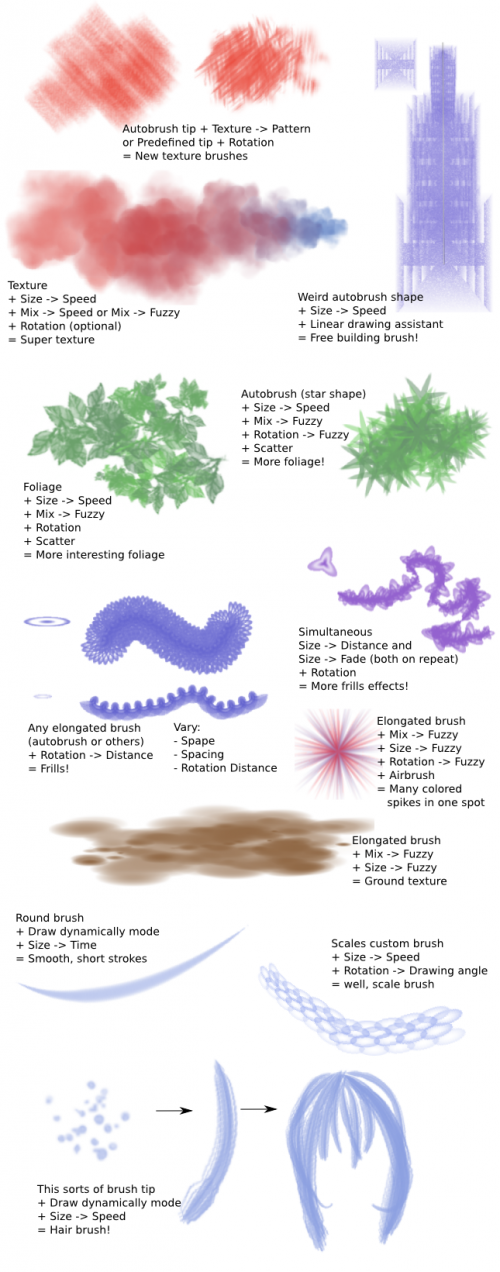
Of course, I skipped all the brushes that are basically "Use a texture-like predefined brush."
Here's a list for your reference.
And this concludes the tutorial on the Pixel Brush. Have fun!


