KWord/1.5/Manual/TemplateWork: Difference between revisions
Created page with '=Creating Templates, Saving a document as a template and Deleting Templates= Mike McBride KWord comes with several predefined templates (both Page Layout and Text Oriented templ...' |
No edit summary |
||
| Line 80: | Line 80: | ||
|Headers and Footers|| ||align="right" |Entering Document Information | |Headers and Footers|| ||align="right" |Entering Document Information | ||
|} | |} | ||
[[Category:Office]] | |||
Latest revision as of 17:08, 17 August 2012
Creating Templates, Saving a document as a template and Deleting Templates
Mike McBride
KWord comes with several predefined templates (both Page Layout and Text Oriented templates), which are designed to provide initial formatting of documents.
If, however, the same format for a custom document is used over and over, KWord can create a template which more exactly matches the needs of the document.
An unlimited number of templates can be created in KWord, and they can be organized into categories for easy recall.
Creating a new template
Templates are created by first generating the layout in KWord based on one of the predefined templates, and then saving the file. Instead of saving it as a traditional file, it is saved as a template.
What follows, is a step by step process to save the current document as a template.
- 1. When the document is a completed template, Select File->Create Template From Document... from the menubar.
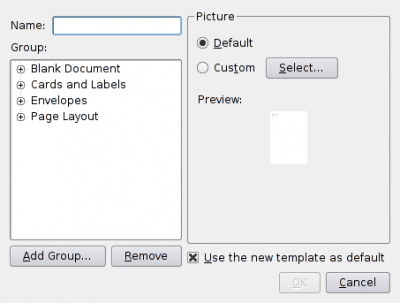
This brings up a dialog:

- This dialog helps organize the templates into groups (categories).
- 2. Select the group to place the new template into.
- To create a new group to place templates in, simply click the button labeled Add Group. A dialog box will appear asking for the name of the new group. Click OK and the new group is created.
- 3. Type in a name for the template in the text box labeled Name.
- 4. Select the icon for your new template by using the radio buttons on the right
- KWord has a default icon, which is shown below both options.
- To change the icon, select Custom and a dialog box will appear. Simply select the desired icon using the dialog box. Click OK when the icon is selected.
- 5. Click OK.
Once you have saved the template, the next time you open a document, your new category/new template will appear in the open file dialog. Removing a template
To delete a template, follow these steps:
- 1. Select File->Create Template From Document... from the menubar.
- This will bring up a dialog
- 2. Click on the small plus sign (+) in front of the template group where the template can be found.
- 3. Click once on the template name
- 4. Click on the button labeled Remove.
- 5. A small dialog box will appear verifying that you do intend to delete the template. Simply click Yes.
The template is now deleted.
Removing a template group
To delete a group of templates, follow these steps:
- 1. Select File->Create Template From Document... from the menubar.
- This will bring up a dialog
- 2. Click once on the group name
- 3. Click on the button labeled Remove.
- 4. A small dialog box will appear verifying that you do intend to delete the group of templates. Simply click Yes.
The group and all of the templates within the group are now deleted.
| Prev | Contents | Next |
| Headers and Footers | Entering Document Information |
