Kubuntu/Installation/pl: Difference between revisions
No edit summary |
(Updating to match new version of source page) |
||
| (33 intermediate revisions by 2 users not shown) | |||
| Line 13: | Line 13: | ||
==Przygotowywanie nośnika instalacyjnego== | ==Przygotowywanie nośnika instalacyjnego== | ||
=== Checking the MD5SUM === | |||
Doing this will ensure that your download is complete and that it has given you a fully working ISO to boot, which can be later installed from. | |||
==== From Windows XP -> 7 -> 8 -> 10 ==== | |||
Microsoft Windows does not have any built-in tools for MD5SUM but they do provide [https://support.microsoft.com/en-us/kb/841290 a tool] for checking the MD5SUM. How-To-Geek also provides some information regarding MD5SUM [http://www.howtogeek.com/67241/htg-explains-what-are-md5-sha-1-hashes-and-how-do-i-check-them reading material] or [https://cygwin.com/install.html Cygwin] can be installed and UNIX utilities used instead. | |||
==== From Mac OS X ==== | |||
Open the Terminal app, then navigate to the directory where the ISO is saved. Run: | |||
{{Input|1=<nowiki> md5 -r kubuntu-15.10-desktop-amd64.iso </nowiki>}} | |||
And compare the output to the hashes page for the ISO file. | |||
List of UbuntuHashes can be found here: https://help.ubuntu.com/community/UbuntuHashes | |||
==== From Ubuntu Linux ==== | |||
The first thing to do is to make sure you're in the directory with the .iso file (It will most likely be found in the Downloads directory). Then run the command 'md5sum': For more a more detailed explanation of MD5SUM: [https://help.ubuntu.com/community/HowToMD5SUM ] | |||
{{Input|1=<nowiki> md5sum kubuntu-15.10-desktop-amd64.iso </nowiki>}} | |||
===Windows 7/8=== | ===Windows 7/8=== | ||
| Line 18: | Line 42: | ||
====USB/Dyski zewnętrzne=== | ====USB/Dyski zewnętrzne=== | ||
For a GUI (Graphic User Interface) we use [https://unetbootin.github.io/ UNetBootin]. | |||
You can use UNetBootin to download the ISO(image file) automatically or it can be downloaded: [http://www.kubuntu.org/getkubuntu/ Get Kubuntu]. | |||
Jeśli zaznaczysz opcję 'Obraz dysku' użyj przycisku <menuchoice>...</menuchoice>, aby wybrać pobrany przez Ciebie plik ISO, a następnie kliknij <menuchoice>OK</menuchoice>. | Jeśli zaznaczysz opcję 'Obraz dysku' użyj przycisku <menuchoice>...</menuchoice>, aby wybrać pobrany przez Ciebie plik ISO, a następnie kliknij <menuchoice>OK</menuchoice>. | ||
| Line 29: | Line 53: | ||
====DVD==== | ====DVD==== | ||
The recommended tool for you to use is [http://www.imgburn.com/ ImgBurn]. | |||
There is an excellent tutorial written by the Admin on the ImgBurn forums. It can be found [http://forum.imgburn.com/index.php?/topic/61-how-to-write-an-image-file-to-a-disc-using-imgburn/ here]. | |||
===Istniejąca instalacja Kubuntu=== | ===Istniejąca instalacja Kubuntu=== | ||
===USB/Dyski zewnętrzne=== | ===USB/Dyski zewnętrzne=== | ||
For a GUI (Graphic User Interface) we use [https://unetbootin.github.io/ UNetBootin]. | |||
You can use UNetBootin to download the ISO(image file) automatically or it can be downloaded here: [http://www.kubuntu.org/getkubuntu/ Get Kubuntu]. | |||
Korzystając z konsoli możemy użyć polecenia 'dd'. | Korzystając z konsoli możemy użyć polecenia 'dd'. | ||
Insert your USB drive into your computer and find the corresponding drive using: | |||
<code>lsblk</code><br /> | <code>lsblk</code><br/> | ||
Then format the USB drive with the 'dd' command: <br/> | |||
<code> sudo dd if=Downloads/kubuntu-15.04-desktop-amd64.iso of=/dev/sd'''X''' </code><br /> | <code> sudo dd if=Downloads/kubuntu-15.04-desktop-amd64.iso of=/dev/sd'''X''' </code><br/> | ||
{{Warning| | {{Warning| Be extremely careful to set /dev/sd'''X''' to the right value, if you direct it to your hard drive you will wipe the disk.}} | ||
====DVD==== | ====DVD==== | ||
For making a DVD we recommend this KDE tool called k3b, which can be found [https://userbase.kde.org/K3b here.] | |||
[[Image:K3b.png|thumb|500px|center|K3b]] | [[Image:K3b.png|thumb|500px|center|K3b]] | ||
Look for <menuchoice>More actions...</menuchoice>, click it and then pick <menuchoice>Burn Image...</menuchoice> from the list of actions. | |||
[[Image:K3b-1-pl PL.png |thumb|500px|center|K3b - okno wyboru obrazu]] | [[Image:K3b-1-pl PL.png |thumb|500px|center|K3b - okno wyboru obrazu]] | ||
| Line 59: | Line 83: | ||
Następnie wybierz obraz (iso), który chcesz nagrać na płytę DVD. | Następnie wybierz obraz (iso), który chcesz nagrać na płytę DVD. | ||
{{Note| | {{Note| Most torrent clients and browsers store your downloads in the 'Download' directory.}} | ||
{{Note| | {{Note| Most of the default settings for K3b for DVD burning do not require any changes.}} | ||
===Inne dystrybucje systemu Linux=== | ===Inne dystrybucje systemu Linux=== | ||
| Line 69: | Line 93: | ||
=====USB/Dyski zewnętrzne===== | =====USB/Dyski zewnętrzne===== | ||
For a GUI (Graphic User Interface) we use [https://unetbootin.github.io/ UNetBootin]. | |||
You can use UNetBootin to download the ISO(image file) automatically or it can be downloaded through [http://www.kubuntu.org/getkubuntu/ Get Kubuntu]. | |||
=====DVD===== | =====DVD===== | ||
[[Image: | [[Image:UbuntuGNOMEBrasero.png|thumb|500px|center|Brasero]] | ||
====Opierające się na KDE==== | ====Opierające się na KDE==== | ||
If you're using a Linux Distribution that uses KDE you can follow the [[Special:MyLanguage/Kubuntu/Installation#Existing_Kubuntu_Install|Kubuntu instructions]] as K3b is provided in every KDE based distribution. | |||
===Proces Instalacji=== | ===Proces Instalacji=== | ||
First, you will need to download '''Kubuntu'''. See [http://www.kubuntu.org/getkubuntu/ Get Kubuntu] | |||
[[Image: | {{Note|You will need to press a special key on the keyboard in order to boot from your chosen Installation Media. Ex: Esc, F2, F10, F12, or Del , depending on the OEM (Original Equipment Manufacturer).}} | ||
[[Image:Welcome_15-10.png|thumb|500px|center|Install Welcome Screen]] | |||
<br clear=all> | <br clear=all> | ||
When the installer starts you will see these options: | |||
* | * Try out '''Kubuntu''' without changing anything on your computer. | ||
* | * Install '''Kubuntu''' on your computer. | ||
====Przygotowanie==== | ====Przygotowanie==== | ||
| Line 98: | Line 122: | ||
* Twój komputer jest podłączony do Internetu, dzięki czemu będziesz mógł pobrać aktualizacje i zewnętrzne aplikacje podczas instalacji '''Kubuntu'''. | * Twój komputer jest podłączony do Internetu, dzięki czemu będziesz mógł pobrać aktualizacje i zewnętrzne aplikacje podczas instalacji '''Kubuntu'''. | ||
[[Image: | [[Image:Prepare-15_10.png|thumb|600px|center|Install Prepare Screen]] | ||
<br clear=all> | <br clear=all> | ||
| Line 106: | Line 130: | ||
====Ustawienia Dysku==== | ====Ustawienia Dysku==== | ||
W tym miejscu będziesz mógł zorganizować swój dysk twardy. Ten krok jest bardzo skomplikowany i ważny w całym procesie instalacji, więc zajmie trochę czasu. | W tym miejscu będziesz mógł zorganizować swój dysk twardy. Ten krok jest bardzo skomplikowany i ważny w całym procesie instalacji, więc zajmie trochę czasu. | ||
| Line 115: | Line 135: | ||
Następne sekcje to niektóre możliwe scenariusze, dostępne do wyboru. Przy niektórych opcjach (oprócz Ręcznej) instalator pyta, którego dysku użyć. Po wyborze zobaczysz układ przed i po instalacji na dysku twardym. | Następne sekcje to niektóre możliwe scenariusze, dostępne do wyboru. Przy niektórych opcjach (oprócz Ręcznej) instalator pyta, którego dysku użyć. Po wyborze zobaczysz układ przed i po instalacji na dysku twardym. | ||
===== Zmiana rozmiaru ===== | ===== Zmiana rozmiaru ===== | ||
Ta opcja pozwala zmienić ci rozmiar partycji i zainstalować '''Kubuntu''' na wolnej przestrzeni. Dzięki tej opcji można stworzyć to, co jest nazywane podwójnym rozruchem (dual-boot) i wybrać system operacyjny, który uruchomi się przy starcie. | Ta opcja pozwala zmienić ci rozmiar partycji i zainstalować '''Kubuntu''' na wolnej przestrzeni. Dzięki tej opcji można stworzyć to, co jest nazywane podwójnym rozruchem (dual-boot) i wybrać system operacyjny, który uruchomi się przy starcie. | ||
{{Note|Ta opcja jest dostępna tylko wtedy, gdy co najmniej 25 GB może zostać uwolnione.}} | |||
=====Use entire disk===== | |||
Using this option the installer will create two partitions on your hard drive; one for most of the content, including the root and home directories, and one partition for the swap. | |||
[[Image:Disksetup-15_10.png|thumb|600px|center|Entire Disk option]] | |||
{{Warning|Ta opcja kompletnie wyczyści twój dysk twardy. Utracisz wszystkie zainstalowane systemy operacyjne (Windows, Mac OS X, Linux, itp.) i wszystkie dane przechowywane na dysku.}} | {{Warning|Ta opcja kompletnie wyczyści twój dysk twardy. Utracisz wszystkie zainstalowane systemy operacyjne (Windows, Mac OS X, Linux, itp.) i wszystkie dane przechowywane na dysku.}} | ||
===== Cały dysk i ustawienie LVM ===== | ===== Cały dysk i ustawienie LVM ===== | ||
Więcej o [https://wiki.ubuntu.com/Lvm LVM] | Więcej o [https://wiki.ubuntu.com/Lvm LVM] | ||
===== Cały dysk i ustawienie szyfrowanego LVM ===== | ===== Cały dysk i ustawienie szyfrowanego LVM ===== | ||
Więcej o [https://help.ubuntu.com/community/EncryptedFilesystems szyfrowanych systemach plików] | Więcej o [https://help.ubuntu.com/community/EncryptedFilesystems szyfrowanych systemach plików] | ||
===== Ręcznie ===== | ===== Ręcznie ===== | ||
Jeśli użyjesz opcji <menuchoice>Ręcznie</menuchoice> dla ustawienia systemu, tak jak tego sam chcesz, musisz pamiętać o kilku rzeczach: | Jeśli użyjesz opcji <menuchoice>Ręcznie</menuchoice> dla ustawienia systemu, tak jak tego sam chcesz, musisz pamiętać o kilku rzeczach: | ||
* | [[Image:Disksetup_part2-15_10.png|thumb|600px|center|Manually setting up your hard drive]] | ||
* | |||
* | * The root ( '''/''' ) directory needs at least 25 GB of space. | ||
* The home ( '''/home''' ) directory needs as much space as you will need for your files, music, pictures, and documents. So it is best to use the remaining space for the home partition, unless you are going to have a dual boot. | |||
* Swap space of at least half of the available RAM is recommended. For instance, with 8 GB of RAM, you should make the swap have at least 4 GB. | |||
{{Note|If you have a Windows 8 sticker on your machine you might need to make a separate EFI partition with a fat32 filesystem.}} | |||
Aby uzyskać bardziej szczegółowe informacje na temat ustawień dysku dla systemów linuksowych, sprawdź stronę [https://help.ubuntu.com/community/DiskSpace DiskSpace]. | Aby uzyskać bardziej szczegółowe informacje na temat ustawień dysku dla systemów linuksowych, sprawdź stronę [https://help.ubuntu.com/community/DiskSpace DiskSpace]. | ||
==== | ==== Timezone ==== | ||
During this step you get to pick the Region where you live and then the Timezone of the location in that Region. An example would be that I live in New York, so my Region is North America and my Timezone is New York (EST). | |||
[[Image:Timezone-15_10.png|thumb|600px|center|Setting your timezone]] | |||
[[Image: | |||
==== | ==== Keyboard ==== | ||
This is the step that will set up your keyboard's language or, if applicable, a different version of the language. For example, there is a Cherokee American English setting as well as different setups with special keys used in certain languages; in '''Kubuntu''' we try to make the use of the system easy for everyone! | |||
[[Image:Keyboard-15_10.png|thumb|600px|center|Keyboard Screen]] | |||
[[Image: | |||
==== Informacje o użytkowniku ==== | ==== Informacje o użytkowniku ==== | ||
Na tym etapie instalacji możliwe będzie wprowadzenie informacji o użytkowniku, jak jego imię i nazwisko, nazwa użytkownika i hasło. Hasło będzie twoim kluczem do zalogowania się do nowej instalacji oraz do instalacji nowych programów, aktualizacji systemu i wielu innych rzeczy, więc go nigdy nie zapominaj! | Na tym etapie instalacji możliwe będzie wprowadzenie informacji o użytkowniku, jak jego imię i nazwisko, nazwa użytkownika i hasło. Hasło będzie twoim kluczem do zalogowania się do nowej instalacji oraz do instalacji nowych programów, aktualizacji systemu i wielu innych rzeczy, więc go nigdy nie zapominaj! | ||
[[Image: | [[Image:Userinfo-15_10.png|thumb|600px|center|Entering your username, password, and hostname]] | ||
[[Special:myLanguage/Kubuntu| Powrót do strony głównej Kubuntu]] | [[Special:myLanguage/Kubuntu| Powrót do strony głównej Kubuntu]] | ||
[[Category:Kubuntu/pl]] | [[Category:Kubuntu/pl]] | ||
Latest revision as of 16:10, 29 May 2019
Dlaczego musisz wypróbować Kubuntu?
Jest wiele powodów, aby zainstalować Kubuntu! Niektóre z nich to:
- Kubuntu czyni twój komputer bardziej przyjaznym.
- Kubuntu to system operacyjny tworzony przez przyjazny zespół ekspertów. Znajdziemy w nim wszystkie aplikacje potrzebne do: przeglądania sieci, zestaw biurowy, aplikacje multimedialne, komunikatory i wiele innych. Aby przejrzeć listę
dołączonego oprogramowania zajrzyj na stronę Oprogramowanie.
- Kubuntu jest wolną, otwarto-źródłową alternatywą dla Windows i Mac OSX.
- Jest łatwy w instalacji obok lub zamiast Windows.
Przygotowywanie nośnika instalacyjnego
Checking the MD5SUM
Doing this will ensure that your download is complete and that it has given you a fully working ISO to boot, which can be later installed from.
From Windows XP -> 7 -> 8 -> 10
Microsoft Windows does not have any built-in tools for MD5SUM but they do provide a tool for checking the MD5SUM. How-To-Geek also provides some information regarding MD5SUM reading material or Cygwin can be installed and UNIX utilities used instead.
From Mac OS X
Open the Terminal app, then navigate to the directory where the ISO is saved. Run:
md5 -r kubuntu-15.10-desktop-amd64.iso
And compare the output to the hashes page for the ISO file.
List of UbuntuHashes can be found here: https://help.ubuntu.com/community/UbuntuHashes
From Ubuntu Linux
The first thing to do is to make sure you're in the directory with the .iso file (It will most likely be found in the Downloads directory). Then run the command 'md5sum': For more a more detailed explanation of MD5SUM: [1]
md5sum kubuntu-15.10-desktop-amd64.iso
Windows 7/8
=USB/Dyski zewnętrzne
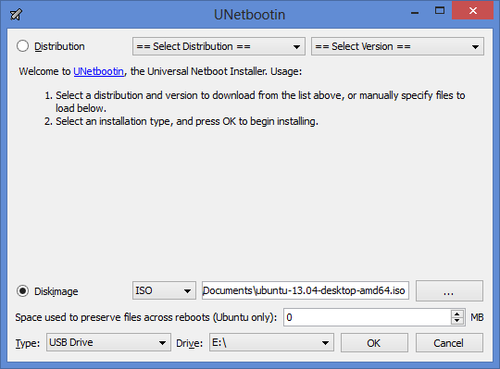
For a GUI (Graphic User Interface) we use UNetBootin.
You can use UNetBootin to download the ISO(image file) automatically or it can be downloaded: Get Kubuntu.
Jeśli zaznaczysz opcję 'Obraz dysku' użyj przycisku , aby wybrać pobrany przez Ciebie plik ISO, a następnie kliknij .

DVD
The recommended tool for you to use is ImgBurn. There is an excellent tutorial written by the Admin on the ImgBurn forums. It can be found here.
Istniejąca instalacja Kubuntu
USB/Dyski zewnętrzne
For a GUI (Graphic User Interface) we use UNetBootin.
You can use UNetBootin to download the ISO(image file) automatically or it can be downloaded here: Get Kubuntu.
Korzystając z konsoli możemy użyć polecenia 'dd'.
Insert your USB drive into your computer and find the corresponding drive using:
lsblk
Then format the USB drive with the 'dd' command:
sudo dd if=Downloads/kubuntu-15.04-desktop-amd64.iso of=/dev/sdX

DVD
For making a DVD we recommend this KDE tool called k3b, which can be found here.

Look for , click it and then pick from the list of actions.
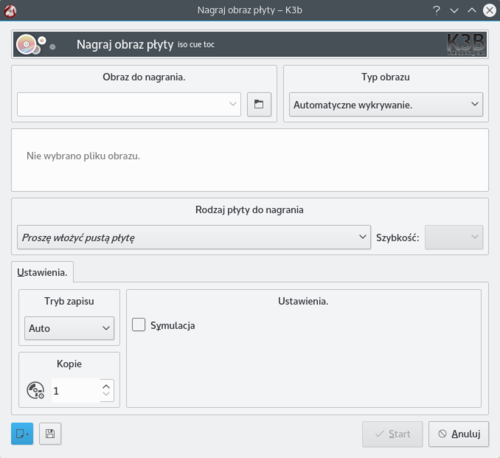
Następnie wybierz obraz (iso), który chcesz nagrać na płytę DVD.
Inne dystrybucje systemu Linux
Opierające się na GNOME
USB/Dyski zewnętrzne
For a GUI (Graphic User Interface) we use UNetBootin.
You can use UNetBootin to download the ISO(image file) automatically or it can be downloaded through Get Kubuntu.
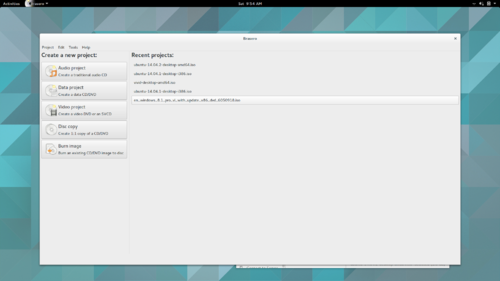
DVD
Opierające się na KDE
If you're using a Linux Distribution that uses KDE you can follow the Kubuntu instructions as K3b is provided in every KDE based distribution.
Proces Instalacji
First, you will need to download Kubuntu. See Get Kubuntu
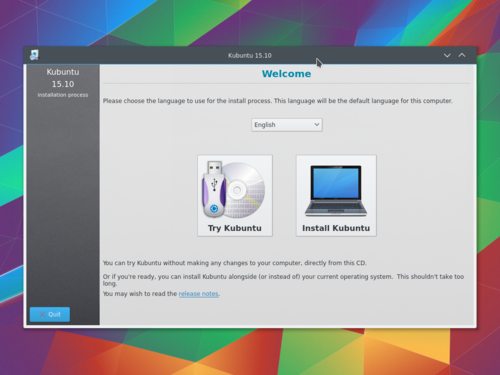
When the installer starts you will see these options:
- Try out Kubuntu without changing anything on your computer.
- Install Kubuntu on your computer.
Przygotowanie
Aby uzyskać najlepsze wyniki upewnij się, że:
- Twój komputer ma wystarczającą przestrzeń dla Kubuntu i twoich danych - muzyki, obrazów, wideo i dokumentów.
- Twój komputer jest podłączony do Internetu, dzięki czemu będziesz mógł pobrać aktualizacje i zewnętrzne aplikacje podczas instalacji Kubuntu.
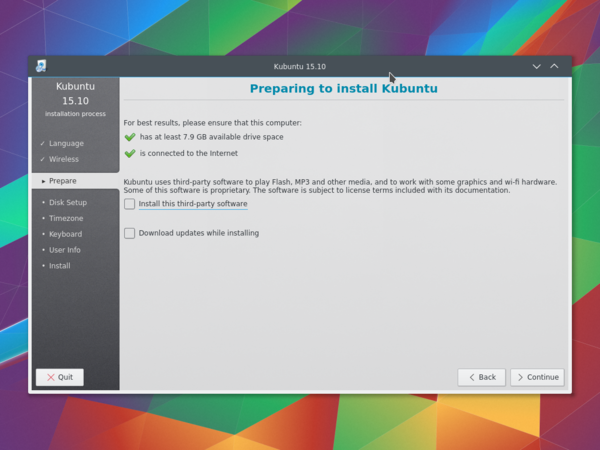
zawiera oprogramowanie, które nie stosuje modelu Open Source, albo Filozofii Ubuntu, lecz jest bezpieczne dla twojego systemu.
zapewni najnowsze poprawki błędów i bezpieczeństwa zaraz po zakończeniu instalacji.
Ustawienia Dysku
W tym miejscu będziesz mógł zorganizować swój dysk twardy. Ten krok jest bardzo skomplikowany i ważny w całym procesie instalacji, więc zajmie trochę czasu.

Następne sekcje to niektóre możliwe scenariusze, dostępne do wyboru. Przy niektórych opcjach (oprócz Ręcznej) instalator pyta, którego dysku użyć. Po wyborze zobaczysz układ przed i po instalacji na dysku twardym.
Zmiana rozmiaru
Ta opcja pozwala zmienić ci rozmiar partycji i zainstalować Kubuntu na wolnej przestrzeni. Dzięki tej opcji można stworzyć to, co jest nazywane podwójnym rozruchem (dual-boot) i wybrać system operacyjny, który uruchomi się przy starcie.
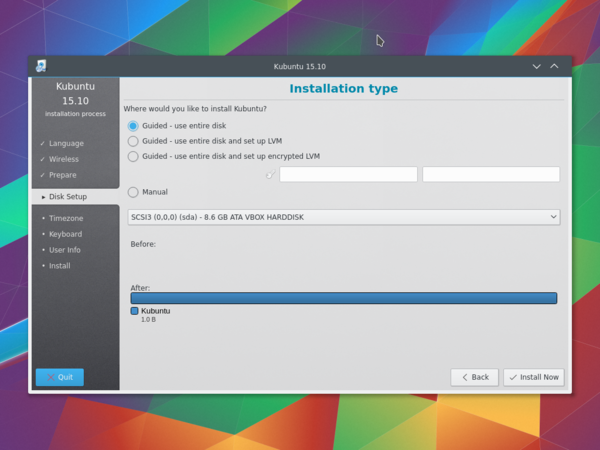
Use entire disk
Using this option the installer will create two partitions on your hard drive; one for most of the content, including the root and home directories, and one partition for the swap.

Cały dysk i ustawienie LVM
Więcej o LVM
Cały dysk i ustawienie szyfrowanego LVM
Więcej o szyfrowanych systemach plików
Ręcznie
Jeśli użyjesz opcji dla ustawienia systemu, tak jak tego sam chcesz, musisz pamiętać o kilku rzeczach:
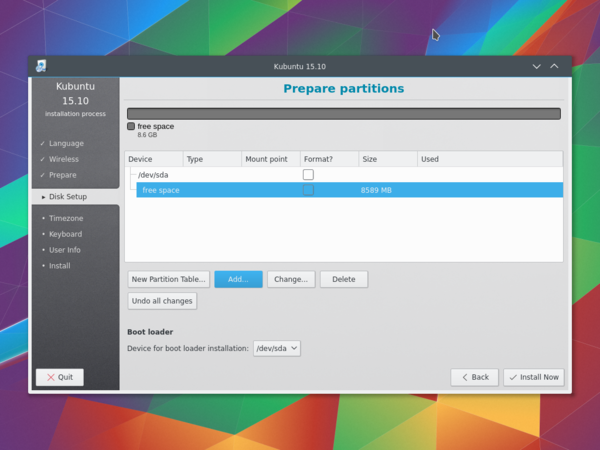
- The root ( / ) directory needs at least 25 GB of space.
- The home ( /home ) directory needs as much space as you will need for your files, music, pictures, and documents. So it is best to use the remaining space for the home partition, unless you are going to have a dual boot.
- Swap space of at least half of the available RAM is recommended. For instance, with 8 GB of RAM, you should make the swap have at least 4 GB.
Aby uzyskać bardziej szczegółowe informacje na temat ustawień dysku dla systemów linuksowych, sprawdź stronę DiskSpace.
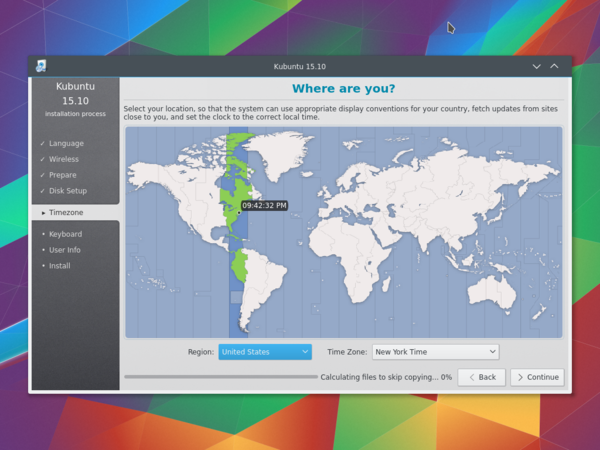
Timezone
During this step you get to pick the Region where you live and then the Timezone of the location in that Region. An example would be that I live in New York, so my Region is North America and my Timezone is New York (EST).
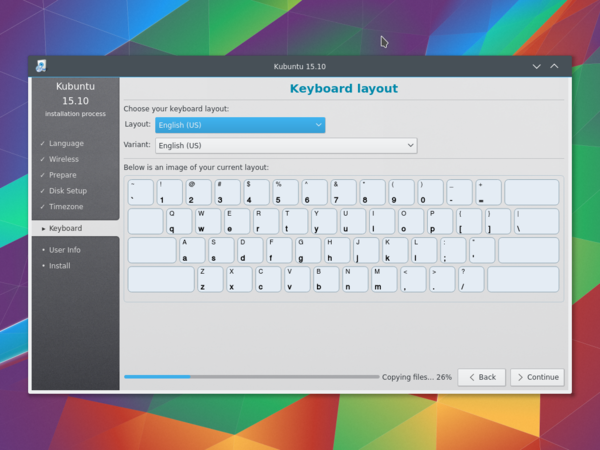
Keyboard
This is the step that will set up your keyboard's language or, if applicable, a different version of the language. For example, there is a Cherokee American English setting as well as different setups with special keys used in certain languages; in Kubuntu we try to make the use of the system easy for everyone!
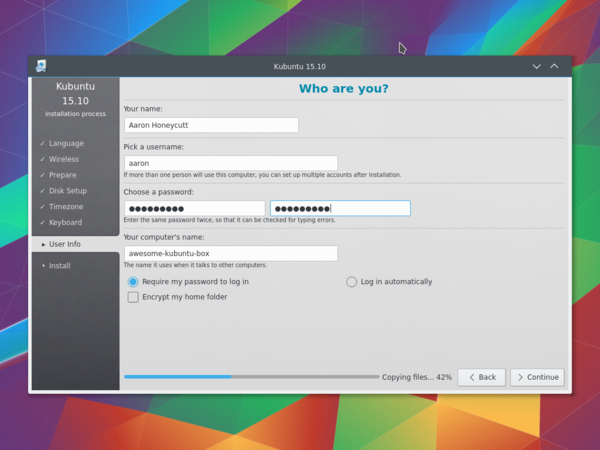
Informacje o użytkowniku
Na tym etapie instalacji możliwe będzie wprowadzenie informacji o użytkowniku, jak jego imię i nazwisko, nazwa użytkownika i hasło. Hasło będzie twoim kluczem do zalogowania się do nowej instalacji oraz do instalacji nowych programów, aktualizacji systemu i wielu innych rzeczy, więc go nigdy nie zapominaj!
