Marble/Maemo/GuidanceMode: Difference between revisions
Earthwings (talk | contribs) |
(Added menuchoice) |
||
| (13 intermediate revisions by 2 users not shown) | |||
| Line 1: | Line 1: | ||
{{ | <languages /> | ||
<translate> | |||
<!--T:1--> | |||
{{Prevnext|Special:myLanguage/Marble/Maemo/OfflineRouting|Special:myLanguage/Marble/Tracking|Offline Routing|Tracking}} | |||
<!--T:2--> | |||
Marble's '''Guidance Mode''' assists you on your way to your destination. Once activated, the map follows your current location (GPS position) and adjusts the zoom value to your speed. When approaching turn points, driving instructions are shown. | |||
<!--T:3--> | |||
[[File:Marble-Maemo-Offline-Routing.png|400px|center]] | |||
== Planning a Route == <!--T:4--> | |||
<!--T:5--> | |||
Marble provides several means to create routes: Use search terms to find source and destination, use your bookmarks or just point at the desired place on the map. | |||
== | === Using the Routing Dialog === <!--T:6--> | ||
<!--T:7--> | |||
The '''Routing dialog''', available from the menu via a click on the | The '''Routing dialog''', available from the menu via a click on the <menuchoice>Marble - Virtual Globe</menuchoice> headline, let's you create routes using search terms and bookmarks. We'll look at an example that combines both. Open the Routing dialog to get a screen similar to the one below. | ||
<!--T:8--> | |||
[[File:MarbleMaemoOfflineRouting-Dialog.png|400px|center]] | [[File:MarbleMaemoOfflineRouting-Dialog.png|400px|center]] | ||
We'll enter ''Augartenstraße, Karlsruhe'' as our search term for the route source in the upper input field. Tapping on the | <!--T:9--> | ||
We'll enter ''Augartenstraße, Karlsruhe'' as our search term for the route source in the upper input field. Tapping on the <menuchoice>Search</menuchoice> button (or pressing <keycap>Enter</keycap>) starts the search. | |||
<!--T:10--> | |||
[[File:MarbleMaemo-RoutingSearchTerm.png|400px|center]] | [[File:MarbleMaemo-RoutingSearchTerm.png|400px|center]] | ||
<!--T:11--> | |||
{{note|Finding route points using search terms requires an Internet connection. Make sure Marble is not in offline mode if no results turn up.}} | |||
<!--T:12--> | |||
More than one result may be found; you can select the correct one in the list at the bottom of the dialog. Of course you can also correct any mistakes and start a new search if the desired location is not among the results. | More than one result may be found; you can select the correct one in the list at the bottom of the dialog. Of course you can also correct any mistakes and start a new search if the desired location is not among the results. | ||
<!--T:13--> | |||
[[File:MarbleMaemo-RoutingSearchResults.png|400px|center]] | [[File:MarbleMaemo-RoutingSearchResults.png|400px|center]] | ||
<!--T:14--> | |||
With the source of the route defined we head over to use one of our bookmarks as the target. We'll get a list of them to pick from when pressing the arrow (triangle) button next to the target input field. It opens a new dialog. | With the source of the route defined we head over to use one of our bookmarks as the target. We'll get a list of them to pick from when pressing the arrow (triangle) button next to the target input field. It opens a new dialog. | ||
<!--T:15--> | |||
[[File:MarbleMaemo-RoutingBookmarks.png|400px|center]] | [[File:MarbleMaemo-RoutingBookmarks.png|400px|center]] | ||
The selected bookmark is used as the route target. You are now ready to calculate the route. Tap on the | <!--T:16--> | ||
The selected bookmark is used as the route target. You are now ready to calculate the route. Tap on the <menuchoice>Get Directions</menuchoice> button to do that. The number of routes found is shown. In case more than one route was found, you can optionally switch to an alternative one at the bottom of the screen. You can also view driving instructions using the <menuchoice>Show Details</menuchoice> button. | |||
<!--T:17--> | |||
[[File:MarbleMaemo-DrivingInstructions.png|400px|center]] | [[File:MarbleMaemo-DrivingInstructions.png|400px|center]] | ||
Your route is now ready. Tap on the | <!--T:18--> | ||
Your route is now ready. Tap on the <menuchoice>arrow</menuchoice> button to close the window. You'll see an overview of the route. | |||
<!--T:19--> | |||
[[File:MarbleMaemo-RouteOverview.png|400px|center]] | [[File:MarbleMaemo-RouteOverview.png|400px|center]] | ||
=== Using the Context Menu === | === Using the Context Menu === <!--T:20--> | ||
<!--T:21--> | |||
If the start or the destination is visible on the map, you can also use the context menu to set the start or the destination of the route. Click on the map once (without moving it) and a context menu comes up. Select <menuchoice>Directions from here</menuchoice> to set the route start and <menuchoice>Directions to here</menuchoice> to set the destination. The route is calculated automatically (if both a start and a destination are set). | |||
<!--T:22--> | |||
[[File:MarbleMaemo-DirectionsFromHere.png|400px|center]] | [[File:MarbleMaemo-DirectionsFromHere.png|400px|center]] | ||
=== Adding Via Points === | === Adding Via Points === <!--T:23--> | ||
<!--T:24--> | |||
Once a route is calculated, you can insert via points (stopover points) with drag and drop. To accomplish that, use the pen of the N900. Click on any point of the route and move the pen to the desired location where a via point should be inserted. While dragging, a small green flag is shown as well as blue lines to the neighboring points on the route. | |||
== Activating Guidance Mode == <!--T:25--> | |||
<!--T:26--> | |||
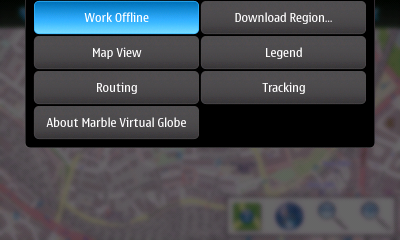
With the route planned you can now switch to guidance mode. Do you have Internet access throughout your journey? If not, switch Marble to offline mode to inform it that you don't want it to download any missing information from the Internet. Otherwise it's likely that your N900 will open popup dialogs asking you to connect to the Internet frequently. Marble's offline mode is activated from the main menu, accessible by tapping on the <menuchoice>Marble - Virtual Globe</menuchoice> headline of the main window. | |||
<!--T:27--> | |||
[[File:MarbleMaemoOfflineRouting-RoutingMenu.png|400px|center]] | [[File:MarbleMaemoOfflineRouting-RoutingMenu.png|400px|center]] | ||
Tap on the guidance mode icon to activate the mode with the same name. It is the left of the four icons on the bottom of the screen. | <!--T:28--> | ||
Tap on the <menuchoice>guidance mode</menuchoice> icon to activate the mode with the same name. It is the left of the four icons on the bottom of the screen. | |||
<!--T:29--> | |||
[[File:MarbleMaemoOfflineRouting-OfflineRoute.png|400px|center]] | [[File:MarbleMaemoOfflineRouting-OfflineRoute.png|400px|center]] | ||
<!--T:30--> | |||
In guidance mode, the GPS and the two zoom icons are hidden. Instead a couple of other elements are shown. Let's look at the items relevant during your journey, one after the other: | In guidance mode, the GPS and the two zoom icons are hidden. Instead a couple of other elements are shown. Let's look at the items relevant during your journey, one after the other: | ||
<!--T:31--> | |||
[[File:MarbleMaemo-GuidanceModeElements.png|400px|center]] | [[File:MarbleMaemo-GuidanceModeElements.png|400px|center]] | ||
<!--T:32--> | |||
# A white triangle indicates your current location (GPS position) and the direction you're moving. The red circle around the current position indicates the quality of the GPS signal: Your real position will likely be somewhere in this circle. The smaller the circle, the better is the GPS signal. | # A white triangle indicates your current location (GPS position) and the direction you're moving. The red circle around the current position indicates the quality of the GPS signal: Your real position will likely be somewhere in this circle. The smaller the circle, the better is the GPS signal. | ||
</translate> | |||
<translate> | |||
<!--T:33--> | |||
# The route source and destination position as well as via points are shown in the map using icons with letters. For a route only consisting of source and destination, the source is indicated by the (A) icon and the destination using the (B) icon. A green icon indicates that you haven't visited the target yet, while a gray icon indicates visited targets. In the screenshot above, the route source position (A) has already been marked visited since we're very close to it at the moment. | # The route source and destination position as well as via points are shown in the map using icons with letters. For a route only consisting of source and destination, the source is indicated by the (A) icon and the destination using the (B) icon. A green icon indicates that you haven't visited the target yet, while a gray icon indicates visited targets. In the screenshot above, the route source position (A) has already been marked visited since we're very close to it at the moment. | ||
</translate> | |||
<translate> | |||
<!--T:34--> | |||
# The next turn point is marked in the map using an orange circle. | # The next turn point is marked in the map using an orange circle. | ||
</translate> | |||
<translate> | |||
<!--T:35--> | |||
# Once the distance to the next turn point falls below 1 km (1000 m), a progress bar is shown. It indicates the distance to the turn point. | # Once the distance to the next turn point falls below 1 km (1000 m), a progress bar is shown. It indicates the distance to the turn point. | ||
# This icon indicates the turn type of the next turn. When it is gray, the next turn is more than 1 km (1000 m) away. Please note that only offline routers generate turn type icons. | </translate> | ||
<translate> | |||
<!--T:36--> | |||
# This icon indicates the turn type of the next turn. When it is gray, the next turn is more than 1 km (1000 m) away. Please note that only offline routers generate turn type icons. The distance to the turn point is shown below the icon. | |||
</translate> | |||
<translate> | |||
<!--T:37--> | |||
# Driving instructions are shown in the middle. | # Driving instructions are shown in the middle. | ||
</translate> | |||
<translate> | |||
<!--T:38--> | |||
# This label displays the distance to the route destination. | # This label displays the distance to the route destination. | ||
# You can disable guidance mode with another click on the guidance mode icon. | </translate> | ||
<translate> | |||
<!--T:39--> | |||
# You can disable guidance mode with another click on the <menuchoice>guidance mode</menuchoice> icon. | |||
<!--T:40--> | |||
{{Prevnext|Special:myLanguage/Marble/Maemo/OfflineRouting|Special:myLanguage/Marble/Tracking|Offline Routing|Tracking}} | |||
<!--T:41--> | |||
[[Category:Education]] | |||
</translate> | |||
Latest revision as of 05:30, 10 May 2011
- ← Offline Routing
- Marble/Maemo/GuidanceMode
- Tracking →
Marble's Guidance Mode assists you on your way to your destination. Once activated, the map follows your current location (GPS position) and adjusts the zoom value to your speed. When approaching turn points, driving instructions are shown.
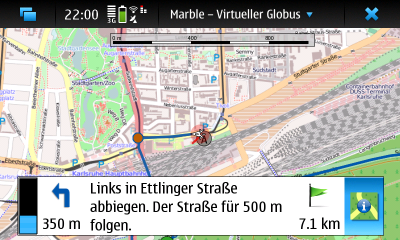
Planning a Route
Marble provides several means to create routes: Use search terms to find source and destination, use your bookmarks or just point at the desired place on the map.
Using the Routing Dialog
The Routing dialog, available from the menu via a click on the headline, let's you create routes using search terms and bookmarks. We'll look at an example that combines both. Open the Routing dialog to get a screen similar to the one below.
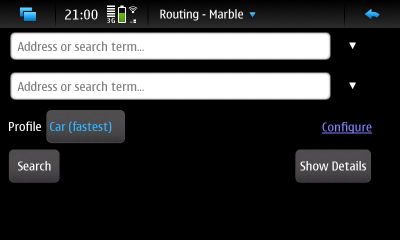
We'll enter Augartenstraße, Karlsruhe as our search term for the route source in the upper input field. Tapping on the button (or pressing Enter) starts the search.
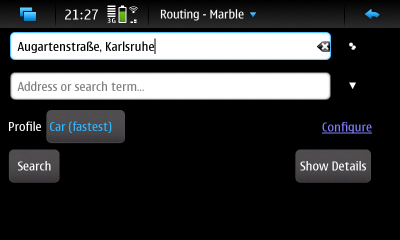
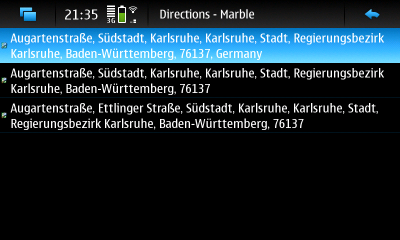
More than one result may be found; you can select the correct one in the list at the bottom of the dialog. Of course you can also correct any mistakes and start a new search if the desired location is not among the results.
With the source of the route defined we head over to use one of our bookmarks as the target. We'll get a list of them to pick from when pressing the arrow (triangle) button next to the target input field. It opens a new dialog.
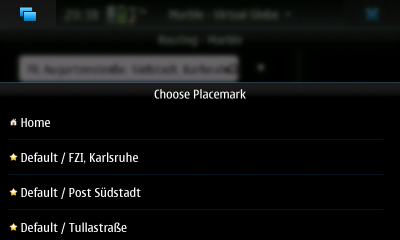
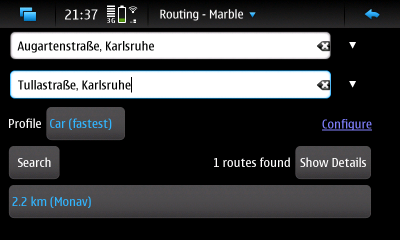
The selected bookmark is used as the route target. You are now ready to calculate the route. Tap on the button to do that. The number of routes found is shown. In case more than one route was found, you can optionally switch to an alternative one at the bottom of the screen. You can also view driving instructions using the button.
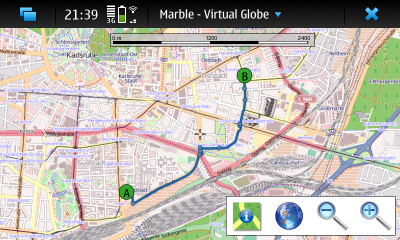
Your route is now ready. Tap on the button to close the window. You'll see an overview of the route.
Using the Context Menu
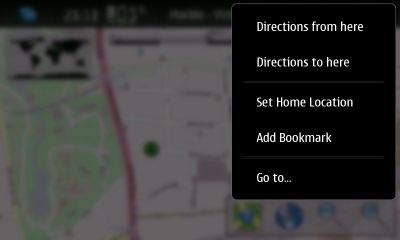
If the start or the destination is visible on the map, you can also use the context menu to set the start or the destination of the route. Click on the map once (without moving it) and a context menu comes up. Select to set the route start and to set the destination. The route is calculated automatically (if both a start and a destination are set).
Adding Via Points
Once a route is calculated, you can insert via points (stopover points) with drag and drop. To accomplish that, use the pen of the N900. Click on any point of the route and move the pen to the desired location where a via point should be inserted. While dragging, a small green flag is shown as well as blue lines to the neighboring points on the route.
Activating Guidance Mode
With the route planned you can now switch to guidance mode. Do you have Internet access throughout your journey? If not, switch Marble to offline mode to inform it that you don't want it to download any missing information from the Internet. Otherwise it's likely that your N900 will open popup dialogs asking you to connect to the Internet frequently. Marble's offline mode is activated from the main menu, accessible by tapping on the headline of the main window.
Tap on the icon to activate the mode with the same name. It is the left of the four icons on the bottom of the screen.
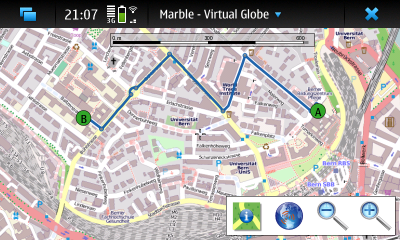
In guidance mode, the GPS and the two zoom icons are hidden. Instead a couple of other elements are shown. Let's look at the items relevant during your journey, one after the other:
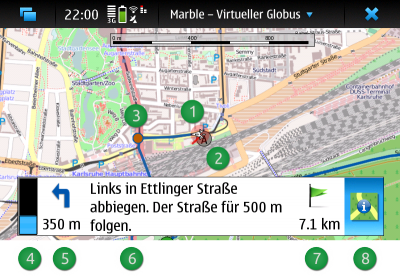
- A white triangle indicates your current location (GPS position) and the direction you're moving. The red circle around the current position indicates the quality of the GPS signal: Your real position will likely be somewhere in this circle. The smaller the circle, the better is the GPS signal.
- The route source and destination position as well as via points are shown in the map using icons with letters. For a route only consisting of source and destination, the source is indicated by the (A) icon and the destination using the (B) icon. A green icon indicates that you haven't visited the target yet, while a gray icon indicates visited targets. In the screenshot above, the route source position (A) has already been marked visited since we're very close to it at the moment.
- The next turn point is marked in the map using an orange circle.
- Once the distance to the next turn point falls below 1 km (1000 m), a progress bar is shown. It indicates the distance to the turn point.
- This icon indicates the turn type of the next turn. When it is gray, the next turn is more than 1 km (1000 m) away. Please note that only offline routers generate turn type icons. The distance to the turn point is shown below the icon.
- Driving instructions are shown in the middle.
- This label displays the distance to the route destination.
- You can disable guidance mode with another click on the icon.
- ← Offline Routing
- Marble/Maemo/GuidanceMode
- Tracking →
