Digikam/Noise Reduction: Difference between revisions
Created page with "<languages /> <translate> ==Reducing Noise Using Digikam== Transcribed from Mohamed Malike's blog, 12 February 2011 All [http://en.wikipedia.org/wiki/Digital_single-lens_reflex_..." |
No edit summary |
||
| (2 intermediate revisions by 2 users not shown) | |||
| Line 1: | Line 1: | ||
<languages /> | <languages /> | ||
<translate> | <translate> | ||
==Reducing Noise Using | ==Reducing Noise Using digiKam== <!--T:1--> | ||
Transcribed from Mohamed | Transcribed from Mohamed Malik's blog, 12 February 2011 | ||
<!--T:2--> | |||
All [http://en.wikipedia.org/wiki/Digital_single-lens_reflex_camera DSLR] cameras noise up to some extent. This is most true for entry level and consumer level DSLR cameras even when these cameras have very good ISO performance up to something like ISO 800. | All [http://en.wikipedia.org/wiki/Digital_single-lens_reflex_camera DSLR] cameras noise up to some extent. This is most true for entry level and consumer level DSLR cameras even when these cameras have very good ISO performance up to something like ISO 800. | ||
I use a Nikon D3000 and its ISO performance is good | <!--T:3--> | ||
I use a Nikon D3000 and its ISO performance is good up to ISO 800. ISO 1600 is good and it can be used in smaller sizes. However ISO 3200 images are very grainy and noise reduction has to be applied. | |||
If you are using '''digiKam''' it has a great noise reduction tool. Double click the image where you want to reduce noise and give a right click -> <menuchoice>Edit</menuchoice>. | <!--T:4--> | ||
If you are using '''digiKam''' it has a great noise reduction tool. Double click the image where you want to reduce noise and give a right click -> <menuchoice>Edit</menuchoice>. You can even press <keycap>F4</keycap> on the keyboard and it will do the same thing. | |||
<!--T:5--> | |||
After this you will be presented with the editor view. | After this you will be presented with the editor view. | ||
<!--T:6--> | |||
From here go to <menuchoice>Enhance -> Noise Reduction</menuchoice> and you will be presented with this window. | From here go to <menuchoice>Enhance -> Noise Reduction</menuchoice> and you will be presented with this window. | ||
<!--T:7--> | |||
[[Image:Digikam_Noise.jpg|center|500px|thumb|Copyright M.Malik]] | [[Image:Digikam_Noise.jpg|center|500px|thumb|Copyright M.Malik]] | ||
<!--T:8--> | |||
Choose from the settings or you can choose your own settings. Here is a picture of before and after from my tests. They are much more usable and better looking after the noise reduction has been applied. | Choose from the settings or you can choose your own settings. Here is a picture of before and after from my tests. They are much more usable and better looking after the noise reduction has been applied. | ||
<!--T:9--> | |||
Before Noise Reduction Was Applied: | Before Noise Reduction Was Applied: | ||
<!--T:10--> | |||
[[Image:Digikam_Noise_Before.jpg|center|500px|thumb|Copyright M.Malik]] | [[Image:Digikam_Noise_Before.jpg|center|500px|thumb|Copyright M.Malik]] | ||
<!--T:11--> | |||
After Noise Reduction Was Applied: | After Noise Reduction Was Applied: | ||
<!--T:12--> | |||
[[Image:Digikam_Noise_After.jpg|center|500px|thumb|Copyright M.Malik]] | [[Image:Digikam_Noise_After.jpg|center|500px|thumb|Copyright M.Malik]] | ||
<!--T:13--> | |||
Here is another picture in which the noise reduction was applied: | Here is another picture in which the noise reduction was applied: | ||
<!--T:14--> | |||
[[Image:Digikam_Noise_Before2.jpg|center|500px|thumb|Copyright M.Malik]] | [[Image:Digikam_Noise_Before2.jpg|center|500px|thumb|Copyright M.Malik]] | ||
<!--T:15--> | |||
After: | After: | ||
<!--T:16--> | |||
[[Image:Digikam_Noise_After2.jpeg|center|500px|thumb|Copyright M.Malik]] | [[Image:Digikam_Noise_After2.jpeg|center|500px|thumb|Copyright M.Malik]] | ||
<!--T:17--> | |||
{{Tip|1=Matthias Welwarsky added "What I like most about the denoise tool is that I can apply separate amounts of reduction on luma and chroma. This helps a lot in preserving detail while giving a smooth color impression. Luminance noise becomes grain and color blotches are eliminated."}} | {{Tip|1=Matthias Welwarsky added "What I like most about the denoise tool is that I can apply separate amounts of reduction on luma and chroma. This helps a lot in preserving detail while giving a smooth color impression. Luminance noise becomes grain and color blotches are eliminated."}} | ||
<!--T:18--> | |||
[[Category:Graphics]] | [[Category:Graphics]] | ||
[[Category:Photography]] | [[Category:Photography]] | ||
[[Category:Tutorials]] | [[Category:Tutorials]] | ||
</translate> | </translate> | ||
Latest revision as of 07:12, 3 March 2011
Reducing Noise Using digiKam
Transcribed from Mohamed Malik's blog, 12 February 2011
All DSLR cameras noise up to some extent. This is most true for entry level and consumer level DSLR cameras even when these cameras have very good ISO performance up to something like ISO 800.
I use a Nikon D3000 and its ISO performance is good up to ISO 800. ISO 1600 is good and it can be used in smaller sizes. However ISO 3200 images are very grainy and noise reduction has to be applied.
If you are using digiKam it has a great noise reduction tool. Double click the image where you want to reduce noise and give a right click -> . You can even press F4 on the keyboard and it will do the same thing.
After this you will be presented with the editor view.
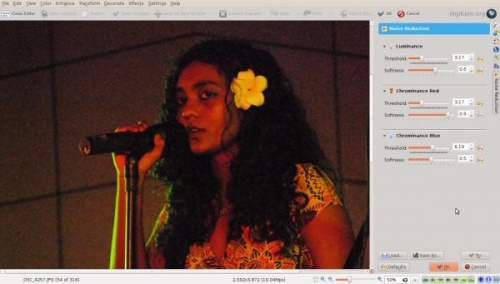
From here go to and you will be presented with this window.

Choose from the settings or you can choose your own settings. Here is a picture of before and after from my tests. They are much more usable and better looking after the noise reduction has been applied.
Before Noise Reduction Was Applied:

After Noise Reduction Was Applied:

Here is another picture in which the noise reduction was applied:

After:


