Working with Google Contacts: Difference between revisions
Viktorious (talk | contribs) |
(Marked this version for translation) |
||
| (17 intermediate revisions by 4 users not shown) | |||
| Line 1: | Line 1: | ||
{{ | <languages /> | ||
<translate> | |||
<!--T:1--> | |||
{{Warning|1=These instructions are only valid for kdepim and Korganizer version 4.3.7 and later. There are significant differences in the older versions, therefore, some instructions may not apply.}} | |||
= | <!--T:2--> | ||
{{Note|1= For demonstration purposes, the Google account used in this tutorial is sync.with.kontact@gmail.com}} | |||
== How to synchronize Google Contacts with Kontact == <!--T:3--> | |||
=== Installing the Google Data API === <!--T:4--> | |||
<!--T:5--> | |||
To synchronize Google Contact and Calendar data, the ''Akonadi Google Data API'' must be installed on your system. Depending on your package manager, the install procedure may be different. | To synchronize Google Contact and Calendar data, the ''Akonadi Google Data API'' must be installed on your system. Depending on your package manager, the install procedure may be different. | ||
<!--T:6--> | |||
To install it, enter a terminal and type: | To install it, enter a terminal and type: | ||
<!--T:7--> | |||
''DEB based distributions:'' <code>sudo apt-get install akonadi-kde-resource-googledata</code> <br /> | ''DEB based distributions:'' <code>sudo apt-get install akonadi-kde-resource-googledata</code> <br /> | ||
''RPM based distributions:'' <code>yum install akonadi-googledata</code> | ''RPM based distributions:'' <code>yum install akonadi-googledata</code> | ||
<!--T:8--> | |||
This will install the akonadi-kde-resource-googledata package as well as its prerequisite, ''libgcal0'' | This will install the akonadi-kde-resource-googledata package as well as its prerequisite, ''libgcal0'' | ||
<!--T:9--> | |||
{{Note|1=Your distro may not have apt-get or yum installed by default. Some distros use their own package managers. If so you can use that to install apt-get (on a DEB based distro) or yum (on an RPM based distro), or you can use your systems standard package manager to install the required packages directly. Some distros have entirely different packaging systems. Is your distro is one of those you should refer to the distro manual, to its web page or to its forums.}} | |||
<!--T:18--> | |||
{{Warning|This instruction does not apply to later versions of Kdepim. Instead, the requirements are built-in. To see whether your version has this, check <menuchoice>System Settings -> Personal Information</menuchoice> and see whether you have google-contacts offered as a resource (in some versions you will find akonadi_gcal_resource4).}} | |||
=== Configuring Kontact Integration === <!--T:10--> | |||
<!--T:11--> | |||
After installing the packages, go to the <menuchoice>Contacts</menuchoice> area of the '''Kontact''' left navigation bar. | |||
Next, on the first panel, the <menuchoice>Address Books</menuchoice> panel, right click the window and select <menuchoice>Add Address Book</menuchoice>. Ensure that the <menuchoice>Akonadi Google Contacts Resource</menuchoice> is selected, and then click <menuchoice>OK</menuchoice>. | |||
<!--T:12--> | |||
A pop-up window will appear that will ask for your Google account login credentials. Enter them and click <menuchoice>OK</menuchoice>. Check the box next to the '''akonadi_google_resource_0''' and then press <keycap>F5</keycap> to update your contacts. | |||
=== Animated GIF Tutorial === <!--T:13--> | |||
<!--T:14--> | |||
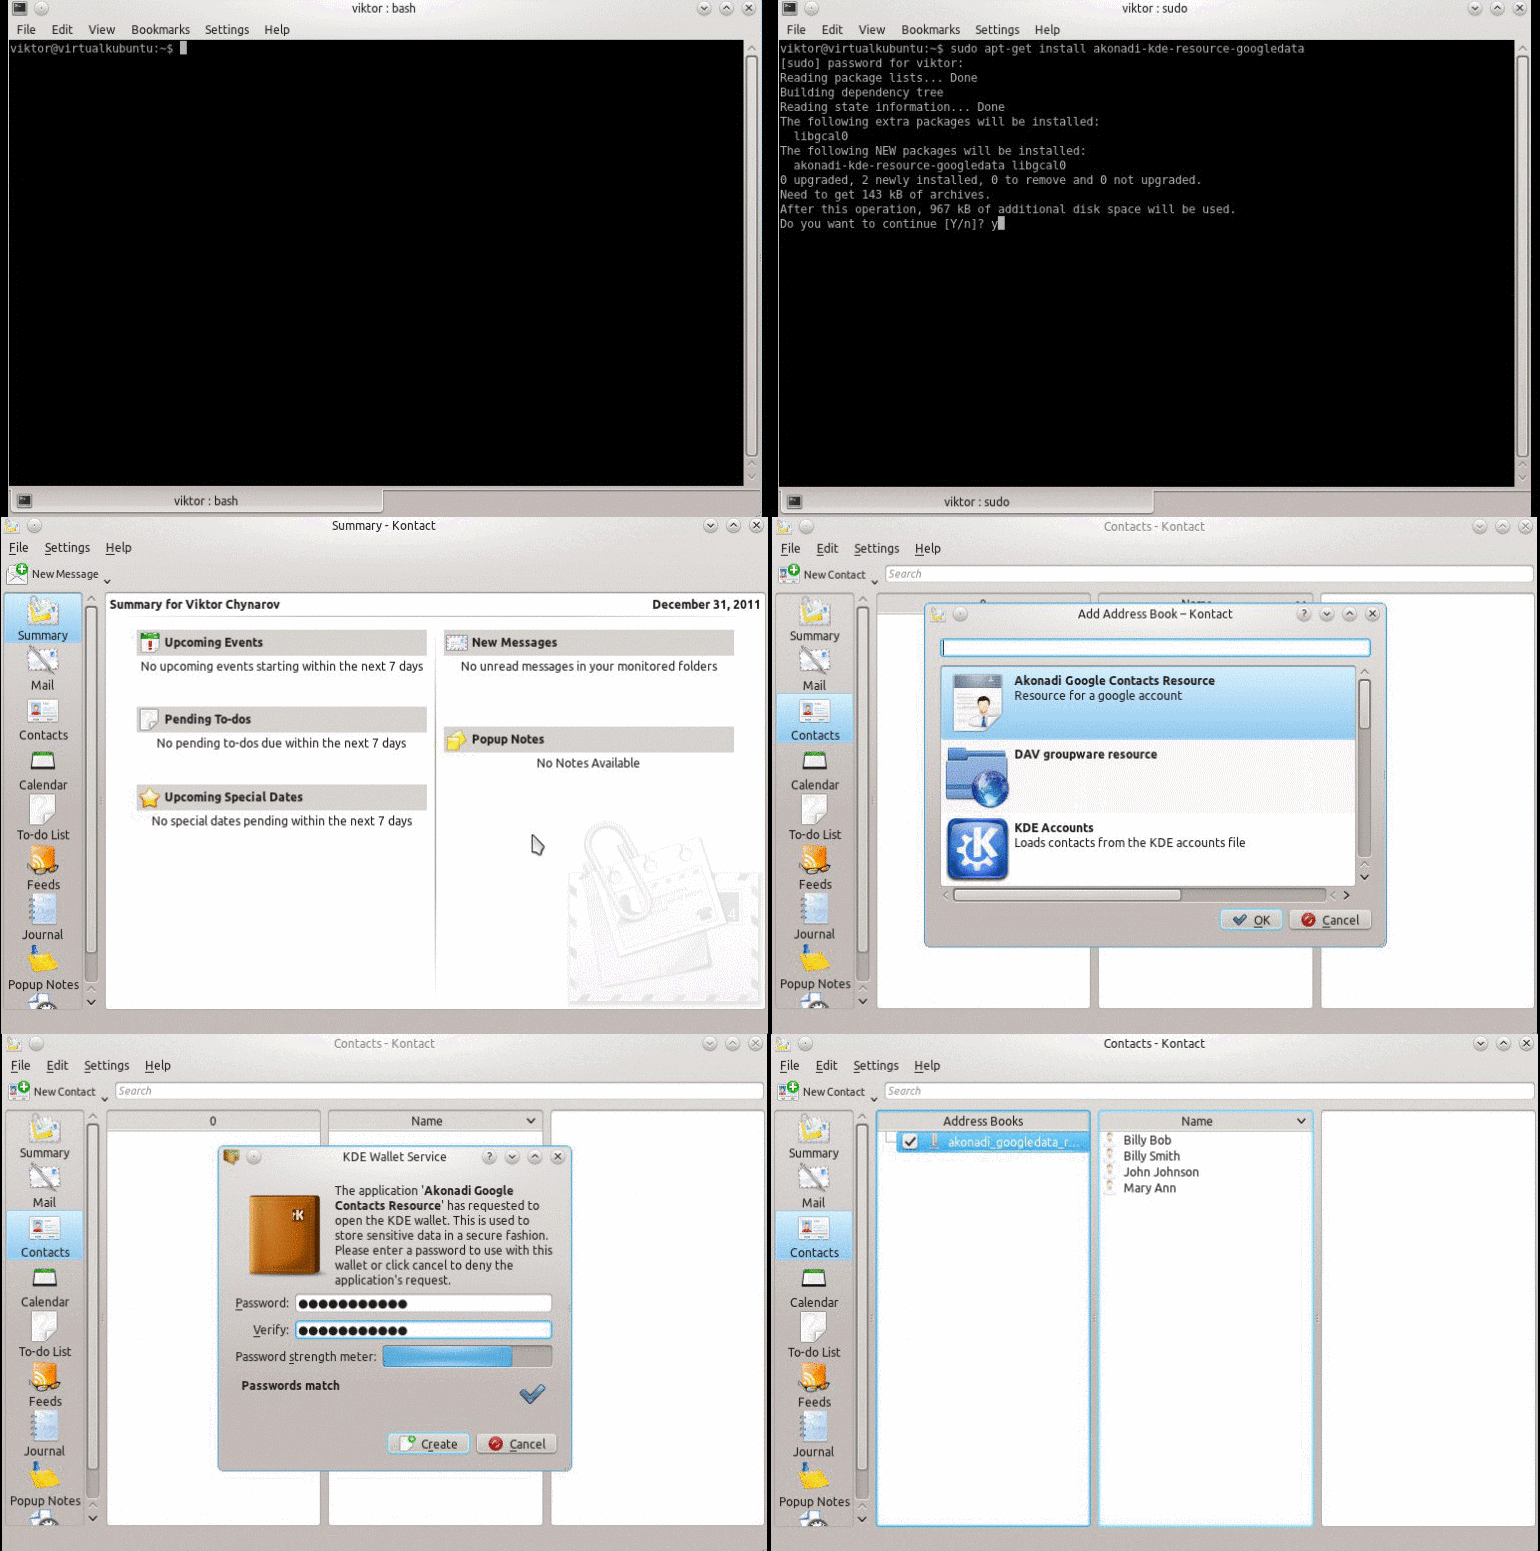
{{Note|1= This animated GIF recaps the steps taken to obtain Google contacts synchronization. }} | |||
<!--T:15--> | |||
[[File:Integrating_contacts.gif |center]] | |||
<!--T:16--> | |||
Your contacts have now been synchronized! | |||
< | <!--T:17--> | ||
[[Category:Office]] | |||
[[Category:Internet]] | |||
</translate> | |||
Latest revision as of 16:53, 2 March 2013

How to synchronize Google Contacts with Kontact
Installing the Google Data API
To synchronize Google Contact and Calendar data, the Akonadi Google Data API must be installed on your system. Depending on your package manager, the install procedure may be different.
To install it, enter a terminal and type:
DEB based distributions: sudo apt-get install akonadi-kde-resource-googledata
RPM based distributions: yum install akonadi-googledata
This will install the akonadi-kde-resource-googledata package as well as its prerequisite, libgcal0

Configuring Kontact Integration
After installing the packages, go to the area of the Kontact left navigation bar. Next, on the first panel, the panel, right click the window and select . Ensure that the is selected, and then click .
A pop-up window will appear that will ask for your Google account login credentials. Enter them and click . Check the box next to the akonadi_google_resource_0 and then press F5 to update your contacts.
Animated GIF Tutorial

Your contacts have now been synchronized!
