Kdenlive/Manual/Monitors/Clip Monitor RightClick: Difference between revisions
| (9 intermediate revisions by 3 users not shown) | |||
| Line 1: | Line 1: | ||
== Clip Monitor - Right Click Menu == | === Clip Monitor - Right Click Menu === | ||
These are the menu items that are available when you right click a clip in the [[Special:myLanguage/Kdenlive/Manual/Monitors#Clip_Monitor|Clip Monitor]]. These actions effect the clip that is currently selected in the [[Special:MyLanguage/Kdenlive/Manual/Projects_and_Files/Project_Tree|Project Tree]]. Similar menu items are available from a Right click menu in the Project monitor. However project monitor menu items effect the currently selected clip on the timeline. | |||
[[File:Kdenlive Clip monitor right click menu.png]] | [[File:Kdenlive Clip monitor right click menu.png]] | ||
=== Play ... === | ==== Play... ==== | ||
==== Play ==== | |||
==== Play Zone ==== | ===== Play ===== | ||
Plays the clip currently selected in the project tree | |||
===== Play Zone ===== | |||
Plays the current zone and stops. (See [[Kdenlive/Manual/Monitors#Creating_Zones_in_Clip_Monitor|Creating Zones in Clip Monitor]] for info about what a Zone is) | Plays the current zone and stops. (See [[Special:myLanguage/Kdenlive/Manual/Monitors#Creating_Zones_in_Clip_Monitor|Creating Zones in Clip Monitor]] for info about what a Zone is) | ||
==== Loop Zone ==== | ===== Loop Zone ===== | ||
Plays the current zone in a continuous loop. (See [[Special:myLanguage/Kdenlive/Manual/Monitors#Creating_Zones_in_Clip_Monitor|Creating Zones in Clip Monitor]] for info about what a Zone is) | |||
==== Go | ==== Go To ==== | ||
Moves the clip position to the previous [[Kdenlive/Manual/Timeline/Editing#Snap|Snap]] Point. Snap points are sections in clips that other clips snap to when "Snap" is turned on. | ===== Go to Project Start ===== | ||
When this item is selected from Clip Monitor it goes the beginning of the clip. (When selected in project monitor it goes to the beginning of the project) | |||
===== Go to Previous Snap Point ===== | |||
Moves the clip position to the previous [[Special:myLanguage/Kdenlive/Manual/Timeline/Editing#Snap|Snap]] Point. Snap points are sections in clips that other clips snap to when "Snap" is turned on. | |||
Snap points include markers, zone in-points, zone out-points, guides, transition start points etc | Snap points include markers, zone in-points, zone out-points, guides, transition start points etc | ||
==== Go to Zone Start ==== | ===== Go to Zone Start ===== | ||
==== Go to Clip Start ==== | Goes to the start of the Zone. (See [[Special:myLanguage/Kdenlive/Manual/Monitors#Creating_Zones_in_Clip_Monitor|Creating Zones in Clip Monitor]] for info about what a Zone is) | ||
===== Go to Clip Start ===== | |||
Not working. Use Go To Project Start to make the clip monitor move to start of the clip. | Not working. Use Go To Project Start to make the clip monitor move to start of the clip. | ||
==== Go to Clip End ==== | ===== Go to Clip End ===== | ||
Not working. Use Go To Project End to make the clip monitor move to end of the clip. | Not working. Use Go To Project End to make the clip monitor move to end of the clip. | ||
==== Go to Zone End ==== | ===== Go to Zone End ===== | ||
Goes to the end of the Zone. (See [[Kdenlive/Manual/Monitors#Creating_Zones_in_Clip_Monitor|Creating Zones in Clip Monitor]] for info about what a Zone is) | Goes to the end of the Zone. (See [[Special:myLanguage/Kdenlive/Manual/Monitors#Creating_Zones_in_Clip_Monitor|Creating Zones in Clip Monitor]] for info about what a Zone is) | ||
==== Go to Next Snap Point ==== | ===== Go to Next Snap Point ===== | ||
Moves the clip position to the next [[Kdenlive/Manual/Timeline/Editing#Snap|Snap]] Point. Snap points are sections in clips that other clips snap to when "Snap" is turned on. | Moves the clip position to the next [[Special:myLanguage/Kdenlive/Manual/Timeline/Editing#Snap|Snap]] Point. Snap points are sections in clips that other clips snap to when "Snap" is turned on. | ||
Snap points include markers, zone in-points, zone out-points, guides, transition start points etc | Snap points include markers, zone in-points, zone out-points, guides, transition start points etc | ||
==== Go to Project End ==== | ===== Go to Project End ===== | ||
When this item is selected from Clip Monitor it goes the end of the clip. (When selected in project monitor it goes to the end of the project) | When this item is selected from Clip Monitor it goes the end of the clip. (When selected in project monitor it goes to the end of the project) | ||
=== Markers === | ==== Markers ==== | ||
= | |||
==== Edit Marker ==== | ===== Add Marker ===== | ||
Brings up a dialog where you can edit the [[Kdenlive/Manual/Projects_and_Files/Clips#Markers|marker]] that is at the current time point. Use ''Go to marker'' to put the monitor at the marker you want to edit. | |||
Adds a new [[Special:myLanguage/Kdenlive/Manual/Projects_and_Files/Clips#Markers|marker]] into the clip at the current time point. | |||
===== Edit Marker ===== | |||
Brings up a dialog where you can edit the [[Special:myLanguage/Kdenlive/Manual/Projects_and_Files/Clips#Markers|marker]] that is at the current time point. Use ''Go to marker'' to put the monitor at the marker you want to edit. | |||
===== Delete Marker ===== | |||
Deletes the [[Special:myLanguage/Kdenlive/Manual/Projects_and_Files/Clips#Markers|marker]] that is a the current timepoint. Use ''Go to marker'' to put the monitor at the marker you want to delete. | |||
===== Delete All Markers ===== | |||
Deletes all the [[Special:myLanguage/Kdenlive/Manual/Projects_and_Files/Clips#Markers|markers]] from the current clip. | |||
===== Go to marker... ===== | |||
Same a Go to Marker [[Special:myLanguage/Kdenlive/Manual/Monitors/Clip_Monitor_RightClick#Go_to_marker..._2|below]]. | |||
==== Go to marker... ==== | ==== Go to marker... ==== | ||
The menu item pops out a list of existing [[Special:myLanguage/Kdenlive/Manual/Projects_and_Files/Clips#Markers|markers]] to select from. When one is selected the Clip monitor moves to that marker. | |||
The menu item pops out a list of existing markers to select from. When one is selected the Clip monitor moves to that marker. | |||
=== Save zone === | ==== Save zone ==== | ||
This brings up the Save Zone dialog | This brings up the '''Save Zone''' dialog | ||
[[File:Kdenlive Save clip zone.png]] | [[File:Kdenlive Save clip zone.png]] | ||
This causes the current zone (see [[Kdenlive/Manual/Monitors#Creating_Zones_in_Clip_Monitor|Creating Zones in Clip Monitor]]) to be saved as a .mlt file. This is a MLT video playlist file which is an xml format file describing the zone that we saved. | This causes the current zone (see [[Kdenlive/Manual/Monitors#Creating_Zones_in_Clip_Monitor|Creating Zones in Clip Monitor]]) to be saved as a <tt>.mlt</tt> file. This is a MLT video playlist file which is an xml format file describing the zone that we saved. | ||
You can then load the .mlt files as clips into the project monitor and edit them like any other clip. | You can then load the <tt>.mlt</tt> files as clips into the project monitor and edit them like any other clip. | ||
=== Extract Zone === | ==== Extract Zone ==== | ||
This brings up the Cut Clip dialog which appears to be setup to extract the zone into a new file and add it to the project tree. | This brings up the '''Cut Clip''' dialog which appears to be setup to extract the zone into a new file and add it to the project tree. | ||
[[File:Kdenlive Extract zone.png]] | [[File:Kdenlive Extract zone.png]] | ||
On the authors 0.9.2 version of | On the authors 0.9.2 and 0.9.5 version of '''Kdenlive''' this feature is broken for .dv format clips at least. It does work for .mp4 type clips. However, the accuracy of the cuts on the clip is way out. | ||
{{Output|1= | |||
ffmpeg version 0.8.3-4:0.8.3-0ubuntu0.12.04.1, Copyright (c) 2000-2012 the Libav developers | ffmpeg version 0.8.3-4:0.8.3-0ubuntu0.12.04.1, Copyright (c) 2000-2012 the Libav developers | ||
built on Jun 12 2012 16:37:58 with gcc 4.6.3 | built on Jun 12 2012 16:37:58 with gcc 4.6.3 | ||
| Line 97: | Line 117: | ||
Stream #0.0 -> #0.0 | Stream #0.0 -> #0.0 | ||
Stream #0.1 -> #0.1 | Stream #0.1 -> #0.1 | ||
Could not write header for output file #0 (incorrect codec parameters ?) | Could not write header for output file #0 (incorrect codec parameters ?)}} | ||
=== Extract frame === | ==== Extract frame ==== | ||
=== Set current image as thumbnail === | Extracts the frame currently in the clip monitor as a <tt>.PNG</tt> image which you can save to the file system. | ||
==== Set current image as thumbnail ==== | |||
This will change the thumbnail that represents this clip in the project tree to the frame that is currently selected in the clip monitor. | This will change the thumbnail that represents this clip in the project tree to the frame that is currently selected in the clip monitor. | ||
=== Monitor overlay infos === | ==== Monitor overlay infos ==== | ||
??? | ??? | ||
=== Real time (drop frames) === | ==== Real time (drop frames) ==== | ||
Setting this to the Checked state means the clip monitor will drop frames | |||
Setting this to the Checked state means the clip monitor will drop frames during playback to ensure the clip plays in real time. This does not effect the final rendered file - it just effect how the clip appears when being previewed in the clip monitor | |||
[[Category:Kdenlive]] | |||
Latest revision as of 08:25, 28 February 2013
Clip Monitor - Right Click Menu
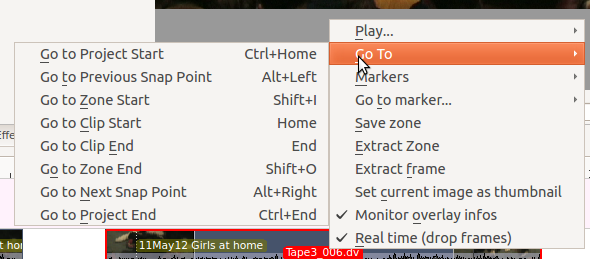
These are the menu items that are available when you right click a clip in the Clip Monitor. These actions effect the clip that is currently selected in the Project Tree. Similar menu items are available from a Right click menu in the Project monitor. However project monitor menu items effect the currently selected clip on the timeline.
Play...
Play
Plays the clip currently selected in the project tree
Play Zone
Plays the current zone and stops. (See Creating Zones in Clip Monitor for info about what a Zone is)
Loop Zone
Plays the current zone in a continuous loop. (See Creating Zones in Clip Monitor for info about what a Zone is)
Go To
Go to Project Start
When this item is selected from Clip Monitor it goes the beginning of the clip. (When selected in project monitor it goes to the beginning of the project)
Go to Previous Snap Point
Moves the clip position to the previous Snap Point. Snap points are sections in clips that other clips snap to when "Snap" is turned on.
Snap points include markers, zone in-points, zone out-points, guides, transition start points etc
Go to Zone Start
Goes to the start of the Zone. (See Creating Zones in Clip Monitor for info about what a Zone is)
Go to Clip Start
Not working. Use Go To Project Start to make the clip monitor move to start of the clip.
Go to Clip End
Not working. Use Go To Project End to make the clip monitor move to end of the clip.
Go to Zone End
Goes to the end of the Zone. (See Creating Zones in Clip Monitor for info about what a Zone is)
Go to Next Snap Point
Moves the clip position to the next Snap Point. Snap points are sections in clips that other clips snap to when "Snap" is turned on.
Snap points include markers, zone in-points, zone out-points, guides, transition start points etc
Go to Project End
When this item is selected from Clip Monitor it goes the end of the clip. (When selected in project monitor it goes to the end of the project)
Markers
Add Marker
Adds a new marker into the clip at the current time point.
Edit Marker
Brings up a dialog where you can edit the marker that is at the current time point. Use Go to marker to put the monitor at the marker you want to edit.
Delete Marker
Deletes the marker that is a the current timepoint. Use Go to marker to put the monitor at the marker you want to delete.
Delete All Markers
Deletes all the markers from the current clip.
Go to marker...
Same a Go to Marker below.
Go to marker...
The menu item pops out a list of existing markers to select from. When one is selected the Clip monitor moves to that marker.
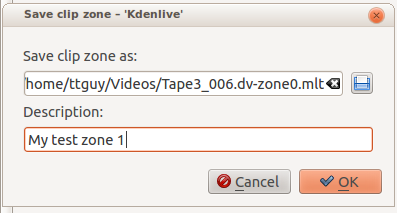
Save zone
This brings up the Save Zone dialog
This causes the current zone (see Creating Zones in Clip Monitor) to be saved as a .mlt file. This is a MLT video playlist file which is an xml format file describing the zone that we saved.
You can then load the .mlt files as clips into the project monitor and edit them like any other clip.
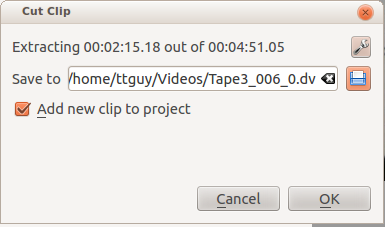
Extract Zone
This brings up the Cut Clip dialog which appears to be setup to extract the zone into a new file and add it to the project tree.
On the authors 0.9.2 and 0.9.5 version of Kdenlive this feature is broken for .dv format clips at least. It does work for .mp4 type clips. However, the accuracy of the cuts on the clip is way out.
ffmpeg version 0.8.3-4:0.8.3-0ubuntu0.12.04.1, Copyright (c) 2000-2012 the Libav developers
  built on Jun 12 2012 16:37:58 with gcc 4.6.3
 [dv @ 0x9d71480] Can't initialize DV format!
 Make sure that you supply exactly two streams:
     video: 25fps or 29.97fps, audio: 2ch/48kHz/PCM
     (50Mbps allows an optional second audio stream)
 Output #0, dv, to '/home/ttguy/Videos/Tape3_006_0.dv':
  Metadata:
    encoder         : Lavf53.21.0
    Stream #0.0: Video: dvvideo, yuv420p, 720x576 [PAR 64:45 DAR 16:9], q=2-31, 28800 kb/s, 90k tbn, 25 tbc
    Stream #0.1: Audio: pcm_s16le, 32000 Hz, 2 channels, 1024 kb/s
 Stream mapping:
  Stream #0.0 -> #0.0
  Stream #0.1 -> #0.1
 Could not write header for output file #0 (incorrect codec parameters ?)
Extract frame
Extracts the frame currently in the clip monitor as a .PNG image which you can save to the file system.
Set current image as thumbnail
This will change the thumbnail that represents this clip in the project tree to the frame that is currently selected in the clip monitor.
Monitor overlay infos
???
Real time (drop frames)
Setting this to the Checked state means the clip monitor will drop frames during playback to ensure the clip plays in real time. This does not effect the final rendered file - it just effect how the clip appears when being previewed in the clip monitor


