KDevelop4/Manual/Getting started: A small CMake tutorial: Difference between revisions
No edit summary |
(Prevented code snippet from running into image) |
||
| (One intermediate revision by the same user not shown) | |||
| Line 1: | Line 1: | ||
== Getting Started with CMake == | |||
{{Construction}} | {{Construction}} | ||
| Line 12: | Line 14: | ||
The newly created file is now opened in the editor. Enter the following code and save the file: | The newly created file is now opened in the editor. Enter the following code and save the file: | ||
<div class="clearfix"></div> | |||
{{Input|#include <iostream> | {{Input|#include <iostream> | ||
Latest revision as of 08:55, 15 September 2012
Getting Started with CMake

In this chapter, you will learn how to build your CMake based project and how to add files.
If you want do get a more in-depth tutorial on CMake, see Appendix B: CMake for bigger projects.
Adding a file

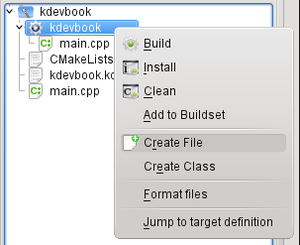
Right-click on the project's main target and select . You will be asked for a filename – enter helloworld.cpp here and click on "OK".
The dialog that pops up now shows the changes that will be made to CMakeLists.txt. For now, click on "OK".
The newly created file is now opened in the editor. Enter the following code and save the file:
#include <iostream>

void heyWorld() {
    std::cout << "Hello, world!";
}
First compilation
There are several ways to compile your program.
- Target context menu
- Right-click on the target you want to build and click on .
- Projects Toolview button
- Click on the small button with the gear on it – it has the same functionality as the menu entry in the target context menu.
- Click on or press F8.
- This is still the same functionality as described above.
- Click on .
- This does what you expect – it builds all your projects.
Now simply press F8.
On the first pass, KDevelop calls CMake and prints its output to the Build Toolview which pops up at the bottom:
/home/sto/projects/kdevbook/build> /usr/bin/cmake -DCMAKE_BUILD_TYPE=Debug /home/sto/projects/kdevbook/
-- The C compiler identification is GNU
-- The CXX compiler identification is GNU
-- Check for working C compiler: /usr/bin/gcc
-- Check for working C compiler: /usr/bin/gcc -- works
-- Detecting C compiler ABI info
-- Detecting C compiler ABI info - done
-- Check for working CXX compiler: /usr/bin/c++
-- Check for working CXX compiler: /usr/bin/c++ -- works
-- Detecting CXX compiler ABI info
-- Detecting CXX compiler ABI info - done
-- Configuring done
-- Generating done
-- Build files have been written to: /home/sto/projects/kdevbook/build
After this step, the Makefiles have been generated, and KDevelop calls make:
/home/sto/projects/kdevbook/build> make
Scanning dependencies of target kdevbook
[ 50%] Building CXX object CMakeFiles/kdevbook.dir/helloworld.cpp.o
[100%] Building CXX object CMakeFiles/kdevbook.dir/main.cpp.o
Linking CXX executable kdevbook
[100%] Built target kdevbook
*** Finished ***
Congratulations, you built your first application using KDevelop!
More about targets
Now add the header file helloworld.h with the following contents to your project:
void heyWorld();
And replace the #include directive with the following line at the top of main.cpp:
#include "helloworld.h"
Finally, replace the line containing std::cout << ... with a call to heyWorld();. Now build your project again.
Let's take a look at CMakeLists.txt – open it by double-clicking on the file in the Projects Toolview. The first line in it defines the project's name. You may define the languages used by the project here – if not defined, they default to C and C++. Take a look at the official documentation for the project command.
Now, let's take a look at the add_executable command: The first argument defines the name of the resulting executable, further arguments define the source files the executable is built from. Again, you may take a look at the official documentation for the add_executable command.
Let's create a separate target for our helloworld.cpp file by defining it as a static library and linking it to our executable. Replace the contents of the CMakeLists.txt with the following text:
project(kdevbook)

add_library(kdevbook_lib STATIC helloworld.cpp)
add_executable(kdevbook main.cpp)

target_link_libraries(kdevbook kdevbook_lib)
So, what have we done? With add_library, we defined a static library which is built from helloworld.cpp. The library may be build from multiple source files, you just have to list them after the STATIC keyword. And with target_link_libraries we tell CMake to link our kdevbook target against kdevbook_lib – as the command name suggests, you can link multiple libraries to one target, again by simply listing the targets.
See the official documentation for add_library and target_link_libraries.
