Archive:Kdenlive/Manual/Timeline: Difference between revisions
added category |
m Claus chr moved page Kdenlive/Manual/Timeline to Archive:Kdenlive/Manual/Timeline without leaving a redirect: Part of translatable page "Kdenlive/Manual/Timeline" |
||
| (43 intermediate revisions by 10 users not shown) | |||
| Line 1: | Line 1: | ||
<languages/> | |||
<!-- Please use level 3 heading (===) to aid docbook creation --> | <!-- Please use level 3 heading (===) to aid docbook creation --> | ||
<translate> | |||
== Timeline == <!--T:2--> | |||
<!--T:3--> | |||
[[File:Kdenlive_timeline.png|300px|thumb|right|Timeline pane]]The timeline is the central part of '''Kdenlive'''. It is made of 4 different areas (see screenshot). | |||
<!--T:4--> | |||
1 - '''Track resizing icon'''. This icon allows you to adjust the track height in the timeline from normal to small. This does not affect the video or the render in any way. The default height of tracks can be configured in '''Kdenlive's''' [[Special:myLanguage/Kdenlive/Manual/Settings_Menu/Configure_Kdenlive#Timeline|Settings]] dialog. | |||
<!--T:5--> | |||
2 - '''Timeline ruler'''. This shows the time in frames or in hh:mm:ss notation. The area highlighted in green is called the selection zone, and is useful if you want to render only a part of your project. Left-clicking in the timeline ruler will move the [[Special:myLanguage/Kdenlive/Manual/Timeline#Timeline_Cursor.2FPosition_Caret|timeline cursor]] and seek to that position. The Timeline ruler context menu allows you to manage [[Special:myLanguage/Kdenlive/Manual/Timeline/Guides|Guides]]. | |||
<!--T:6--> | |||
3 - '''Track header'''. This box shows some options for a track. First is the track name (Main Video Track in the screenshot). That name can be changed by simply clicking in it. Below are icons to <menuchoice>Lock the track</menuchoice> {{Icon|kdenlive-lock}} which will prevent adding clips, removing clips, or moving of clips on the timeline; <menuchoice>Mute the track</menuchoice> {{Icon|kdenlive-hide-audio}}; <menuchoice>Hide video</menuchoice> {{Icon|kdenlive-hide-video}} from this track; and, <menuchoice>Enable/Disable track effects</menuchoice> {{Icon|Kdenlive-Wand}} allows you to enable or disable the effects applied to the track. Right clicking in the track header will give you a context menu allowing to manage (add / delete) tracks. | |||
<!--T:7--> | |||
* 4 - The track itself, this is where you can drop your clips. | * 4 - The track itself, this is where you can drop your clips. | ||
==== Tracks === | </translate><span id="Timeline Cursor/Position Caret"></span><translate> | ||
The timeline is made of tracks. There are two | |||
<!--T:42--> | |||
'''Since Version 21.04.0''' | |||
'''Zoombars''' | |||
<!--T:43--> | |||
Besides the availability of zoombars in the monitor and keyframe scroll bars, zoombars are now available in the timeline as well. You can easily zoom in/out in the timeline by dragging the edges of the timeline scrollbar. (Vertical zoombars coming soon.) Recommend playing this video in full-screen mode. | |||
[[File: zoom-bar.mp4|2000px|center]] | |||
<!--T:44--> | |||
'''Key binding information''' | |||
<!--T:45--> | |||
Key binding info has been added on the left while context item information has been moved to the right of the status bar. Recommend playing this video in full-screen mode. | |||
[[File: context-and-keybinds.mp4|2000px|center]] | |||
<!--T:46--> | |||
'''Improved timeline visuals''' | |||
<!--T:47--> | |||
The timeline got a visual overhaul with more and better looking guides/marker colors, the guides have been moved above the timeline ruler while preview and zone bars have been moved below. | |||
<!--T:48--> | |||
[[File: timeline-overhaul.png]] | |||
Before (above) and after (below) | |||
=== Split Audio/Video === <!--T:23--> | |||
<!--T:24--> | |||
Since version 19.04.0 | |||
<!--T:25--> | |||
[[File:splitAV.gif]] | |||
<!--T:26--> | |||
Since version 19.04.0 the way timeline tracks work has changed. Each track is now either audio or video, and will only accept audio and video clips respectively. When dragging an AV clip from the project bin in the timeline, the clip will be automatically split, the video part going on a video track, and the audio part on an audio track. | |||
<!--T:27--> | |||
The separation of audio/video is important for implementing same-track-transitions. | |||
=== Timeline Cursor/Position Caret/Playhead === <!--T:18--> | |||
<!--T:20--> | |||
[[File:kdenlive_timeline_playhead.png|left]] | |||
This indicates the position we are displaying in the [[Special:myLanguage/Kdenlive/Manual/Monitors#Project_Monitor|Project Monitor]]. You can scroll the position by dragging the Timeline cursor (a.k.a Position Caret or Playhead). | |||
<!--T:21--> | |||
Beginning with version 0.9.4, dragging the timeline cursor will play the audio of the clip (a.k.a. Audio Scrubbing). This feature only works if you have checked <menuchoice>Use Open GL for video display</menuchoice> in [[Special:myLanguage/Kdenlive/Manual/Settings_Menu/Configure_Kdenlive#Playback|Settings -> Configure Kdenlive -> Playback]]. | |||
=== Tracks === <!--T:8--> | |||
<!--T:17--> | |||
The timeline is made of tracks. There are two kinds of tracks: audio and video. The number of tracks is defined when creating a new project in the [[Special:myLanguage/Kdenlive/Manual/Projects and Files/Project Settings|Project Settings Dialog]]. Adding a clip in timeline can be achieved by dragging it from the [[Special:MyLanguage/Kdenlive/Manual/Projects_and_Files/Project_Tree|Project Bin]] or the [[Special:myLanguage/Kdenlive/Manual/Monitors|Clip Monitor]]. More about tracks see [[Special:MyLanguage/Kdenlive/Manual/Timeline_Menu/Tracks|Menu Tracks]] | |||
==== Resizing tracks ==== <!--T:28--> | |||
<!--T:29--> | |||
Since version 19.04.0 | |||
<!--T:30--> | |||
[[File:resize-tracks.gif]] | |||
<!--T:31--> | |||
Tracks can be individually resized. (Holding down <keycap>Shift</keycap> makes all video or audio tracks change in height simultaneously.) | |||
<!--T:32--> | |||
[[File:layout-modes.gif]] | |||
<!--T:33--> | |||
Switch live between two different layout modes (Mixed or Split). | |||
==== Configurable thumbnails for each track ==== <!--T:34--> | |||
<!--T:35--> | |||
Since version 19.04.0 | |||
<!--T:36--> | |||
[[File:Configurable_thumbnails.png]] | |||
<!--T:37--> | |||
You can choose to display between <menuchoice>In frame</menuchoice>, <menuchoice>In/Out frames</menuchoice>, <menuchoice>All frames</menuchoice> or <menuchoice>No thumbnails</menuchoice>. | |||
=== Disabling individual clips === <!--T:38--> | |||
<!--T:39--> | |||
Since version 19.04.0 | |||
<!--T:40--> | |||
[[File:Disabling_individual_clips.png]] | |||
<!--T:41--> | |||
Individual clips can be disabled while still in the timeline but with no audio and no video – (works for all clip types). Right-click on the clip and choose <menuchoice>Disable clip</menuchoice> or <menuchoice>Enable clip</menuchoice>. | |||
=== See also === <!--T:9--> | |||
<!--T:10--> | |||
* [[Special:myLanguage/Kdenlive/Manual/QuickStart#Timeline|QuickStart-Timeline]] | |||
<!--T:11--> | |||
* [[Special:myLanguage/Kdenlive/Manual/Timeline/Editing|Editing]] | |||
<!--T:12--> | |||
* [[Special:myLanguage/Kdenlive/Manual/Timeline/Grouping|Grouping]] | |||
<!--T:13--> | |||
* [[Special:myLanguage/Kdenlive/Manual/Timeline/Guides|Guides]] | |||
<!--T:14--> | |||
* [[Special:myLanguage/Kdenlive/Manual/Timeline/Right_Click_Menu|Right Click Menu]] | |||
<!--T:22--> | |||
* [[Special:myLanguage/Kdenlive/Manual/Timeline_Menu|Time Line Menu]] | |||
<!--T:15--> | |||
{{Prevnext2 | {{Prevnext2 | ||
| prevpage=Special:MyLanguage/Kdenlive/Manual/Projects_and_Files/Management | nextpage=Special:MyLanguage/Kdenlive/Manual/Timeline/Editing | | prevpage=Special:MyLanguage/Kdenlive/Manual/Projects_and_Files/Management | nextpage=Special:MyLanguage/Kdenlive/Manual/Timeline/Editing | ||
| prevtext= | | prevtext=Clip Management | nexttext=Editing | ||
| index=Special:MyLanguage/Kdenlive/Manual | indextext=Back to menu | | index=Special:MyLanguage/Kdenlive/Manual | indextext=Back to menu | ||
}} | }} | ||
<!--T:16--> | |||
[[Category:Kdenlive]] | [[Category:Kdenlive]] | ||
</translate> | |||
Latest revision as of 13:10, 15 August 2023
Timeline

The timeline is the central part of Kdenlive. It is made of 4 different areas (see screenshot).
1 - Track resizing icon. This icon allows you to adjust the track height in the timeline from normal to small. This does not affect the video or the render in any way. The default height of tracks can be configured in Kdenlive's Settings dialog.
2 - Timeline ruler. This shows the time in frames or in hh:mm:ss notation. The area highlighted in green is called the selection zone, and is useful if you want to render only a part of your project. Left-clicking in the timeline ruler will move the timeline cursor and seek to that position. The Timeline ruler context menu allows you to manage Guides.
3 - Track header. This box shows some options for a track. First is the track name (Main Video Track in the screenshot). That name can be changed by simply clicking in it. Below are icons to ![]() which will prevent adding clips, removing clips, or moving of clips on the timeline;
which will prevent adding clips, removing clips, or moving of clips on the timeline; ![]() ;
; ![]() from this track; and,
from this track; and, ![]() allows you to enable or disable the effects applied to the track. Right clicking in the track header will give you a context menu allowing to manage (add / delete) tracks.
allows you to enable or disable the effects applied to the track. Right clicking in the track header will give you a context menu allowing to manage (add / delete) tracks.
- 4 - The track itself, this is where you can drop your clips.
Since Version 21.04.0
Zoombars
Besides the availability of zoombars in the monitor and keyframe scroll bars, zoombars are now available in the timeline as well. You can easily zoom in/out in the timeline by dragging the edges of the timeline scrollbar. (Vertical zoombars coming soon.) Recommend playing this video in full-screen mode. File:Zoom-bar.mp4
Key binding information
Key binding info has been added on the left while context item information has been moved to the right of the status bar. Recommend playing this video in full-screen mode. File:Context-and-keybinds.mp4
Improved timeline visuals
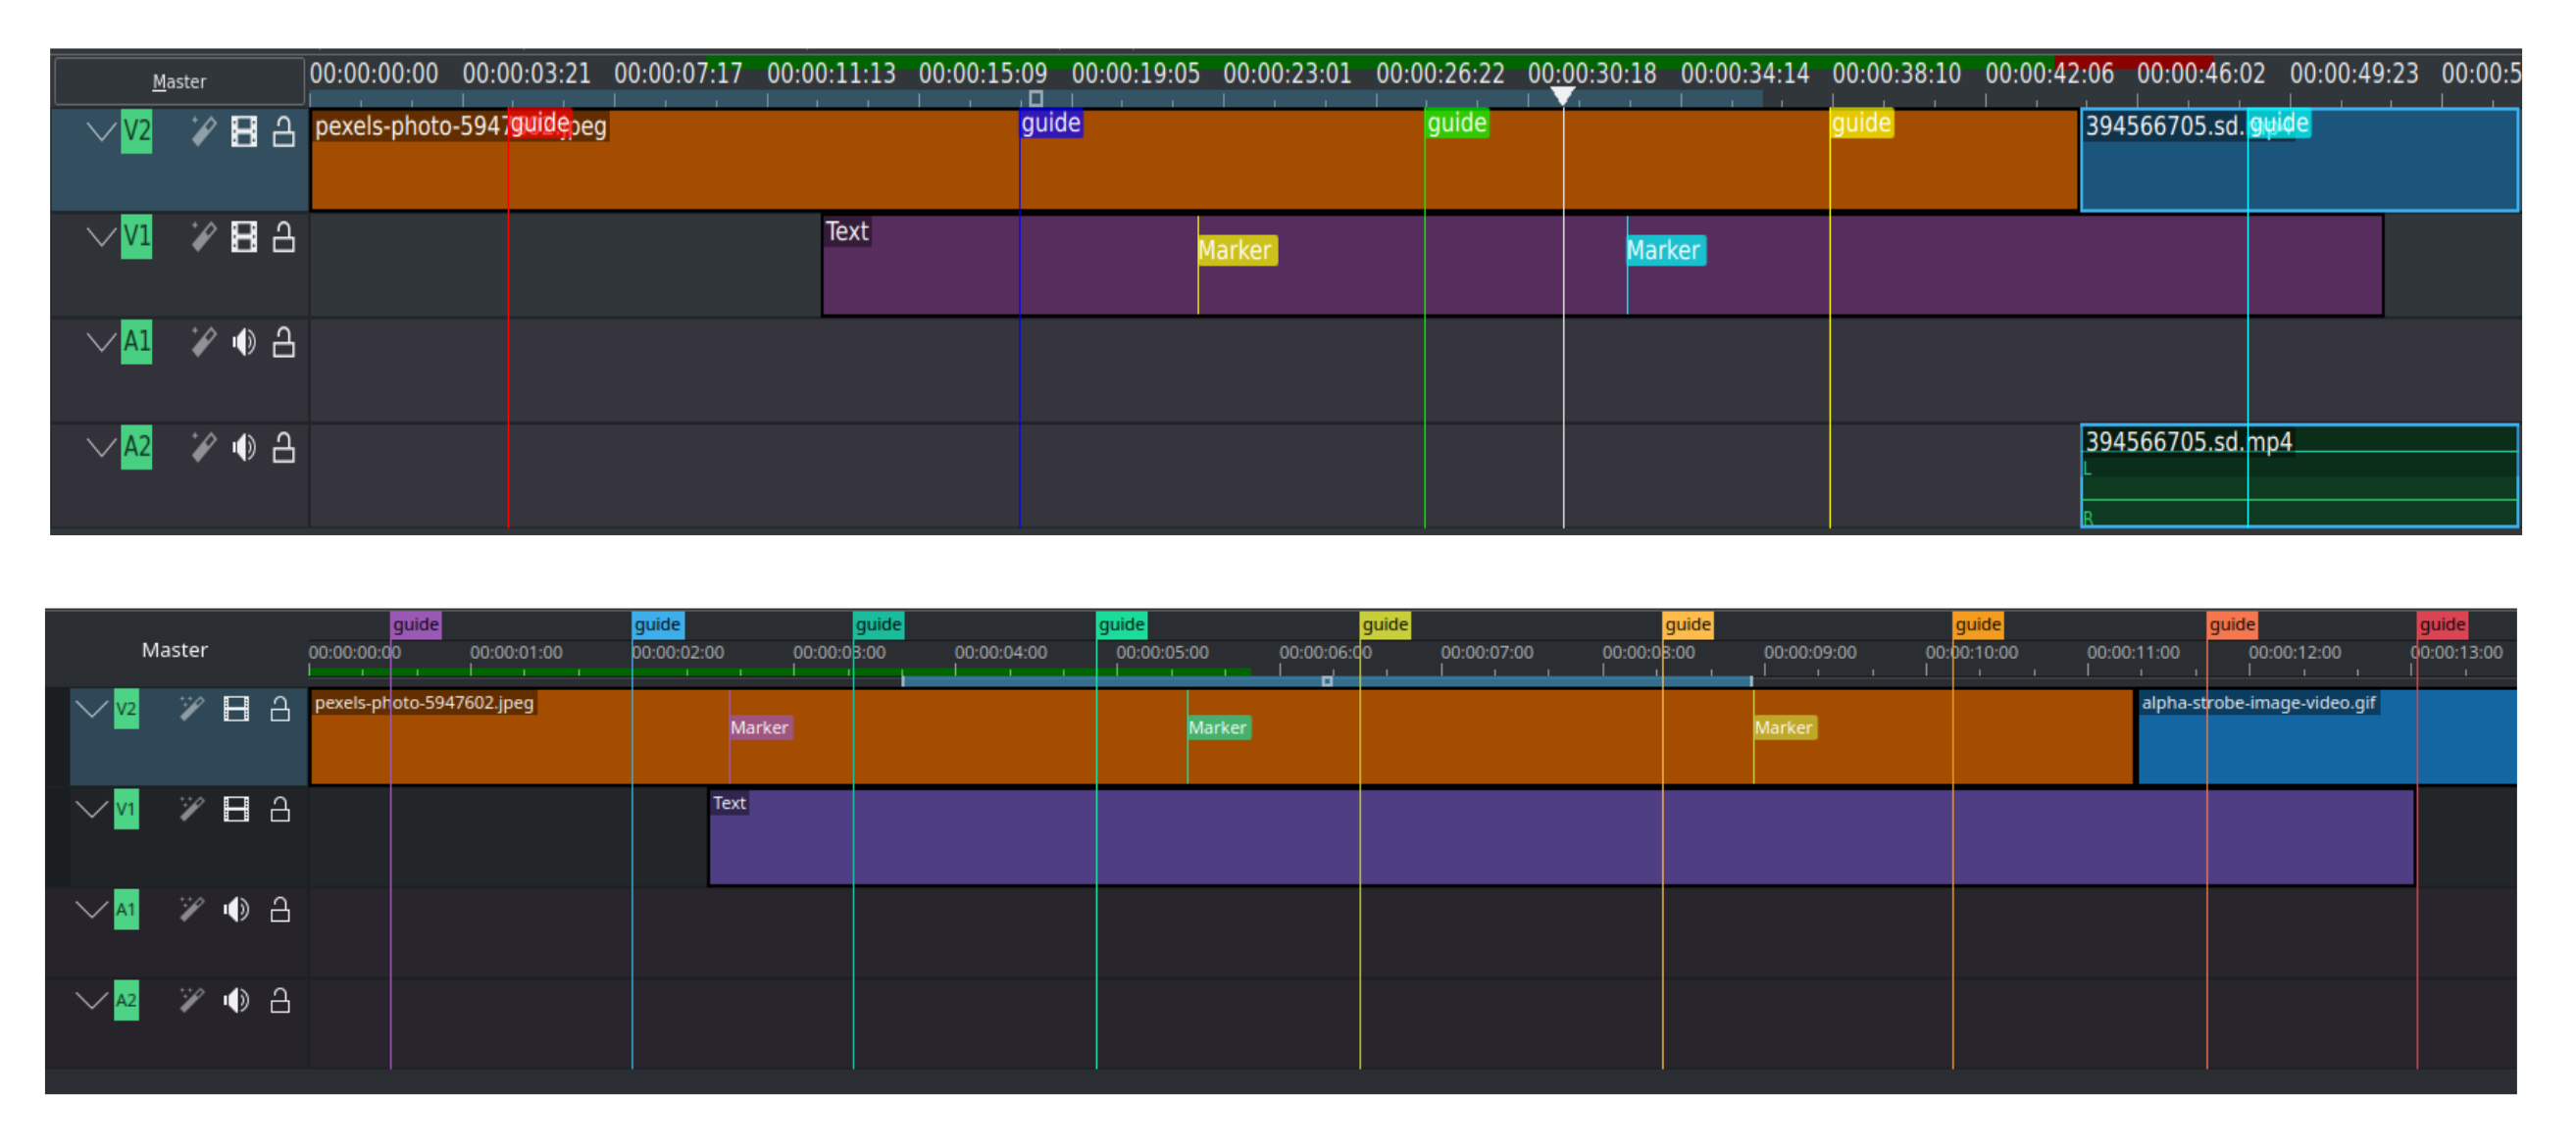
The timeline got a visual overhaul with more and better looking guides/marker colors, the guides have been moved above the timeline ruler while preview and zone bars have been moved below.
 Before (above) and after (below)
Split Audio/Video
Since version 19.04.0
Since version 19.04.0 the way timeline tracks work has changed. Each track is now either audio or video, and will only accept audio and video clips respectively. When dragging an AV clip from the project bin in the timeline, the clip will be automatically split, the video part going on a video track, and the audio part on an audio track.
The separation of audio/video is important for implementing same-track-transitions.
Timeline Cursor/Position Caret/Playhead

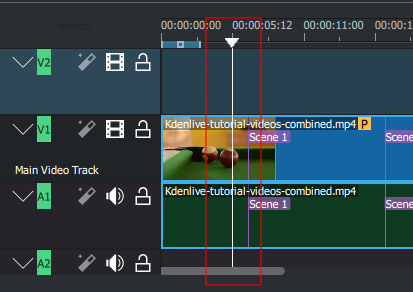
This indicates the position we are displaying in the Project Monitor. You can scroll the position by dragging the Timeline cursor (a.k.a Position Caret or Playhead).
Beginning with version 0.9.4, dragging the timeline cursor will play the audio of the clip (a.k.a. Audio Scrubbing). This feature only works if you have checked in Settings -> Configure Kdenlive -> Playback.
Tracks
The timeline is made of tracks. There are two kinds of tracks: audio and video. The number of tracks is defined when creating a new project in the Project Settings Dialog. Adding a clip in timeline can be achieved by dragging it from the Project Bin or the Clip Monitor. More about tracks see Menu Tracks
Resizing tracks
Since version 19.04.0
Tracks can be individually resized. (Holding down Shift makes all video or audio tracks change in height simultaneously.)
Switch live between two different layout modes (Mixed or Split).
Configurable thumbnails for each track
Since version 19.04.0
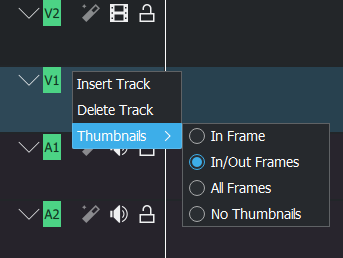
You can choose to display between , , or .
Disabling individual clips
Since version 19.04.0
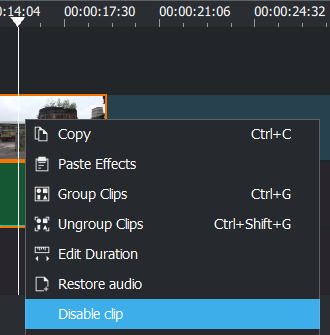
Individual clips can be disabled while still in the timeline but with no audio and no video – (works for all clip types). Right-click on the clip and choose or .
See also


