Kdenlive/Manual/Timeline/Editing/da: Difference between revisions
(Importing a new version from external source) |
(Updating to match new version of source page) |
||
| (148 intermediate revisions by 2 users not shown) | |||
| Line 4: | Line 4: | ||
=== Redigering === | === Redigering === | ||
Redigering udføres i [[Special:myLanguage/Kdenlive/Manual/Timeline|tidslinjen]]. Tilføj et klip ved at trække det fra [[Special:myLanguage/Kdenlive/Manual/Projects_and_Files/Project_Tree|projekttræet]] eller [[Special:myLanguage/Kdenlive/Manual/Monitors|klipmonitoren]]. Når et klip er blevet sluppet på et spor kan det flyttes (træk og slip det) til et andet sted på det samme spor eller til et andet spor. | |||
[[File:Kdenlive-addcliptotimeline.gif|center]] | |||
With 19.08.0 editing with keyboard shortcuts was introduced. This will speed up the editing work and you can do editing steps that are not possible or not as quick and easy with the mouse. Working with keyboard shortcuts in 19.08 is different as in the former Kdenlive versions. Mouse operations have not changed and working as before. See [[Special:MyLanguage/Kdenlive/Manual/Timeline/Editing#3 point editing|3 point editing]]. | |||
==== Søgning igennem dit projekt ==== | |||
Tidslinjemarkøren viser din aktuelle position i projektet. Markørens position på tidslinjen og i projektmonitoren følges altid ad. Positionen kan flyttes på følgende måder: | |||
* | * Tastaturgenveje: <keycap>Pil til venstre</keycap> og <keycap>Pil til højre</keycap> flytter et frame, <keycap>Skift + Pil til højre</keycap> og <keycap>Skift + Pil til venstre</keycap> flytter et sekund. | ||
* | * Klikke/trække i [[Special:myLanguage/Kdenlive/Manual/Timeline|Tidslinjelinealen]] eller i en tomt område på tidslinjen. | ||
* | * Klikke/trække i linealen i [[Special:myLanguage/Kdenlive/Manual/Monitors#Project Monitor|projektmonitoren]] | ||
* Brug af musehjulet mens musemarkøren er over [[Special:myLanguage/Kdenlive/Manual/Timeline|tidslinjen]] eller over [[Special:myLanguage/Kdenlive/Manual/Monitors#Project Monitor|projektmonitoren]] | |||
* Redigering af tidskoden i [[Special:myLanguage/Kdenlive/Manual/Monitors#Project Monitor|projektmonitorens]] tidskodekontrol. | |||
* Klik på op- eller nedpilene i [[Special:myLanguage/Kdenlive/Manual/Monitors#Project Monitor|projektmonitorens]] tidskodekontrol | |||
==== Beskæring af et klip ==== | ==== Beskæring af et klip ==== | ||
Den nemmeste måde at beskære et klip er at placere tidslinjemarkøren der, hvor du ønsker at beskære klippet og så vælge klippet (klik på det) og bruge menuen <menuchoice>Tidslinje -> Aktuelt klip -> Udklip klip</menuchoice> (standard tastaturgenvej <keycap> | Den nemmeste måde at beskære et klip er at placere tidslinjemarkøren der, hvor du ønsker at beskære klippet og så vælge klippet (klik på det) og bruge menuen <menuchoice>Tidslinje -> Aktuelt klip -> Udklip klip</menuchoice> (standard tastaturgenvej <keycap>Skift + R</keycap>). | ||
eller <menuchoice>Højreklik -> Udklip klip</menuchoice> | |||
Alternativt kan du bruge [[Special:MyLanguage/Kdenlive/Manual/Timeline/Editing#Razor_Tool|skæreværktøjet]]. | Alternativt kan du bruge [[Special:MyLanguage/Kdenlive/Manual/Timeline/Editing#Razor_Tool|skæreværktøjet]]. | ||
| Line 28: | Line 36: | ||
==== Ændring af et klips størrelse ==== | ==== Ændring af et klips størrelse ==== | ||
Et klips størrelse kan ændres fra starten eller slutningen af klippet ved at trække dets venstre eller højre kant. Hvis du ønsker en mere præcis justering af størrelsen, så kan du placere tidslinjemarkøren der, hvor du ønsker at justere størrelsen til og så bruge <menuchoice>Start at størrelsesændring af element</menuchoice> (standard tastaturgenvej: <keycap>1</keycap>) eller <menuchoice>Slut på størrelsesændring af element</menuchoice> (standard tastaturgenvej: <keycap>2</keycap>) | Et klips størrelse kan ændres fra starten eller slutningen af klippet ved at trække dets venstre eller højre kant. Hvis du ønsker en mere præcis justering af størrelsen, så kan du placere tidslinjemarkøren der, hvor du ønsker at justere størrelsen til og så bruge <menuchoice>Tidslinje -> Start at størrelsesændring af element</menuchoice> (standard tastaturgenvej: <keycap>1</keycap>) eller <menuchoice>Tidslinje -> Slut på størrelsesændring af element</menuchoice> (standard tastaturgenvej: <keycap>2</keycap>). | ||
For at få endnu mere præcis kontrol over længden af et klip kan du dobbeltklikke på det i tidslinjen og justere dets varighed ved hjælp af dialogen '''Varighed'''. Du kan opnå præcision på frame-niveau på denne måde. | For at få endnu mere præcis kontrol over længden af et klip kan du dobbeltklikke på det i tidslinjen og justere dets varighed ved hjælp af dialogen '''Varighed'''. Du kan opnå præcision på frame-niveau på denne måde. | ||
[[File: | [[File:kdenlive_timeline_current_clip_duration02.png]] | ||
Du kan også ændre et klips størrelse ved at beskære det med [[Special:MyLanguage/Kdenlive/Manual/Timeline/Editing#Razor_Tool|skæreværktøjet]] og så slette den del, som du ikke vil bruge. | Du kan også ændre et klips størrelse ved at beskære det med [[Special:MyLanguage/Kdenlive/Manual/Timeline/Editing#Razor_Tool|skæreværktøjet]] og så slette den del, som du ikke vil bruge. | ||
| Line 40: | Line 48: | ||
Højreklik i mellemrummet mellem klippene og vælg <menuchoice>Fjern tomrum</menuchoice>. Vær dog opmærksom på, at hvis du har klip i flere spor og de ikke er grupperede, så kan fjernelse af tomrum forstyrre justeringen af klippene imellem sporene; tomrummet fjernes kun fra den tidslinje du klkkede på. I denne situation kan det være mere sikkert at bruge [[Special:MyLanguage/Kdenlive/Manual/Timeline/Editing#Spacer_Tool|tomrumsværktøjet]]. | Højreklik i mellemrummet mellem klippene og vælg <menuchoice>Fjern tomrum</menuchoice>. Vær dog opmærksom på, at hvis du har klip i flere spor og de ikke er grupperede, så kan fjernelse af tomrum forstyrre justeringen af klippene imellem sporene; tomrummet fjernes kun fra den tidslinje du klkkede på. I denne situation kan det være mere sikkert at bruge [[Special:MyLanguage/Kdenlive/Manual/Timeline/Editing#Spacer_Tool|tomrumsværktøjet]]. | ||
[[File: | [[File:Kdenlive-removespace.gif|center]] | ||
==== Den miderste værktøjslinje ==== | |||
<div class="mw-translate-fuzzy"> | |||
Der er en værktøjslinje mellem monitorene og tidslinjen, som kontrollerer de forskellige aspekter af editoren. | |||
[[File:Kdenlive Top toolbar17 04b.png|left|frame|Midterste værktøjslinje ver 17.04]] | |||
<br clear=all> | |||
</div> | |||
1. '''Sporsammensætning''' drop-ned. | |||
1a. [[Special:MyLanguage/Kdenlive/Manual/Timeline/Editing#Track_Compositing_-_None|Ingen]] | |||
1b. [[Special:MyLanguage/Kdenlive/Manual/Timeline/Editing#Track_Compositing_-_Preview|Forhåndsvisning]] | |||
1c. [[Special:MyLanguage/Kdenlive/Manual/Timeline/Editing#Track_Compositing_-_HighQuality|Høj kvalitet]] | |||
1d. '''Mixed Audio tracks''' changes the order in which tracks are displayed to mixed audio and video tracks. For example, from the bottom of the timeline to the top of the timeline: A1, V1, A2, V2, A3, V3 | |||
1e. '''Split Audio tracks''' changes the order in which tracks are displayed to separate audio and video tracks. For example, from the bottom of the timeline to the top of the timeline: A1, A2, A1, V1, V2, V3 | |||
1f. '''Split Audio tracks (reverse)''' changes the order in which tracks are displayed to separate audio and video tracks with the audio tracks in reverse order. For example, from the bottom of the timeline to the top of the timeline: A1, A2, A3, V1, V2, V3 | |||
2. '''Redigeringstilstand for tidslinje''' drop-ned | |||
2a. [[Special:MyLanguage/Kdenlive/Manual/Timeline/Editing#Timeline Edit Mode - Normal_Mode|Normal tilstand]] | |||
2b. [[Special:MyLanguage/Kdenlive/Manual/Timeline/Editing#Timeline Edit Mode - Overwrite_Mode|Overskrivningstilstand]] | |||
2c. [[Special:MyLanguage/Kdenlive/Manual/Timeline/Editing#Timeline Edit Mode - Insert_Mode|Indsætningstilstand]] | |||
Disse indstillinger kan også findes i menuen <menuchoice>Værktøj</menuchoice>. | |||
<div class="mw-translate-fuzzy"> | |||
23. Brug tidslinjezone [[File:Kdenlive Use timeline zone for insert.png]] / Brug ikke tidslinjezone [[File:Kdenlive Dont Use timeline zone for insert.png]] ved indsætning (slå til/fra). Se [https://kdenlive.org/project/insert-overwrite-advanced-timeline-editing/ Insert & Overwrite Advanced Timeline Editing] på Kdenlives hjemmeside. | |||
</div> | |||
Gruppen '''Værktøjer''' (kun en af disse tre kan være aktive) | |||
Aktive knapper er grå. | |||
<div class="mw-translate-fuzzy"> | |||
3. [[Special:MyLanguage/Kdenlive/Manual/Timeline/Editing#Selection_Tool|Markeringsværktøj]] | |||
</div> | |||
<div class="mw-translate-fuzzy"> | |||
4. [[Special:MyLanguage/Kdenlive/Manual/Timeline/Editing#Razor_Tool|Skæreværktøj]] | |||
</div> | |||
<div class="mw-translate-fuzzy"> | |||
5. [[Special:MyLanguage/Kdenlive/Manual/Timeline/Editing#Spacer_Tool|Tomrumsværktøj]] | |||
</div> | |||
<div class="mw-translate-fuzzy"> | |||
6. Positionsmarkøren - viser tidspunktet eller framenummer for det sted, hvor musen svæver. Klik på kontrollen for at skifte visning imellem tid og framenummer | |||
</div> | |||
7a. '''hh:mm:ss:ff;''' Sets the position indicator to display time units | |||
7b. '''Frames''' Sets the position indicator to display frames | |||
8. '''Mix Clips''' - allows same-track transitions to be applied between two clips. See [[Special:MyLanguage/Kdenlive/Manual/Timeline/Editing#Same_track_transitions|Same Track Transitions]] for a detailed explination. | |||
<div class="mw-translate-fuzzy"> | |||
8. Indsæt klipzone i tidslinje. Se [https://kdenlive.org/project/insert-overwrite-advanced-timeline-editing/ Insert & Overwrite Advanced Timeline Editing] på Kdenlives hjemmeside. | |||
</div> | |||
<div class="mw-translate-fuzzy"> | |||
9. Overskriv klipzone i tidslinje. Se [https://kdenlive.org/project/insert-overwrite-advanced-timeline-editing/ Insert & Overwrite Advanced Timeline Editing] på Kdenlives hjemmeside. | |||
</div> | |||
<div class="mw-translate-fuzzy"> | |||
10. Udtræk tidslinjezone | |||
</div> | |||
<div class="mw-translate-fuzzy"> | |||
11. Løft tidslinjezone | |||
</div> | |||
<div class="mw-translate-fuzzy"> | |||
12. Foretrukne effekter | |||
</div> | |||
<div class="mw-translate-fuzzy"> | |||
13. Start forhåndsvisning af rendér | |||
</div> | |||
<div class="mw-translate-fuzzy"> | |||
14. Stop forhåndsvisning af rendér | |||
</div> | |||
<div class="mw-translate-fuzzy"> | |||
15. Tilføj zone til forhåndsvisning | |||
</div> | |||
<div class="mw-translate-fuzzy"> | |||
16. Fjern zone til forhåndsvisning | |||
</div> | |||
<div class="mw-translate-fuzzy"> | |||
17. Fjern alle zoner til forhåndsvisning | |||
</div> | |||
<div class="mw-translate-fuzzy"> | |||
18. Automatisk forhåndsvisning | |||
</div> | |||
<div class="mw-translate-fuzzy"> | |||
19. Deaktivér forhåndsvisning af tidslinje | |||
</div> | |||
<div class="mw-translate-fuzzy"> | |||
20. Håndtér data i cache | |||
</div> | |||
<div class="mw-translate-fuzzy"> | |||
Punkt 13-20 omtales i artiklen [https://kdenlive.org/project/timeline-preview-rendering/ Timeline preview rendering] på kdenlives hjemmeside. | |||
</div> | |||
15. Show/Hide the '''Audio Mixer''' tool. The audio mixer tool allows audio to be managed in the project. | |||
16. Show/Hide the '''Subtitle Tool'''. This will show or hide the subtitle track where subtitles can be created or edited in the project. | |||
==== Den nederste værktøjslinje ==== | ==== Den nederste værktøjslinje ==== | ||
[[File:Kdenlive Bottom toolbar17 04b.png|left|frame|Nederste værktøjslinje ver 17.04]] | |||
<br clear=all> | |||
24. [[Special:MyLanguage/Kdenlive/Manual/Timeline/Editing#Split_Audio_and_Video_Automatically|Opdel lyd og video automatisk]] | |||
25. [[Special:MyLanguage/Kdenlive/Manual/Timeline/Editing#Automatic_Transitions|Automatiske overgange]] | |||
26. [[Special:MyLanguage/Kdenlive/Manual/Timeline/Editing#Show_Video_Thumbnails|Vis videominiaturer]] | |||
27. [[Special:MyLanguage/Kdenlive/Manual/Timeline/Editing#Show_Audio_Thumbnails|Vis lydminiaturer]] | |||
28. [[Special:MyLanguage/Kdenlive/Manual/Timeline/Editing#Show_marker_comments|Vis markørkommentarer]] | |||
29. [[Special:MyLanguage/Kdenlive/Manual/Timeline/Editing#Snap|Hægt]] | |||
'''Zoomværktøjer''' | |||
[[ | 30. [[Special:MyLanguage/Kdenlive/Manual/Timeline/Editing#Fit_Zoom_to_Project|Tilpas zoom til projekt]] | ||
31. Zoom ud | |||
32. [[Special:MyLanguage/Kdenlive/Manual/Timeline/Editing#Zoom_project|Zoom projekt]] | |||
33. Zoom ind | |||
==== Beskrivelse af knapper ==== | |||
<span id="Track Compositing - None"></span> | |||
===== Sporsammensætning - Ingen ===== | |||
Når sporsammensætning er sat til Ingen får du ikke spor med alfakanalinformation til sammensætning med andre spor medmindre en eksplicit sammensat eller affin overgang indsættes imellem klippene. Det er den måde Kdenlive virkede i ændre versioner (<= ver 0.9.X). | |||
<span id="Track Compositing - Preview"></span> | |||
===== Sporsammensætning - Forhåndsvisning ===== | |||
Når sporsammensætning er sat til Forhåndsvisning, så vil spor med alfakanalinformation automatisk blive sammensat med andre spor ved brug af en algoritme, som er noget hurtigere end den algoritme, som bruges med '''Sporsammensætning - Høj kvalitet''', men som forringer farverne en smule. | |||
<span id="Track Compositing - HighQuality"></span> | |||
===== Sporsammensætning - Høj kvalitet ===== | |||
Når sporsammensætning er sat til Høj kvalitet, så vil spor med alfakanalinformation automatisk blive sammensat med andre spor ved brug af en algoritme (qtblend), som er noget langsommere end den algoritme, som bruges med '''Sporsammensætning - Forhåndsvisning''', men som bevarer farveinformationen bedre. | |||
<span id="Timeline Edit Mode - Normal Mode"></span> | |||
===== Tidslinjeredigering - Normal tilstand ===== | |||
I denne redigeringstilstand kan du ikke trække klip ovenover andre klip i det samme spor i tidslinjen. Du kan trække dem til et andet spor i tidslinjen, men ikke til det samme sted som et eksisterende klip. Dette er i modsætning til overskrivningstilstand. | |||
<span id="Timeline Edit Mode - Overwrite Mode"></span> | |||
===== Tidslinjeredigering - Overskrivningstilstand ===== | |||
I denne redigeringstilstand kan du trække et klip ind i et spor, hvor der allerede er et klip, og det indkommende klip vil overskrive den del af det (eller de) eksisterende klip som overlappes af det indhentede klip. | |||
[[File:kdenlive_overwrite_mode_before01.png|left|frame|Før]] | |||
[[File:kdenlive_overwrite_mode_after01.png|left|frame|Efter]] | |||
<br clear=all> | |||
I skærmbilledet "Efter" herover kan du se at klippet, som blev trukket ind fra det øvre spor har erstattet en del af klippet i det nedre spor. | |||
<span id="Timeline Edit Mode - Insert Mode"></span> | |||
'''Rearrange clips in the timeline''' | |||
Performing a rearrange edit. This technique lets you quickly change the order of clips in the timeline. | |||
[[File: Overwrite-mode.mp4]] | |||
Drag a clip, as you drop it to a new location performs an overwrite edit that overwrites the existing clip. | |||
===== Tidslinjeredigering - Indsætningstilstand ===== | |||
Når denne tilstand er valgt og du slipper et klip på tidslinjen, så vil det blive sat ind på tidslinjen på det sted, hvor du slipper det. Klippet, som ligger der blive delt og klippene flyttes til højre for at give plads til det nye klip. | |||
[[File:Kdenlive Insert mode0before.png|left|frame|Før]] | |||
[[File:Kdenlive Insert mode1before.png|left|frame|Under]] | |||
== | [[File:Kdenlive Insert mode1after.png|left|frame|Efter. Indkommende klip indsættes. Klip efter indsætningspunktet flyttes til højre]] | ||
<br clear=all> | |||
<span id="Selection Tool"></span> | |||
'''Rearrange edit in the timeline''' | |||
Performing a rearrange edit. Only clips in the destination track are shifted; clips in other tracks are not affected. This technique lets you quickly change the order of clips in the timeline. | |||
It always closes all space in the track. | |||
[[File: Insert-mode.mp4]] | |||
Drag a clip, as you drop it to a new location. Releasing the clip performs an insert edit that shifts clips in the destination track only. | |||
===== Markeringsværktøjet ===== | |||
===== | Brug dette til at vælge klip i tidslinjen. Markøren bliver til en hånd, når dette værktøj er aktivt. | ||
<span id="Razor Tool"></span> | |||
===== Skæreværktøjet ===== | |||
Brug dette værktøj til at beskære klip i tidslinjen. Markøren bliver til en saks når dette værktøj er aktivt. | |||
<span id="Spacer Tool"></span> | |||
===== Tomrumsværktøjet ===== | |||
Brug dette værktøj ({{Icon1|Kdenilve_Spacer_tool_icon.png}}) til midlertidigt at gruppere forskellige klip og trække dem rundt på tidslinjen for at oprette eller fjerne tomrum imellem klippene. Meget nyttigt. Eksperimentér med dette værktøj for at se, hvordan det virker. | |||
[[File:Kdenlive_Spacer_tool_crop.png|600px]] | |||
===== | I ovenstående eksempel er klippene ikke grupperede, men tomrumsværktøjet grupperer dem midlertidigt for dig, sådan at du kan flytte dem alle som en gruppe. | ||
<span id="Fit Zoom to Project"></span> | |||
===== Tilpas zoom til projektet ===== | |||
Dette vil zoome projektet ud, sådan at det hele kan ses i tidslinjevinduet. Det er den samme funktion, som udløses af <menuchoice>Tilpas zoom til projekt</menuchoice> i menuen [[Special:MyLanguage/Kdenlive/Manual/Timeline Menu|Tidslinje]]. | |||
<span id="Zoom project"></span> | |||
===== Zoom projekt ===== | |||
Forstørrelsesglassene zoomer ind og ud på tidslinjen. Skyderen justerer zoomfaktoren i store spring. De samme indstillinger kontrolleres af <menuchoice>Zoom ind</menuchoice> og <menuchoice>zoom ud</menuchoice> i menuen <menuchoice>Tidslinje</menuchoice>. | |||
<span id="Split Audio and Video Automatically"></span> | |||
===== Opdel lyd og video automatisk ===== | |||
Når denne er aktiveret og du trækker et klip til tidslinjen, så vil lyden i klippet blive placeret i et lydspor og videoen i et videospor. Du kan opnå det samme resultat ved at [[Special:MyLanguage/Kdenlive/Manual/Timeline/Right Click Menu|højreklikke]] på klippet og vælge <menuchoice>Opdel lyd</menuchoice> efter . Når den ikke er aktiveret og du trækker et klip til tidslinjen, så kombineres lyd- og videosporet til et videospor. | |||
<span id="Automatic Transitions"></span> | |||
===== Automatiske overgange ===== | |||
===== | Når knappen er aktiveret, så vil enhver overgang som føjes til tidslinjen have tilvalget for automatisk overgang sat som standard. Se [[Special:MyLanguage/Kdenlive/Manual/Transitions#Automatic_Transitions|Automatiske overgange]] | ||
<span id="Show Video Thumbnails"></span> | |||
===== Vis videominiaturer ===== | |||
<div class="mw-translate-fuzzy"> | |||
Når den er aktiv, så vil videoklippene i tidslinjen indeholde en miniature foruden filnavnet; ellers vises kun klippets filnavn. | |||
</div> | |||
===== | Når der er zoomet maksimalt ind i tidslinjen, så viser videosporet en miniature af hver frame i klippet. Når der ikke er zoomet maksimalt ind i tidslinjen, så viser videosporet en miniature for første og sidste frame i klippet. | ||
<span id="Show Audio Thumbnails"></span> | |||
===== Vis lydminiaturer ===== | |||
Når den er aktiv, så vises en bølgeform, som repræsenterer lydklippet sammen med filnavnet; ellers vises kun filnavnet. | |||
<span id="Show marker comments"></span> | |||
===== Vis markørkommentarer ===== | |||
Denne knap slår visning af kommentarer til og fra. Kommentarer kan være gemt i [[Special:MyLanguage/Kdenlive/Manual/Projects_and_Files/Clips#Markers|markører]] (teksten med guldfarvet baggrund i eksemplet herunder) og i [[Special:MyLanguage/Kdenlive/Manual/Timeline/Guides|hjælpelinjer]] (teksten med violet baggrund). | |||
[[File:Kdenlive_Markers_and_guides_crop.png]] | |||
<span id="Snap"></span> | |||
===== Hægt ===== | |||
Når denne funktion er aktiv og du trækker starten af et klip hen i nærheden et andet klips ende, så vil det første klip hægte sig på og blive perfekt justeret med det andet klips ende. Når du nærmer de to klips ender til hinanden, så hægter de sig sammen uden tomrum eller overlapning lige så snart de er inden for en vis lille afstand. Bemærk, at dette sker, selv hvis klippene er i forskellige spor i tidslinjen. | |||
Klip vil også hægte sig til tidslinjemarkøren position, til markører og til [[Special:myLanguage/Kdenlive/Manual/Timeline/Guides|hjælpelinjer]]. | |||
==== | ==== Klip materiale fra flere justerede spor - Ripple Delete ==== | ||
Dette findes i menuen <menuchoice>Tidslinje</menuchoice> under <menuchoice>Alle klip -> Ripple Delete</menuchoice> <ref>tilgængelig i allernyeste versioner > 0.9.10 (januar 2015)</ref> | |||
< | <b>Findes tilsyneladende ikke i Kdenlive 17.04 & 18.04</b> <br> | ||
Markér start- og slutpunkter i projektmonitoren og vælg så <menuchoice>Tidslinje -> Alle klip -> Ripple Delete</menuchoice> (eller <keycap>Ctrl-X</keycap>). '''Kdenlive''' sletter alt materiale imellem start- og slutpunkterne i ikke-låste spor, skubber resten tilbage, sådan at hullet fyldes ud og placerer afspilningshovedet på startpunktet. | |||
==== Subtitle ==== | |||
Since Version 20.12.0 | |||
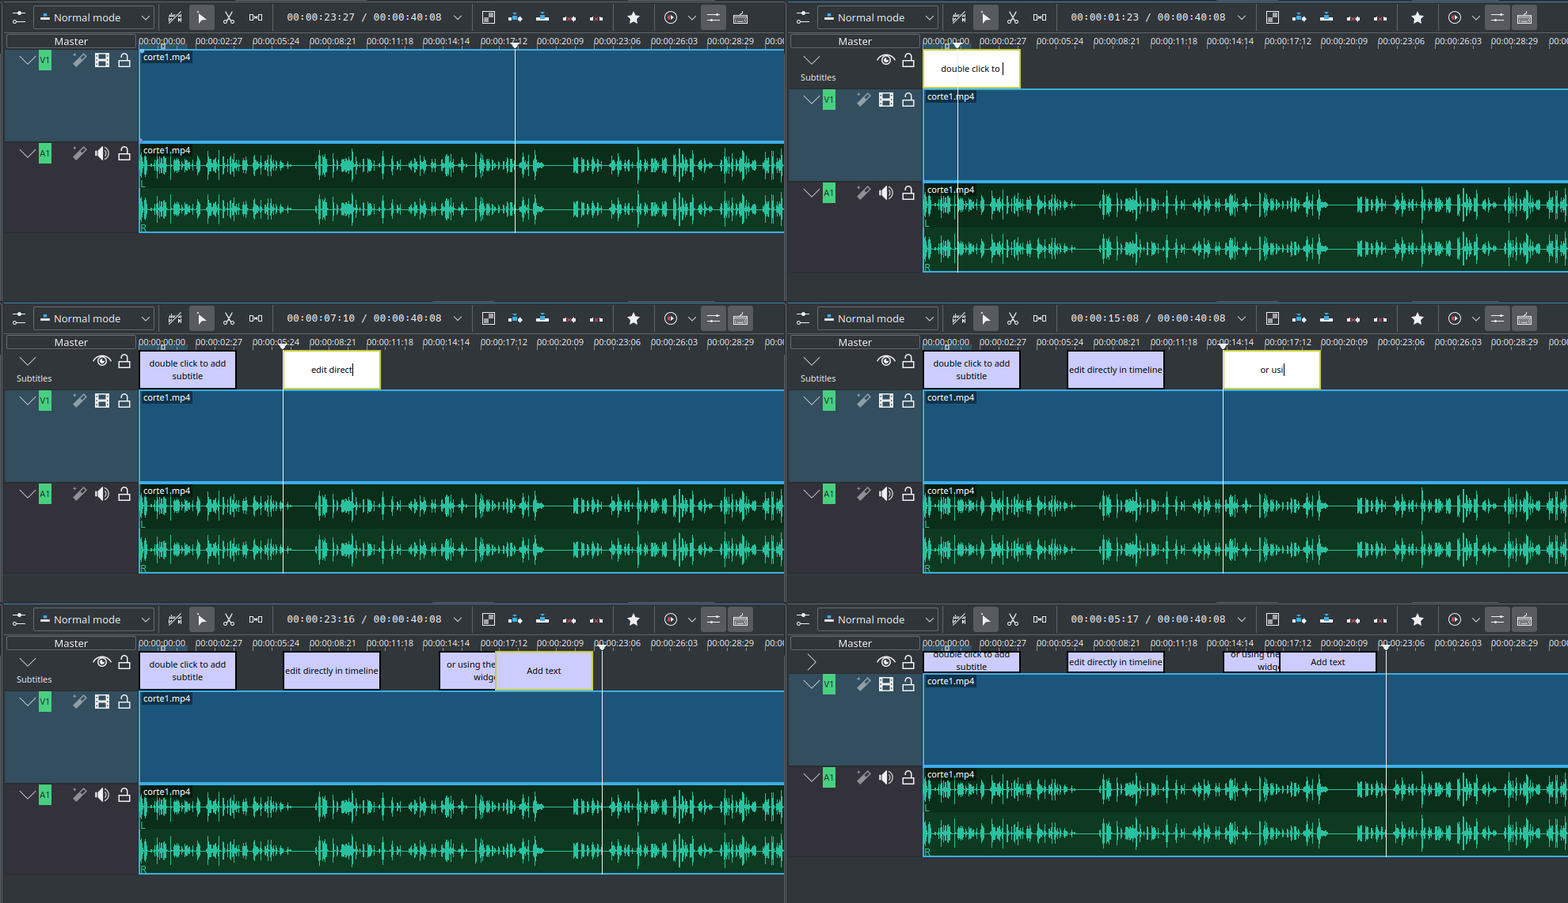
[[File:subtitle-timeline-1.gif]] | |||
The subtitling tool allows you to add and edit subtitles directly in the timeline on a special subtitle track or by using the new subtitle window. You can also import (SRT/ASS) and export (SRT) subtitles. | |||
There are 3 ways to add subtitle: | |||
* ''' Menu ''' | |||
:* <menuchoice>Project -> Subtitle -> Add Subtitle</menuchoice> | |||
* ''' Keyboard ''' | |||
:* <keycap>Shift+S</keycap> adds a subtitle. | |||
* ''' Icon and Mouse''' | |||
:* Click the "subtitle" icon in the timeline toolbar to open the subtitle track in the timeline. | |||
:* Double-click in the subtitle track to add a subtitle. | |||
''' Adding and editing text''' | |||
Add or editing text either directly into the subtitle clip or in the subtitle window. | |||
''' Adjust the length of subtitle ''' | |||
Grab the end of a subtitle with the mouse and lengthen or shorten it as needed. | |||
Set subtitle in/out can be achieved with the same shortcut as to set clip in/out (left/right parenthesis shortcut). | |||
''' Subtitle window ''' | |||
[[File:subtitle-widget.gif]] | |||
* The subtitles window allows easier editing and also makes it possible to easily navigate between subtitles with the left/right button. | |||
* With the plus sign, you can add subtitles. | |||
* The scissors are mostly here for divide subtitles: let's say your subtitle text is too long and you want to make it 2 different subtitles. Put the cursor in the text widget where you want to cut and click the scissors, it will split the text between 2 different subtitle items. The scissors are only working when the playhead is over the subtitle itself. | |||
* The tick adds the text to the subtitle. | |||
'''Import and export subtitle''' | |||
Importing SRT and ASS subtitle file: <menuchoice>Project -> Subtitles -> Import subtitles file</menuchoice> | |||
Exporting SRT subtitles only: <menuchoice>Project -> Subtitles -> Export subtitles file</menuchoice> | |||
{{Tip| SRT supports markup for: bold, italic, underline, text color and line break. | |||
* <code><nowiki> <b>text in boldface</b> </nowiki></code> | |||
* <code><nowiki> <i>text in italics</i> </nowiki></code> | |||
* <code><nowiki> <u>text underlined</u> </nowiki></code> | |||
* <code><nowiki> <font color="#00ff00"> text in green</font> </nowiki></code> you can use the font tag only to change color. | |||
* And all combined: <nowiki> <font color="#00ff00"><b><i><u>All combined</u></i></b></font> </nowiki> | |||
<!--}}--> | |||
* '''Line break:''' Add on the end of each line a <code><nowiki><br></nowiki></code> (for break). Now the srt file is stored correct and reopened with the line break. The subtitle in the subtitle window will be all in 1 line after several save but the breaks is working. | |||
<keycap>Alt+arrow</keycap> jumps from subtitle to subtitle.}} <!--{{--> | |||
Since version 21.04.0 | |||
*''' Spelling check ''' | |||
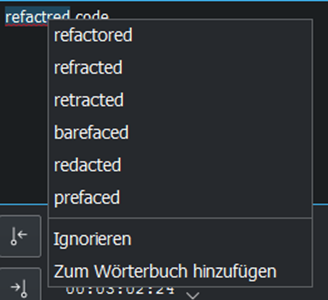
Spelling check for subtitle is integrated and shows incorrect words by a red wiggly line. Right-click on the word and you get a list of possible words you can choose by click on it. | |||
[[File: Speech-to-text_Spell-Check.png]] | |||
==== Speech to text ==== | |||
Since version 21.04.0 | |||
*''' Install Python ''' | |||
Python needs to be installed on your computer. Download it from here https://www.python.org/downloads/ for installation on your computer. | |||
Speech recognition requires the vosk and srt python modules | |||
- On Linux open a terminal and put in and run: "pip3 install vosk;pip3 install srt". | |||
- On Windows, you can download this batch file ([[File: Install_vosk_srt.zip]]). After download double click starts the installations. | |||
*''' Install a language ''' | |||
Goto <menuchoice>Settings -> Configure Kdenlive -> Speech to Text</menuchoice> | |||
Click on the link to get a language model | |||
[[File: Speech-to-text_Download-link.png]] | |||
Drag & drop the language you want from the vosk-model download page to the model window, and it will download and extract it for you. | |||
[[File: Speech-to-text_Download-model.png]] | |||
If you have problems click on "Check configuration" button. | |||
''' Speech recognition ''' | |||
*''' Creating subtitle by speech recognition ''' | |||
1. Mark the timeline zone you want to recognize (adjust the blue line). | |||
2. Click on the "Speech recognition" icon. | |||
3. Choose the language. | |||
4. Choose how the selected zone should be applied. | |||
5. Click "Process" | |||
The subtitle gets created and inserted automatically. | |||
Remark: Only timeline zone is implemented for now in automatic subtitles. | |||
[[File: Speech-to-text_Subtitle.png]] | |||
*''' Creating clips by speech recognition ''' | |||
This is useful for interviews and other speech-related footage. | |||
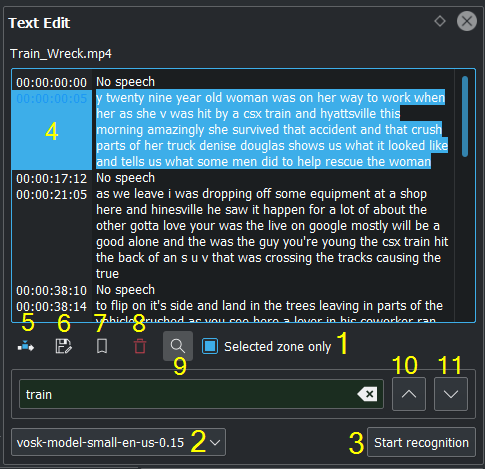
Enable <menuchoice>View -> Text Edit</menuchoice> | |||
Select a clip in the project bin. | |||
1. If needed set in/out point in the clip monitor and enable "selected zone only". This will only recognize the text inside the zone. | |||
2. Choose the correct language | |||
3. Click "start recognition" | |||
4. Selecting the text you want to either | |||
5. Put into the timeline | |||
6. Save as a new clip | |||
7. Add a Bookmark. You can jump to these bookmarks in the timeline with <keycap>alt+arrow</keycap> or edit the bookmark by double click. | |||
8. Delete the selection. | |||
9. Here you can search in the text. | |||
10. And navigate up | |||
11. Or down in the text. | |||
[[File: Speech-to-text_Text-Edit.png]] | |||
{{Warning|Speech to text doesn't work with version 21.04.2 due to vosk API issues. Use version 21.04.1 or 21.04.3 and later versions.}} | |||
==== 3 point editing ==== | |||
Since version 19.08.0 | |||
3 important points to understand the 3 point editing concept (with keyboard shortcuts): | |||
[[File:3p-Source-1.gif]] | |||
'''Source''' | |||
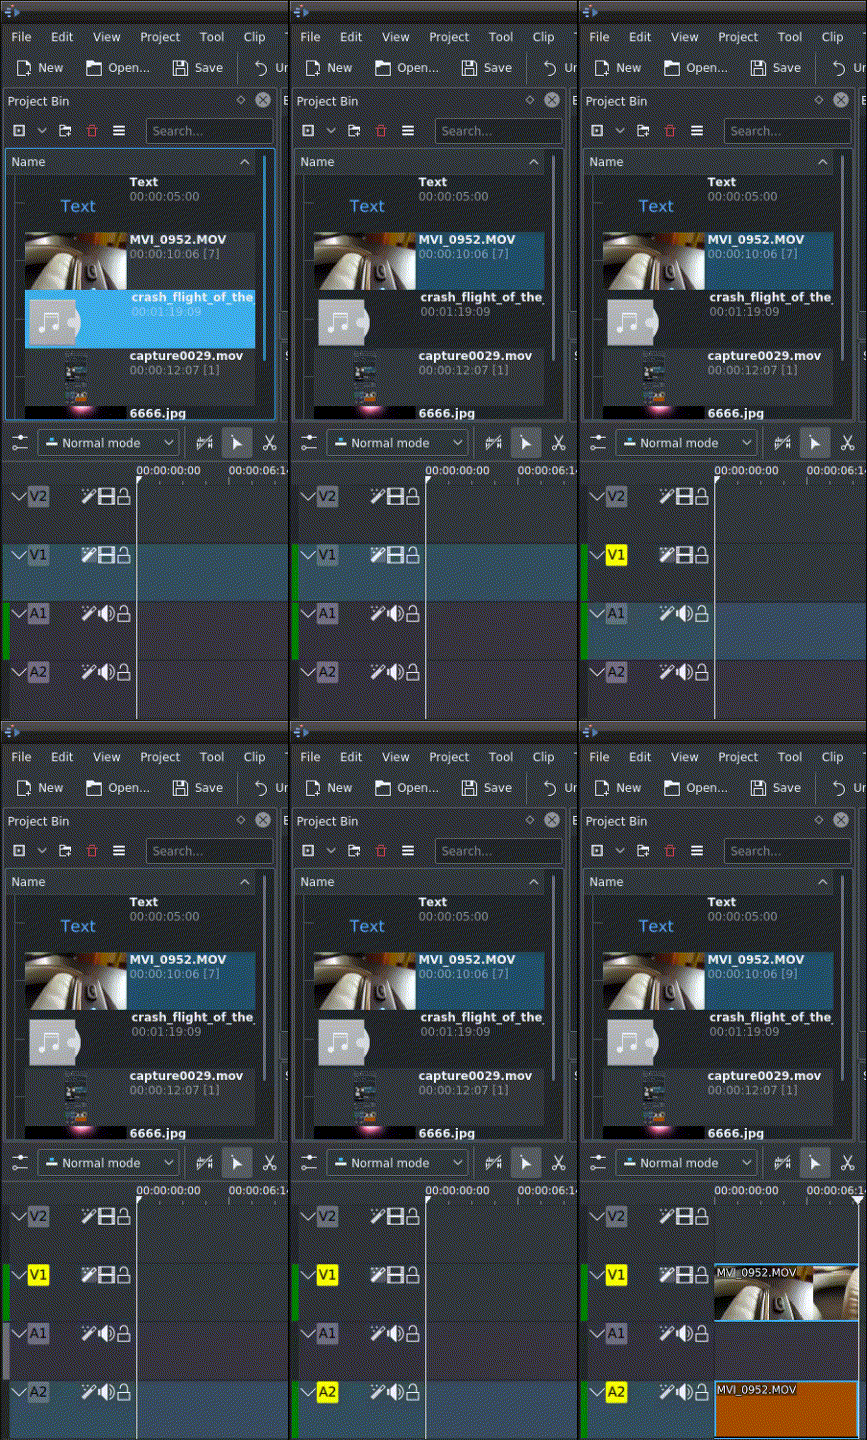
: On the left of the track head the green vertical lines (V1 or A2). The green line is connected to the source clip in the project bin. Only when a clip is selected in the project bin, the green line shows up depending on the type of the clip (A/V clip, picture/title/color clip, audio clip). | |||
[[File:3p-Target-active-1.gif]] | |||
'''Target''' | |||
: In the track head the target V1 or A1 is active when it’s yellow. An active target track reacts to edit operations like insert a clip even if the source is not active. | |||
'''The concept is like thinking of connectors''' | |||
: Connect the source (the clip in the project bin) to a target (a track in the timeline). Only when both connectors on the '''same''' track are switched on the clip “flow” from the project bin to the timeline. | |||
'''Be aware''' | |||
: Active target tracks without connected source react on edit operations. | |||
'''Example of advanced edit''' | |||
Here is a brief introduction to the 3 point editing system. | |||
[[File:3p-Insert-clip-1.gif]] | |||
1. Select a clip in the project bin with an up/down arrow | |||
2. Navigate the clip by the <keycap>JKL</keycap> keys or by the <keycap>left/right</keycap> arrows and set the IN and the OUT point by the <keycap>I</keycap> and <keycap>O</keycap> keys. | |||
3. Hit <keycap>T</keycap> to change to the timeline | |||
4. Select a video or audio track in the timeline (up/down arrow key) and set it as source with <keycap>Shift+T</keycap>. | |||
5. Activate the track as a target with shortcut <keycap>A</keycap> (this connects the track to the source) | |||
6. Hit <keycap>V</keycap> (insert) or <keycap>B</keycap> (overwrite) to add the clip at the play-head position or to fill the selected area in the timeline if it is active. If you need to activate it use the <keycap>G</keycap> key. | |||
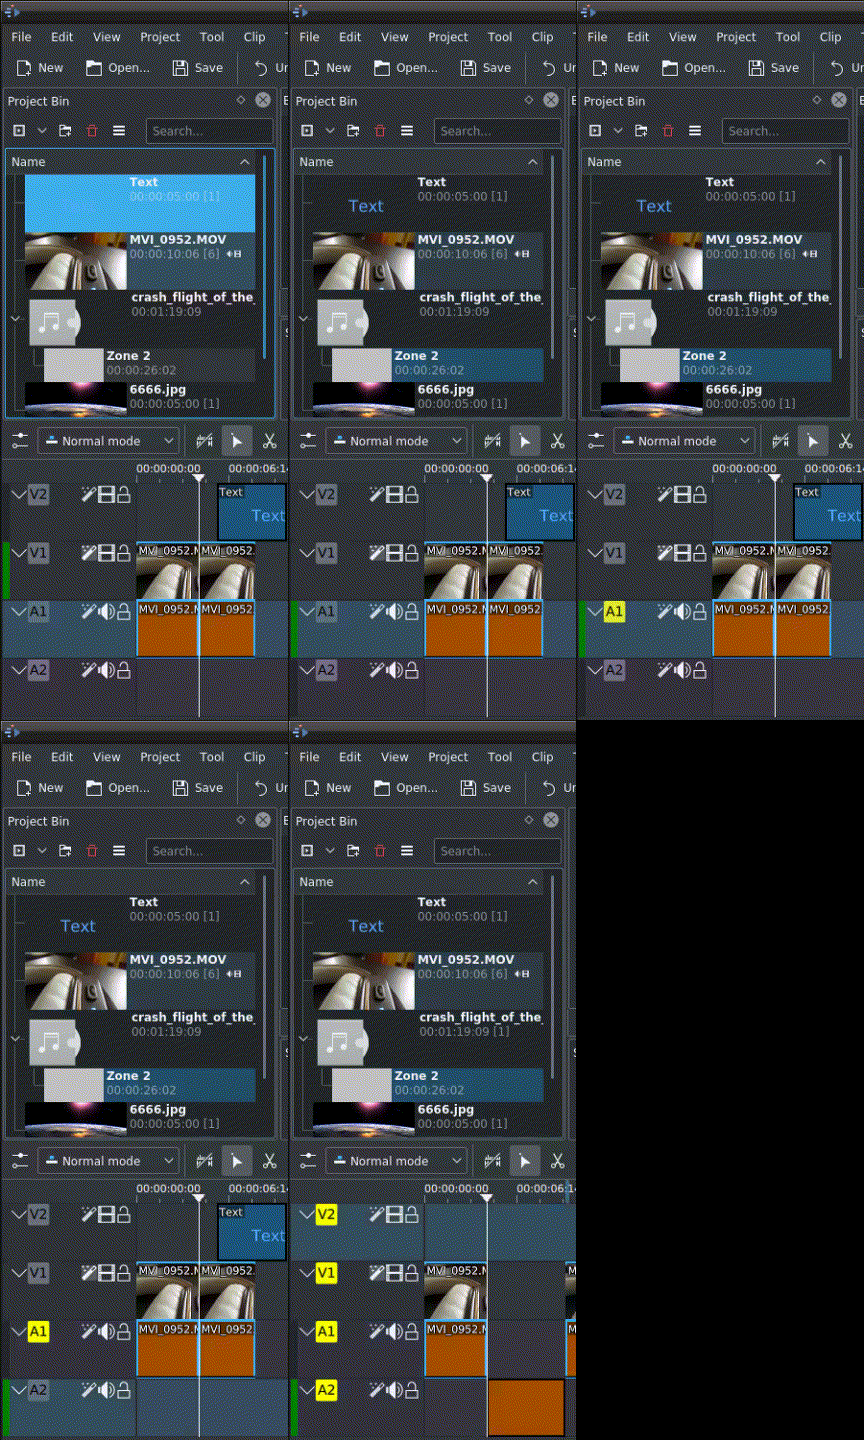
[[File:3p-Advanced-edit-1.gif]] | |||
In the following example, we want only to insert the audio part of a clip in A2 and we want to create a gap in all the other video and audio tracks: | |||
1. Activate all the target tracks which contain clips (yellow buttons). | |||
2. Activate just the audio source on A2 | |||
3. Press <keycap>V</keycap> (insert). | |||
<references /> | |||
{{Prevnext2 | {{Prevnext2 | ||
| prevpage=Special:MyLanguage/Kdenlive/Manual/Timeline| nextpage=Special:MyLanguage/Kdenlive/Manual/Timeline/Grouping | | prevpage=Special:MyLanguage/Kdenlive/Manual/Timeline| nextpage=Special:MyLanguage/Kdenlive/Manual/Timeline/Grouping | ||
| prevtext= | | prevtext=Tidslinje | nexttext=Gruppering | ||
| index=Special:MyLanguage/Kdenlive/Manual | indextext= | | index=Special:MyLanguage/Kdenlive/Manual | indextext=Indholdsfortegnelse | ||
}} | }} | ||
[[Category:Kdenlive]] | [[Category:Kdenlive/da]] | ||
Latest revision as of 23:08, 23 September 2022
Redigering
Redigering udføres i tidslinjen. Tilføj et klip ved at trække det fra projekttræet eller klipmonitoren. Når et klip er blevet sluppet på et spor kan det flyttes (træk og slip det) til et andet sted på det samme spor eller til et andet spor.
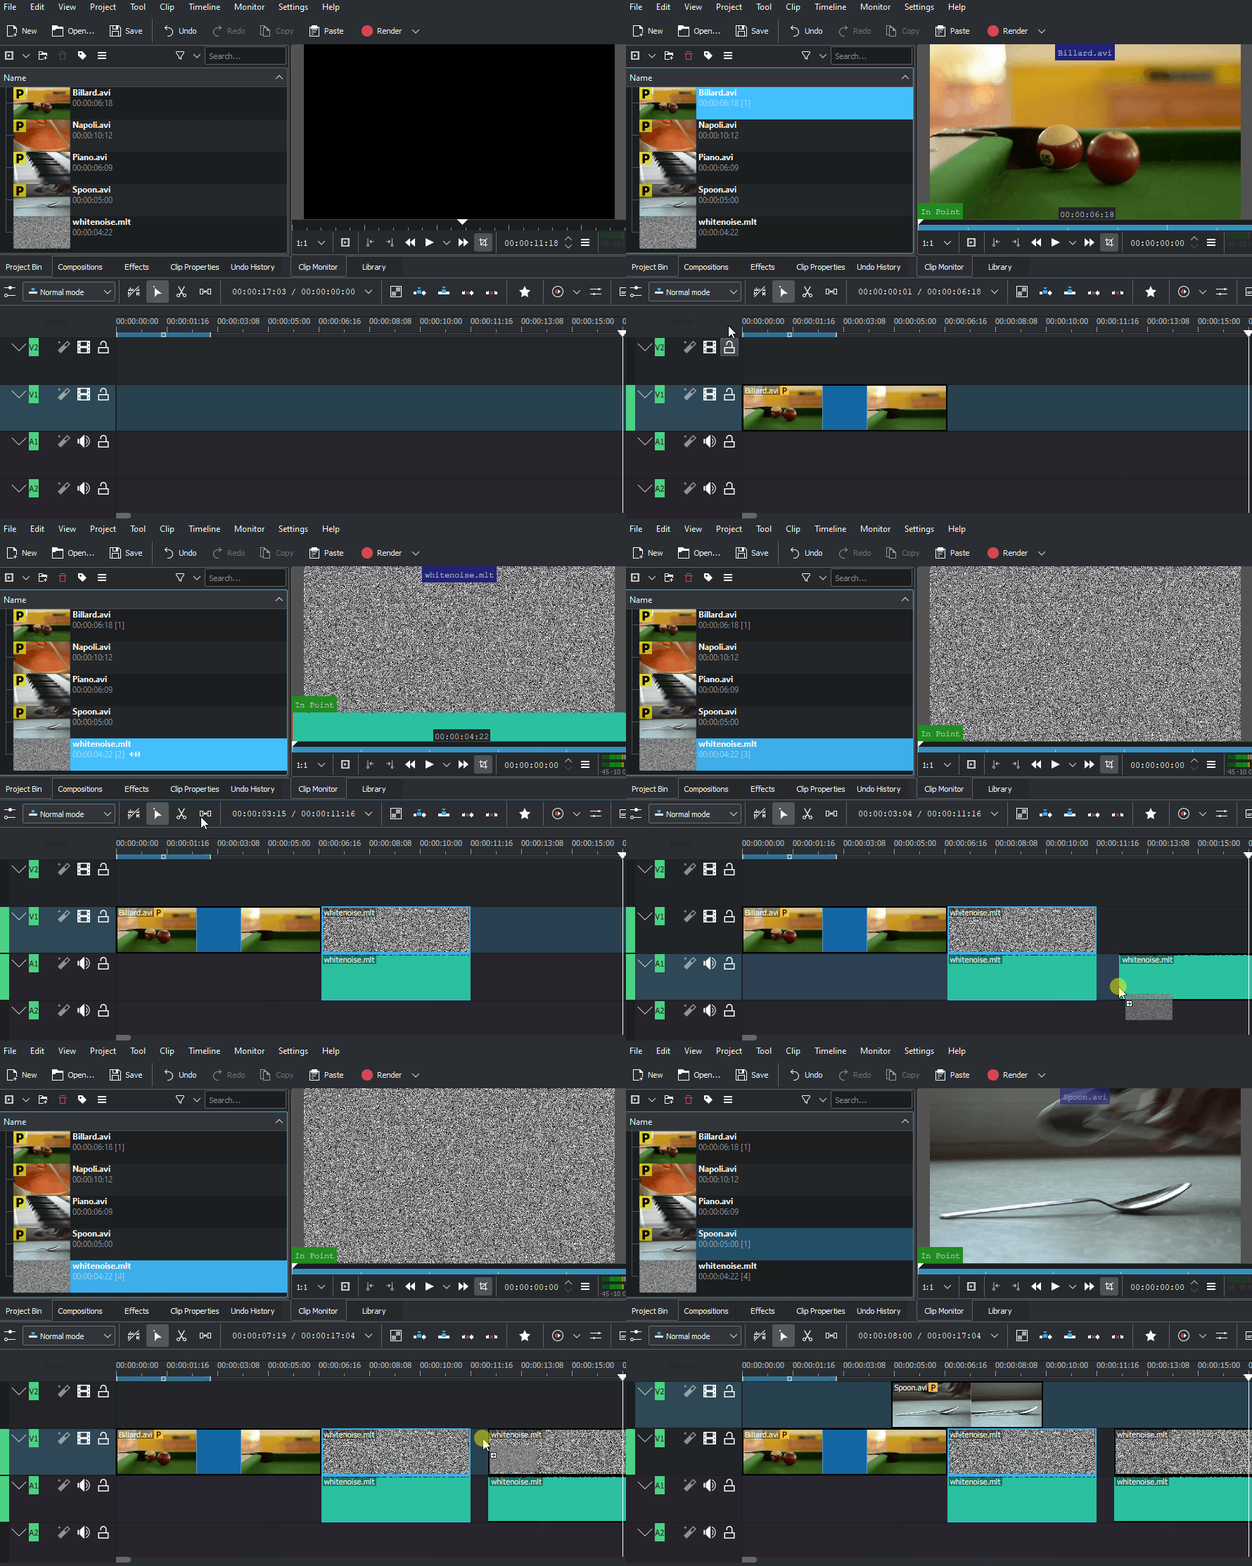
With 19.08.0 editing with keyboard shortcuts was introduced. This will speed up the editing work and you can do editing steps that are not possible or not as quick and easy with the mouse. Working with keyboard shortcuts in 19.08 is different as in the former Kdenlive versions. Mouse operations have not changed and working as before. See 3 point editing.
Søgning igennem dit projekt
Tidslinjemarkøren viser din aktuelle position i projektet. Markørens position på tidslinjen og i projektmonitoren følges altid ad. Positionen kan flyttes på følgende måder:
- Tastaturgenveje: Pil til venstre og Pil til højre flytter et frame, Skift + Pil til højre og Skift + Pil til venstre flytter et sekund.
- Klikke/trække i Tidslinjelinealen eller i en tomt område på tidslinjen.
- Klikke/trække i linealen i projektmonitoren
- Brug af musehjulet mens musemarkøren er over tidslinjen eller over projektmonitoren
- Redigering af tidskoden i projektmonitorens tidskodekontrol.
- Klik på op- eller nedpilene i projektmonitorens tidskodekontrol
Beskæring af et klip
Den nemmeste måde at beskære et klip er at placere tidslinjemarkøren der, hvor du ønsker at beskære klippet og så vælge klippet (klik på det) og bruge menuen (standard tastaturgenvej Skift + R).
eller
Alternativt kan du bruge skæreværktøjet.
Ændring af et klips størrelse
Et klips størrelse kan ændres fra starten eller slutningen af klippet ved at trække dets venstre eller højre kant. Hvis du ønsker en mere præcis justering af størrelsen, så kan du placere tidslinjemarkøren der, hvor du ønsker at justere størrelsen til og så bruge (standard tastaturgenvej: 1) eller (standard tastaturgenvej: 2).
For at få endnu mere præcis kontrol over længden af et klip kan du dobbeltklikke på det i tidslinjen og justere dets varighed ved hjælp af dialogen Varighed. Du kan opnå præcision på frame-niveau på denne måde.
Du kan også ændre et klips størrelse ved at beskære det med skæreværktøjet og så slette den del, som du ikke vil bruge.
Fjernelse af tomrum imellem klip
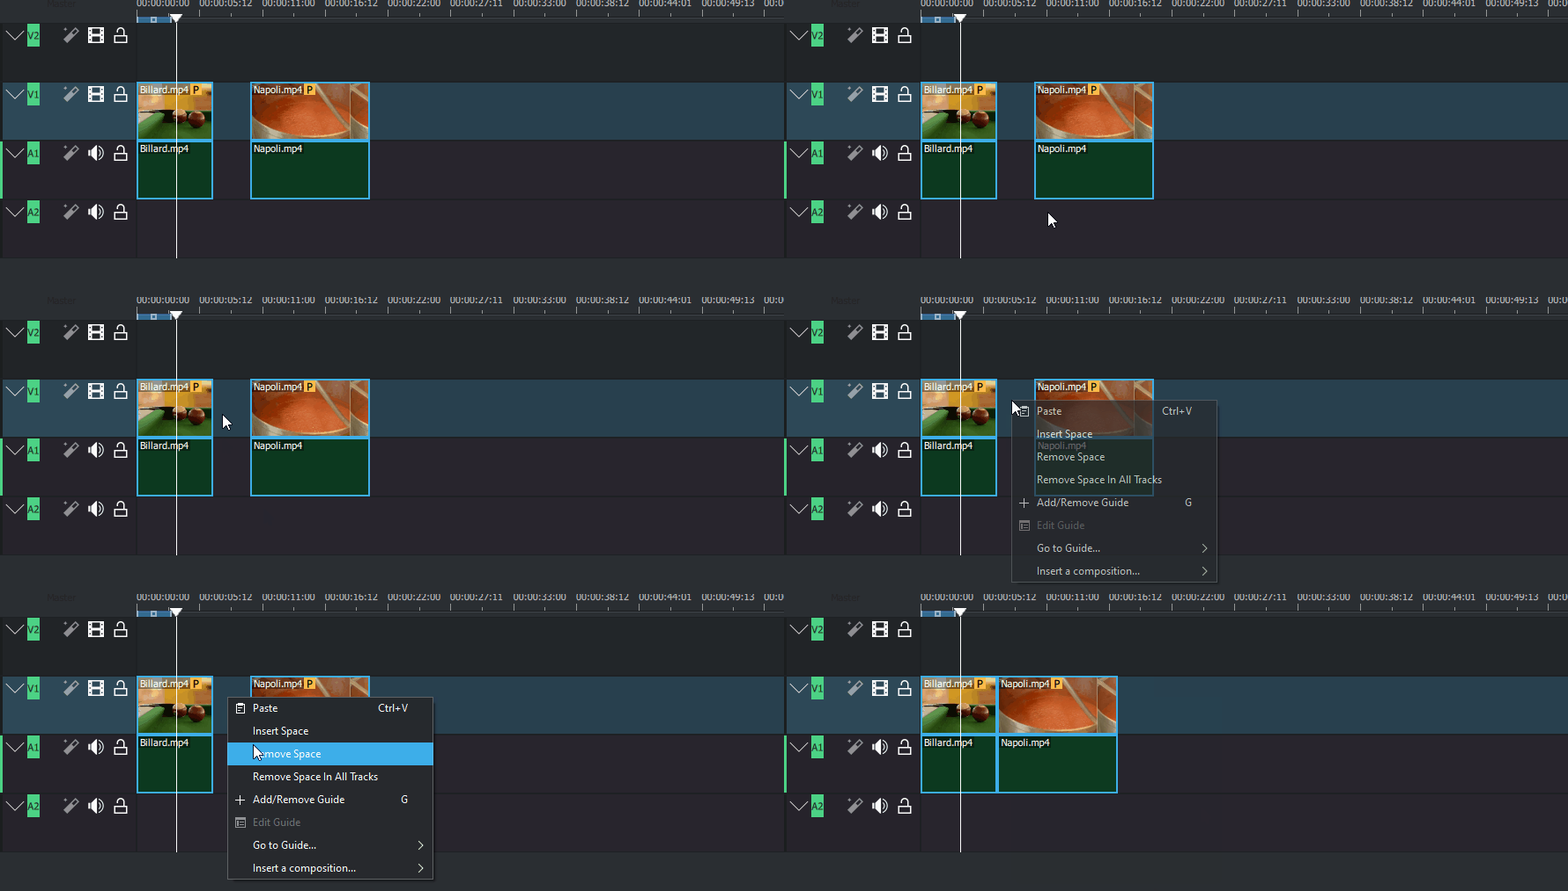
Højreklik i mellemrummet mellem klippene og vælg . Vær dog opmærksom på, at hvis du har klip i flere spor og de ikke er grupperede, så kan fjernelse af tomrum forstyrre justeringen af klippene imellem sporene; tomrummet fjernes kun fra den tidslinje du klkkede på. I denne situation kan det være mere sikkert at bruge tomrumsværktøjet.
Den miderste værktøjslinje
Der er en værktøjslinje mellem monitorene og tidslinjen, som kontrollerer de forskellige aspekter af editoren.

1. Sporsammensætning drop-ned.
1a. Ingen
1b. Forhåndsvisning
1c. Høj kvalitet
1d. Mixed Audio tracks changes the order in which tracks are displayed to mixed audio and video tracks. For example, from the bottom of the timeline to the top of the timeline: A1, V1, A2, V2, A3, V3
1e. Split Audio tracks changes the order in which tracks are displayed to separate audio and video tracks. For example, from the bottom of the timeline to the top of the timeline: A1, A2, A1, V1, V2, V3
1f. Split Audio tracks (reverse) changes the order in which tracks are displayed to separate audio and video tracks with the audio tracks in reverse order. For example, from the bottom of the timeline to the top of the timeline: A1, A2, A3, V1, V2, V3
2. Redigeringstilstand for tidslinje drop-ned
2a. Normal tilstand
Disse indstillinger kan også findes i menuen .
23. Brug tidslinjezone ![]() / Brug ikke tidslinjezone
/ Brug ikke tidslinjezone ![]() ved indsætning (slå til/fra). Se Insert & Overwrite Advanced Timeline Editing på Kdenlives hjemmeside.
ved indsætning (slå til/fra). Se Insert & Overwrite Advanced Timeline Editing på Kdenlives hjemmeside.
Gruppen Værktøjer (kun en af disse tre kan være aktive)
Aktive knapper er grå.
4. Skæreværktøj
6. Positionsmarkøren - viser tidspunktet eller framenummer for det sted, hvor musen svæver. Klik på kontrollen for at skifte visning imellem tid og framenummer
7a. hh:mm:ss:ff; Sets the position indicator to display time units
7b. Frames Sets the position indicator to display frames
8. Mix Clips - allows same-track transitions to be applied between two clips. See Same Track Transitions for a detailed explination.
8. Indsæt klipzone i tidslinje. Se Insert & Overwrite Advanced Timeline Editing på Kdenlives hjemmeside.
9. Overskriv klipzone i tidslinje. Se Insert & Overwrite Advanced Timeline Editing på Kdenlives hjemmeside.
10. Udtræk tidslinjezone
11. Løft tidslinjezone
12. Foretrukne effekter
13. Start forhåndsvisning af rendér
14. Stop forhåndsvisning af rendér
15. Tilføj zone til forhåndsvisning
16. Fjern zone til forhåndsvisning
17. Fjern alle zoner til forhåndsvisning
18. Automatisk forhåndsvisning
19. Deaktivér forhåndsvisning af tidslinje
20. Håndtér data i cache
Punkt 13-20 omtales i artiklen Timeline preview rendering på kdenlives hjemmeside.
15. Show/Hide the Audio Mixer tool. The audio mixer tool allows audio to be managed in the project.
16. Show/Hide the Subtitle Tool. This will show or hide the subtitle track where subtitles can be created or edited in the project.
Den nederste værktøjslinje

24. Opdel lyd og video automatisk
29. Hægt
Zoomværktøjer
31. Zoom ud
32. Zoom projekt
33. Zoom ind
Beskrivelse af knapper
Sporsammensætning - Ingen
Når sporsammensætning er sat til Ingen får du ikke spor med alfakanalinformation til sammensætning med andre spor medmindre en eksplicit sammensat eller affin overgang indsættes imellem klippene. Det er den måde Kdenlive virkede i ændre versioner (<= ver 0.9.X).
Sporsammensætning - Forhåndsvisning
Når sporsammensætning er sat til Forhåndsvisning, så vil spor med alfakanalinformation automatisk blive sammensat med andre spor ved brug af en algoritme, som er noget hurtigere end den algoritme, som bruges med Sporsammensætning - Høj kvalitet, men som forringer farverne en smule.
Sporsammensætning - Høj kvalitet
Når sporsammensætning er sat til Høj kvalitet, så vil spor med alfakanalinformation automatisk blive sammensat med andre spor ved brug af en algoritme (qtblend), som er noget langsommere end den algoritme, som bruges med Sporsammensætning - Forhåndsvisning, men som bevarer farveinformationen bedre.
Tidslinjeredigering - Normal tilstand
I denne redigeringstilstand kan du ikke trække klip ovenover andre klip i det samme spor i tidslinjen. Du kan trække dem til et andet spor i tidslinjen, men ikke til det samme sted som et eksisterende klip. Dette er i modsætning til overskrivningstilstand.
Tidslinjeredigering - Overskrivningstilstand
I denne redigeringstilstand kan du trække et klip ind i et spor, hvor der allerede er et klip, og det indkommende klip vil overskrive den del af det (eller de) eksisterende klip som overlappes af det indhentede klip.
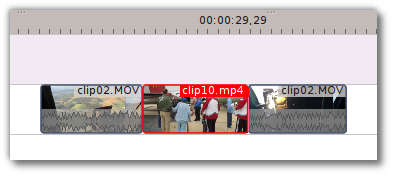
I skærmbilledet "Efter" herover kan du se at klippet, som blev trukket ind fra det øvre spor har erstattet en del af klippet i det nedre spor.
Rearrange clips in the timeline
Performing a rearrange edit. This technique lets you quickly change the order of clips in the timeline.
Drag a clip, as you drop it to a new location performs an overwrite edit that overwrites the existing clip.
Tidslinjeredigering - Indsætningstilstand
Når denne tilstand er valgt og du slipper et klip på tidslinjen, så vil det blive sat ind på tidslinjen på det sted, hvor du slipper det. Klippet, som ligger der blive delt og klippene flyttes til højre for at give plads til det nye klip.


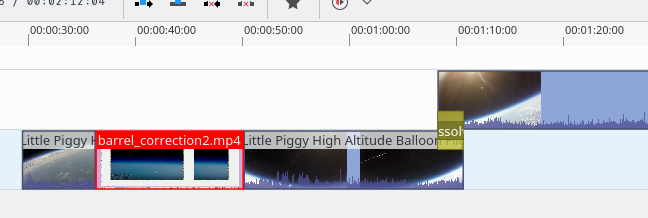
Rearrange edit in the timeline
Performing a rearrange edit. Only clips in the destination track are shifted; clips in other tracks are not affected. This technique lets you quickly change the order of clips in the timeline.
It always closes all space in the track.
Drag a clip, as you drop it to a new location. Releasing the clip performs an insert edit that shifts clips in the destination track only.
Markeringsværktøjet
Brug dette til at vælge klip i tidslinjen. Markøren bliver til en hånd, når dette værktøj er aktivt.
Skæreværktøjet
Brug dette værktøj til at beskære klip i tidslinjen. Markøren bliver til en saks når dette værktøj er aktivt.
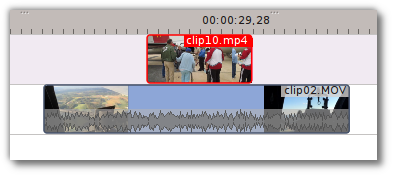
Tomrumsværktøjet
Brug dette værktøj (![]() ) til midlertidigt at gruppere forskellige klip og trække dem rundt på tidslinjen for at oprette eller fjerne tomrum imellem klippene. Meget nyttigt. Eksperimentér med dette værktøj for at se, hvordan det virker.
) til midlertidigt at gruppere forskellige klip og trække dem rundt på tidslinjen for at oprette eller fjerne tomrum imellem klippene. Meget nyttigt. Eksperimentér med dette værktøj for at se, hvordan det virker.
I ovenstående eksempel er klippene ikke grupperede, men tomrumsværktøjet grupperer dem midlertidigt for dig, sådan at du kan flytte dem alle som en gruppe.
Tilpas zoom til projektet
Dette vil zoome projektet ud, sådan at det hele kan ses i tidslinjevinduet. Det er den samme funktion, som udløses af i menuen Tidslinje.
Zoom projekt
Forstørrelsesglassene zoomer ind og ud på tidslinjen. Skyderen justerer zoomfaktoren i store spring. De samme indstillinger kontrolleres af og i menuen .
Opdel lyd og video automatisk
Når denne er aktiveret og du trækker et klip til tidslinjen, så vil lyden i klippet blive placeret i et lydspor og videoen i et videospor. Du kan opnå det samme resultat ved at højreklikke på klippet og vælge efter . Når den ikke er aktiveret og du trækker et klip til tidslinjen, så kombineres lyd- og videosporet til et videospor.
Automatiske overgange
Når knappen er aktiveret, så vil enhver overgang som føjes til tidslinjen have tilvalget for automatisk overgang sat som standard. Se Automatiske overgange
Vis videominiaturer
Når den er aktiv, så vil videoklippene i tidslinjen indeholde en miniature foruden filnavnet; ellers vises kun klippets filnavn.
Når der er zoomet maksimalt ind i tidslinjen, så viser videosporet en miniature af hver frame i klippet. Når der ikke er zoomet maksimalt ind i tidslinjen, så viser videosporet en miniature for første og sidste frame i klippet.
Vis lydminiaturer
Når den er aktiv, så vises en bølgeform, som repræsenterer lydklippet sammen med filnavnet; ellers vises kun filnavnet.
Vis markørkommentarer
Denne knap slår visning af kommentarer til og fra. Kommentarer kan være gemt i markører (teksten med guldfarvet baggrund i eksemplet herunder) og i hjælpelinjer (teksten med violet baggrund).
Hægt
Når denne funktion er aktiv og du trækker starten af et klip hen i nærheden et andet klips ende, så vil det første klip hægte sig på og blive perfekt justeret med det andet klips ende. Når du nærmer de to klips ender til hinanden, så hægter de sig sammen uden tomrum eller overlapning lige så snart de er inden for en vis lille afstand. Bemærk, at dette sker, selv hvis klippene er i forskellige spor i tidslinjen.
Klip vil også hægte sig til tidslinjemarkøren position, til markører og til hjælpelinjer.
Klip materiale fra flere justerede spor - Ripple Delete
Dette findes i menuen under [1]
Findes tilsyneladende ikke i Kdenlive 17.04 & 18.04
Markér start- og slutpunkter i projektmonitoren og vælg så (eller Ctrl-X). Kdenlive sletter alt materiale imellem start- og slutpunkterne i ikke-låste spor, skubber resten tilbage, sådan at hullet fyldes ud og placerer afspilningshovedet på startpunktet.
Subtitle
Since Version 20.12.0
The subtitling tool allows you to add and edit subtitles directly in the timeline on a special subtitle track or by using the new subtitle window. You can also import (SRT/ASS) and export (SRT) subtitles.
There are 3 ways to add subtitle:
- Menu
- Keyboard
- Shift+S adds a subtitle.
- Icon and Mouse
- Click the "subtitle" icon in the timeline toolbar to open the subtitle track in the timeline.
- Double-click in the subtitle track to add a subtitle.
Adding and editing text
Add or editing text either directly into the subtitle clip or in the subtitle window.
Adjust the length of subtitle
Grab the end of a subtitle with the mouse and lengthen or shorten it as needed. Set subtitle in/out can be achieved with the same shortcut as to set clip in/out (left/right parenthesis shortcut).
Subtitle window
- The subtitles window allows easier editing and also makes it possible to easily navigate between subtitles with the left/right button.
- With the plus sign, you can add subtitles.
- The scissors are mostly here for divide subtitles: let's say your subtitle text is too long and you want to make it 2 different subtitles. Put the cursor in the text widget where you want to cut and click the scissors, it will split the text between 2 different subtitle items. The scissors are only working when the playhead is over the subtitle itself.
- The tick adds the text to the subtitle.
Import and export subtitle
Importing SRT and ASS subtitle file:
Exporting SRT subtitles only:

<b>text in boldface</b><i>text in italics</i><u>text underlined</u><font color="#00ff00"> text in green</font>you can use the font tag only to change color.- And all combined: <font color="#00ff00"><b><i><u>All combined</u></i></b></font>
- Line break: Add on the end of each line a
<br>(for break). Now the srt file is stored correct and reopened with the line break. The subtitle in the subtitle window will be all in 1 line after several save but the breaks is working.
Since version 21.04.0
- Spelling check
Spelling check for subtitle is integrated and shows incorrect words by a red wiggly line. Right-click on the word and you get a list of possible words you can choose by click on it.
Speech to text
Since version 21.04.0
- Install Python
Python needs to be installed on your computer. Download it from here https://www.python.org/downloads/ for installation on your computer.
Speech recognition requires the vosk and srt python modules
- On Linux open a terminal and put in and run: "pip3 install vosk;pip3 install srt".
- On Windows, you can download this batch file (File:Install vosk srt.zip). After download double click starts the installations.
- Install a language
Goto
Click on the link to get a language model
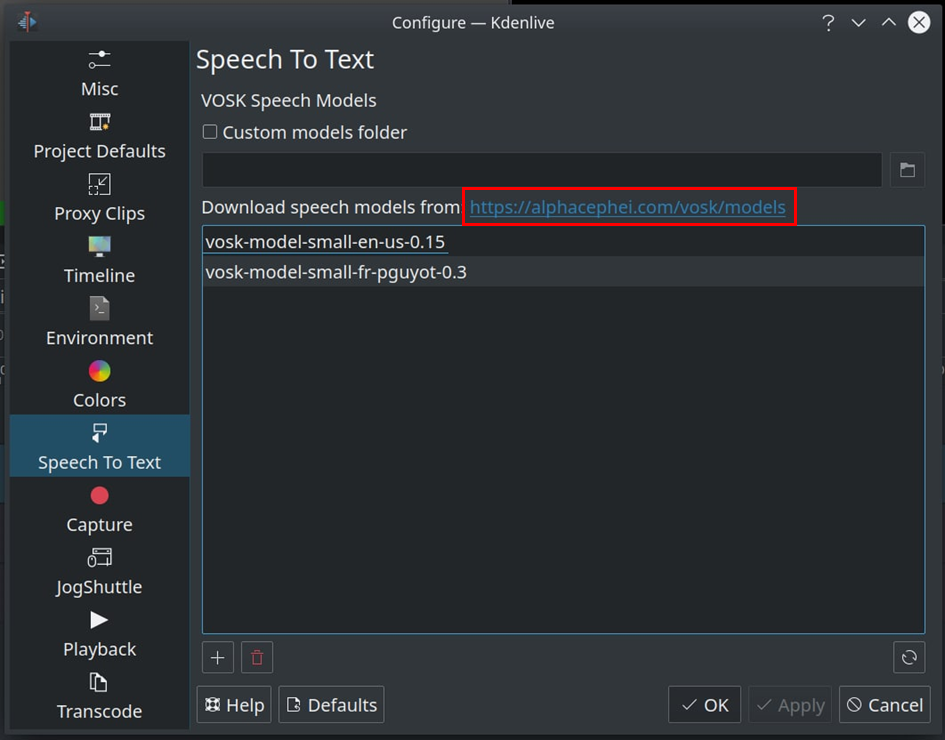
Drag & drop the language you want from the vosk-model download page to the model window, and it will download and extract it for you.
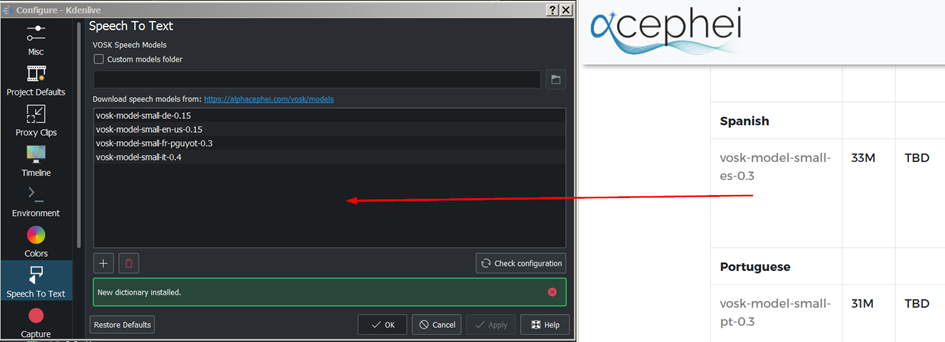
If you have problems click on "Check configuration" button.
Speech recognition
- Creating subtitle by speech recognition
1. Mark the timeline zone you want to recognize (adjust the blue line).
2. Click on the "Speech recognition" icon.
3. Choose the language.
4. Choose how the selected zone should be applied.
5. Click "Process"
The subtitle gets created and inserted automatically.
Remark: Only timeline zone is implemented for now in automatic subtitles.

- Creating clips by speech recognition
This is useful for interviews and other speech-related footage. Enable
Select a clip in the project bin.
1. If needed set in/out point in the clip monitor and enable "selected zone only". This will only recognize the text inside the zone.
2. Choose the correct language
3. Click "start recognition"
4. Selecting the text you want to either
5. Put into the timeline
6. Save as a new clip
7. Add a Bookmark. You can jump to these bookmarks in the timeline with alt+arrow or edit the bookmark by double click.
8. Delete the selection.
9. Here you can search in the text.
10. And navigate up
11. Or down in the text.

3 point editing
Since version 19.08.0
3 important points to understand the 3 point editing concept (with keyboard shortcuts):
Source
- On the left of the track head the green vertical lines (V1 or A2). The green line is connected to the source clip in the project bin. Only when a clip is selected in the project bin, the green line shows up depending on the type of the clip (A/V clip, picture/title/color clip, audio clip).
Target
- In the track head the target V1 or A1 is active when it’s yellow. An active target track reacts to edit operations like insert a clip even if the source is not active.
The concept is like thinking of connectors
- Connect the source (the clip in the project bin) to a target (a track in the timeline). Only when both connectors on the same track are switched on the clip “flow” from the project bin to the timeline.
Be aware
- Active target tracks without connected source react on edit operations.
Example of advanced edit
Here is a brief introduction to the 3 point editing system.
1. Select a clip in the project bin with an up/down arrow
2. Navigate the clip by the JKL keys or by the left/right arrows and set the IN and the OUT point by the I and O keys.
3. Hit T to change to the timeline
4. Select a video or audio track in the timeline (up/down arrow key) and set it as source with Shift+T.
5. Activate the track as a target with shortcut A (this connects the track to the source)
6. Hit V (insert) or B (overwrite) to add the clip at the play-head position or to fill the selected area in the timeline if it is active. If you need to activate it use the G key.
In the following example, we want only to insert the audio part of a clip in A2 and we want to create a gap in all the other video and audio tracks:
1. Activate all the target tracks which contain clips (yellow buttons).
2. Activate just the audio source on A2
3. Press V (insert).
- ↑ tilgængelig i allernyeste versioner > 0.9.10 (januar 2015)


