Archive:Kdenlive/Manual/Timeline/Right Click Menu/da: Difference between revisions
Appearance
Importing a new version from external source |
Updating to match new version of source page |
||
| (53 intermediate revisions by 2 users not shown) | |||
| Line 1: | Line 1: | ||
<languages/> | <languages/> | ||
<span id="Clip_in_Timeline_-_Right-Click_Menu"></span> | |||
==== Klip i tidslinjen - højrekliksmenuen ==== | ==== Klip i tidslinjen - højrekliksmenuen ==== | ||
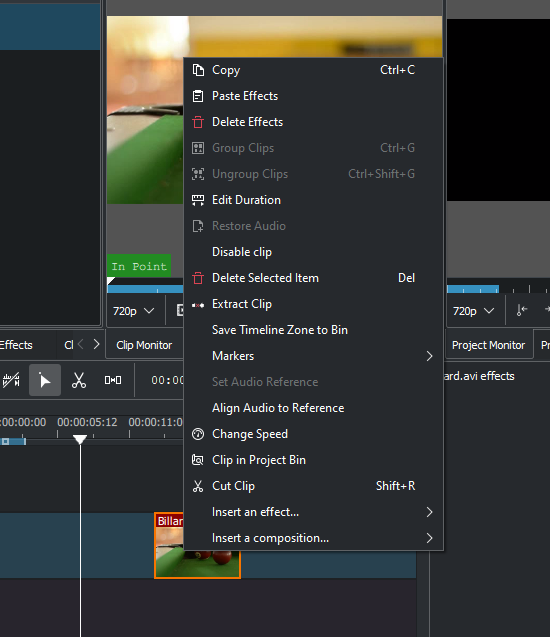
Dette er kontekstmenuen, som dukker op når du højreklikker på et klip i tidslinjen. En anden menu dukker op, hvis du højreklikker på et tomt område i tidslinjen. | Dette er kontekstmenuen, som dukker op når du højreklikker på et klip i tidslinjen. En anden menu dukker op, hvis du højreklikker på et tomt område i tidslinjen. | ||
[[File: | [[File:kdenlive_right-click_on_clip.png]] | ||
<menuchoice>Klip i projekttræ</menuchoice> vil få det valgte klip til at blive fremhævet i projekttræet. | <div class="mw-translate-fuzzy"> | ||
* <menuchoice>Klip i projekttræ</menuchoice> vil få det valgte klip til at blive fremhævet i projekttræet. | |||
* <menuchoice>Slet markerede emne</menuchoice> sletter det/de markerede klip.<!--xxTjekxx--> | |||
</div> | |||
<menuchoice> | * <menuchoice>Paste Effects</menuchoice> will paste only the effects of the last copied clip to the selected clip. See [[Special:myLanguage/Kdenlive/Manual/Edit_Menu/Paste_Effects|Paste Effects]]. | ||
* <menuchoice>Delete Effects</menuchoice> will remove all effects from the selected clip. | |||
* | <div class="mw-translate-fuzzy"> | ||
* Gruppér klip - se [[Special:myLanguage/Kdenlive/Manual/Timeline/Grouping#Groupin|Gruppering]] | |||
</div> | |||
<div class="mw-translate-fuzzy"> | |||
* Afgruppér klip - se [[Special:myLanguage/Kdenlive/Manual/Timeline/Grouping#Groupin|Gruppering]] | |||
</div> | |||
* | * <menuchoice>Edit Duration</menuchoice> - will open the Duration Dialog and will allow you to adjust the position of the clip int he timeline, what time point of the source clip to start on the timeline, the duration of the clip, and what time point of the source clip to end on the timeline. Note that Kdenlive will automatically adjust co-related values. | ||
* | [[File:kdenlive_timeline_current_clip_duration02.png]] | ||
* <menuchoice>Restore audio</menuchoice> will add any audio track that is part of the original clip to the timeline | |||
[[File:Kdenlive-restore-audio.gif|center]] | |||
* <menuchoice>Disable clip</menuchoice> will disable the clip so it will not render in the project monitor or in a final video render. | |||
* <menuchoice>Extract clip</menuchoice> will remove the clip from the timeline and the space it occupied. | |||
[[File:Kdenlive-extract clip.gif|thumb|center]] | |||
* <menuchoice>Save timeline zone to bin</menuchoice> will take the selected timeline zone and add markers to your clips in the project bin. | |||
[[File:Kdenlive-timeline-righ-click-markersmenu.png|thumb|center]] | |||
* The markers sub-menu allows you to add, edit and remove markers from your clips that are displayed on the timeline. These markers will move with the clips. See [[Special:myLanguage/Kdenlive/Manual/Clip_Menu/Markers|Markers]]. | |||
* <menuchoice>Angiv lydreference</menuchoice> og <menuchoice>Justér lyd til reference</menuchoice> bruges til at justere to klip i forskellige spor i tidslinjen baseret på lyden i sporene. Dette er nyttigt, hvis to kameraer optager den samme scene samtidigt. '''Kdenlive''' kan bruge de næsten identiske lydspor til at justere de to klip. | |||
*: For at bruge denne funktion: | |||
*:* Markér det klip du vil justere ind efter. | |||
*:* Højreklik og vælg <menuchoice>Angiv lydreference</menuchoice>. | |||
*:* Markér alle de klip du vil have rettet ind. | |||
*:* Højreklik og vælg <menuchoice>Justér lyd til reference</menuchoice>. | |||
* <menuchoice>Change speed</menuchoice> will open the change speed dialog that will allow you to increase or decrease the playback speed of a clip, allow you to play the clip in reverse, and will enable / disable pitch compensation for the audio on a speed-adjusted clip. | |||
[[File:Kdenlive-change speed dialog.png|thumb|center]] | |||
* <menuchoice>Clip in project bin</menuchoice> will highlight the selected clip in the project bin. | |||
<div class="mw-translate-fuzzy"> | |||
* <menuchoice>Udklik klip</menuchoice>. At vælge dette får det markerede klip til at blive klippet ved [[Special:myLanguage/Kdenlive/Manual/Timeline#Timeline_Cursor.2FPosition_Carat|tidslinjemarkøren]]. Se også [[Special:myLanguage/Kdenlive/Manual/Timeline/Editing#Cutting_a_clip|Beskæring af et klip]] | |||
</div> | |||
<div class="mw-translate-fuzzy"> | |||
* [[Special:myLanguage/Kdenlive/Manual/Transitions|Tilføj overgang]]. | |||
</div> | |||
<div class="mw-translate-fuzzy"> | |||
* [[Special:myLanguage/Special:myLanguage/Kdenlive/Manual/Effects|Tilføj effekt]]. | |||
</div> | |||
<span id="Empty_Space_in_Timeline_-_Right-Click_Menu"></span> | |||
==== Tomme områder i tidslinjen - højrekliksmenu ==== | |||
En anden menu dukker op, hvis du klikker i et tomt område i tidslinjen. | |||
[[File:kdenlive_right-click_in_timeline_space.png]] | |||
* <menuchoice>Paste</menuchoice> will paste a clip from the clipboard into the timeline | |||
* <menuchoice>Insert Space</menuchoice> will open the Insert Space dialog and will allow you to insert blank space in the timeline in a single track. | |||
* <menuchoice>Remove Space</menuchoice> will remove all space between clips on the track. | |||
* <menuchoice>Remove Space in All Tracks</menuchoice> will remove space between clips on all the tracks. | |||
* <menuchoice>Add/Remove Guide</menuchoice> will add a guide to the timeline. | |||
* <menuchoice>Edit Guide</menuchoice> will allow you to edit the guide label. | |||
* <menuchoice>Go to Guide</menuchoice> will pop-up a sub-menu with a list of your guides and will move the timeline position marker to that guide. | |||
* <menuchoice>Insert composition</menuchoice> will open a sub-menu to allow you to quickly add the [[Special:myLanguage/Kdenlive/Manual/Transitions/CompositeAndTransform|composite and transform]] or the [[Special:myLangauge/Kdenlive/Manual/Transitions/Wipe|Wipe]] composition | |||
{{Prevnext2 | {{Prevnext2 | ||
| prevpage=Special:MyLanguage/Kdenlive/Manual/Timeline/Guides | nextpage=Special:MyLanguage/Kdenlive/Manual/Effects_And_Transitions | | prevpage=Special:MyLanguage/Kdenlive/Manual/Timeline/Guides | nextpage=Special:MyLanguage/Kdenlive/Manual/Effects_And_Transitions | ||
| prevtext= | | prevtext=Hjælpelinjer | nexttext=Alfabetisk liste over effekter og overgange | ||
| index=Special:MyLanguage/Kdenlive/Manual | indextext=Back to menu | | index=Special:MyLanguage/Kdenlive/Manual | indextext=Back to menu | ||
}} | }} | ||
[[Category:Kdenlive]] | [[Category:Kdenlive/da]] | ||
Latest revision as of 13:08, 15 August 2023
Dette er kontekstmenuen, som dukker op når du højreklikker på et klip i tidslinjen. En anden menu dukker op, hvis du højreklikker på et tomt område i tidslinjen.
- vil få det valgte klip til at blive fremhævet i projekttræet.
- sletter det/de markerede klip.
- will paste only the effects of the last copied clip to the selected clip. See Paste Effects.
- will remove all effects from the selected clip.
- Gruppér klip - se Gruppering
- Afgruppér klip - se Gruppering
- - will open the Duration Dialog and will allow you to adjust the position of the clip int he timeline, what time point of the source clip to start on the timeline, the duration of the clip, and what time point of the source clip to end on the timeline. Note that Kdenlive will automatically adjust co-related values.
- will add any audio track that is part of the original clip to the timeline
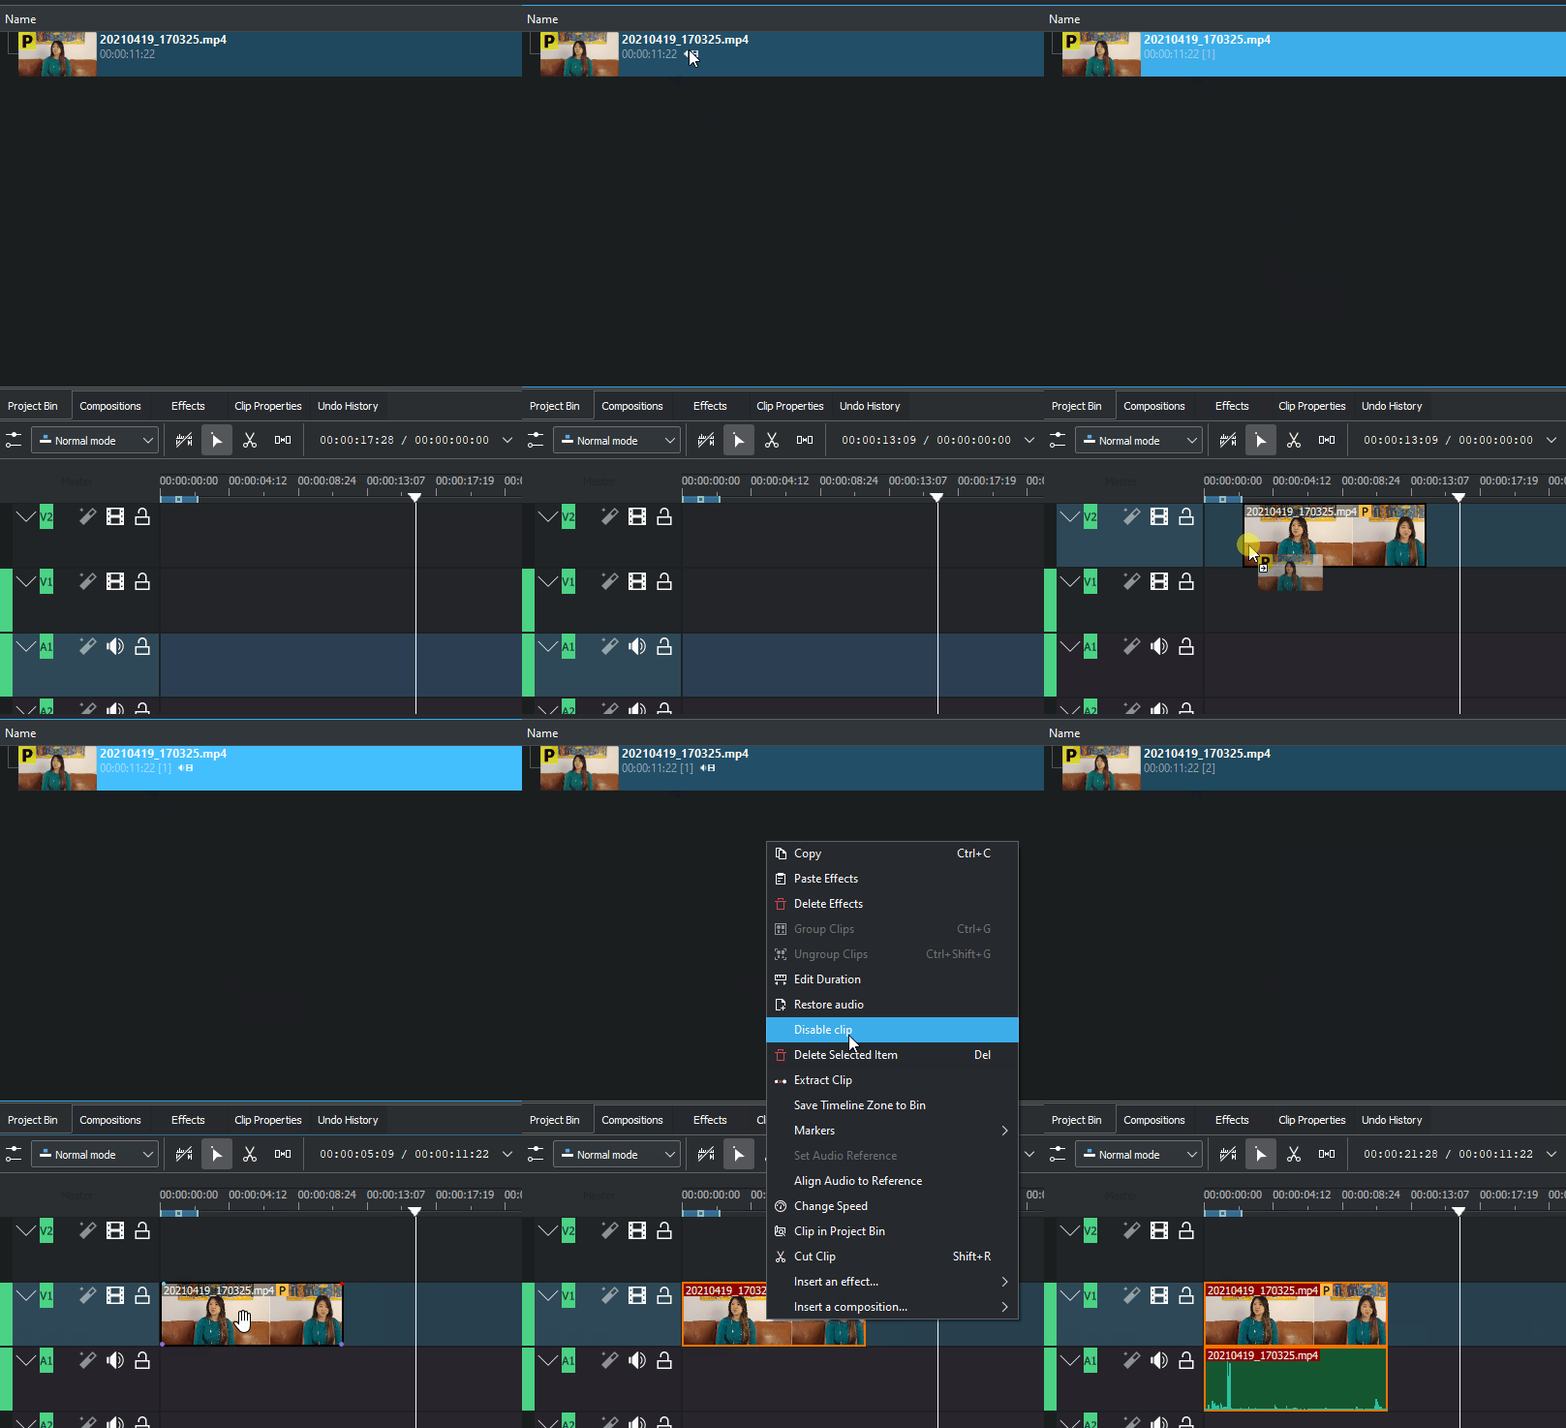
- will disable the clip so it will not render in the project monitor or in a final video render.
- will remove the clip from the timeline and the space it occupied.
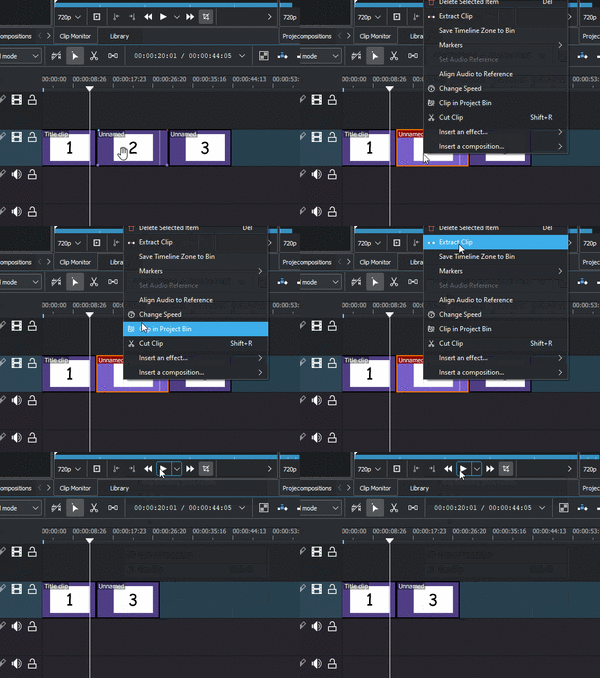
- will take the selected timeline zone and add markers to your clips in the project bin.
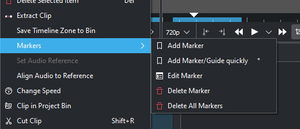
- The markers sub-menu allows you to add, edit and remove markers from your clips that are displayed on the timeline. These markers will move with the clips. See Markers.
- og bruges til at justere to klip i forskellige spor i tidslinjen baseret på lyden i sporene. Dette er nyttigt, hvis to kameraer optager den samme scene samtidigt. Kdenlive kan bruge de næsten identiske lydspor til at justere de to klip.
- For at bruge denne funktion:
- Markér det klip du vil justere ind efter.
- Højreklik og vælg .
- Markér alle de klip du vil have rettet ind.
- Højreklik og vælg .
- For at bruge denne funktion:
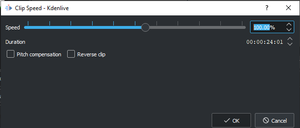
- will open the change speed dialog that will allow you to increase or decrease the playback speed of a clip, allow you to play the clip in reverse, and will enable / disable pitch compensation for the audio on a speed-adjusted clip.
- will highlight the selected clip in the project bin.
- . At vælge dette får det markerede klip til at blive klippet ved tidslinjemarkøren. Se også Beskæring af et klip
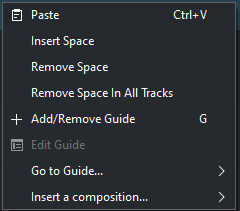
En anden menu dukker op, hvis du klikker i et tomt område i tidslinjen.
- will paste a clip from the clipboard into the timeline
- will open the Insert Space dialog and will allow you to insert blank space in the timeline in a single track.
- will remove all space between clips on the track.
- will remove space between clips on all the tracks.
- will add a guide to the timeline.
- will allow you to edit the guide label.
- will pop-up a sub-menu with a list of your guides and will move the timeline position marker to that guide.
- will open a sub-menu to allow you to quickly add the composite and transform or the Wipe composition

