Kdenlive/Manual/Project Menu/Create Folder: Difference between revisions
No edit summary |
m formatting |
||
| (One intermediate revision by one other user not shown) | |||
| Line 2: | Line 2: | ||
<translate> | <translate> | ||
==== | ==== Create Folder ==== <!--T:1--> | ||
<!--T:2--> | <!--T:2--> | ||
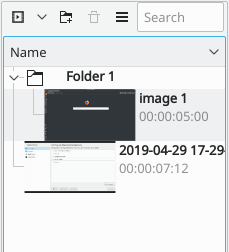
There are three ways to access a menu containing this option: from the [[Special:myLanguage/Kdenlive/Manual/Project_Menu|Project]] menu, the [[Special:myLanguage/Kdenlive/Manual/Projects_and_Files/Clips#Clips_.28Video.2C_Audio_and_Images.29|Add Clip]] dropdown on the Project Tree toolbar or by right-clicking on a clip in the Project Tree. This menu item creates a folder in the Project Tree. It is a virtual folder, not one created on your hard disk. You can use this feature to organize your Project Tree when it gets very large or complex by placing clips in folders, which can then be collapsed to free up space in the tree. Existing clips in the Project Tree can be moved to a folder using drag and drop. New clips can be added directly to a folder by first selecting the folder (or any clip in the folder) and then choosing an add clip option from one of the dropdown menus described above. | |||
<!--T:3--> | <!--T:3--> | ||
[[File:Kdenlive Create folder.png]] | [[File:Kdenlive Create folder.png|center]] | ||
<!--T:4--> | <!--T:4--> | ||
Latest revision as of 16:53, 1 May 2019
Create Folder
There are three ways to access a menu containing this option: from the Project menu, the Add Clip dropdown on the Project Tree toolbar or by right-clicking on a clip in the Project Tree. This menu item creates a folder in the Project Tree. It is a virtual folder, not one created on your hard disk. You can use this feature to organize your Project Tree when it gets very large or complex by placing clips in folders, which can then be collapsed to free up space in the tree. Existing clips in the Project Tree can be moved to a folder using drag and drop. New clips can be added directly to a folder by first selecting the folder (or any clip in the folder) and then choosing an add clip option from one of the dropdown menus described above.

Click on the text Folder to the right of the icon to edit the name of the folder.
