Phonon/Handbook: Difference between revisions
No edit summary |
mNo edit summary |
||
| (15 intermediate revisions by 2 users not shown) | |||
| Line 1: | Line 1: | ||
<languages /> | |||
<translate> | |||
<!--T:1--> | |||
[[File:Phonon-logo.png]] | |||
[[Phonon]] is a multimedia, multi-platform sound framework for the application developer. This | <!--T:2--> | ||
[[Special:myLanguage/Phonon|Phonon]] is a multimedia, multi-platform sound framework for the application developer. This short guide aims to document the various options available in the System Settings. Out of the box, the default settings should be suitable for most users, however there are configuration available for users who have particular hardware or multiple pieces of multimedia equipment. | |||
<!--T:3--> | |||
Revision 0.1 | Revision 0.1 | ||
<!--T:4--> | |||
Refers to Phonon Configuration Module 4.11.2 | Refers to Phonon Configuration Module 4.11.2 | ||
=== Access the settings === | === Access the settings === <!--T:5--> | ||
The Phonon Configuration Module can be accessed through | <!--T:6--> | ||
The Phonon Configuration Module can be accessed through <menuchoice>System Settings -> Multimedia ->Audio and Video Settings</menuchoice>. | |||
[[File:Phonon-Configure.png]] | <!--T:7--> | ||
[[File:Phonon-Configure.png|500px]] | |||
It is divided into 3 tabs, | <!--T:8--> | ||
It is divided into 3 tabs, <menuchoice>Device Preference</menuchoice>, <menuchoice>Audio Hardware Setup</menuchoice> and <menuchoice>Backend</menuchoice>. Settings need to be applied before they take effect. | |||
=== Device Preference === | === Device Preference === <!--T:9--> | ||
<!--T:10--> | |||
[[FIle:Phonon-preferences.png|500px]] | |||
<!--T:11--> | |||
Device preference allows you to set a sequential list of audio devices which will be tried in sequence. The first device in the list for a particular category of audio or video event will be attempted, and if that device is not available, the next device will be attempted, etc. | Device preference allows you to set a sequential list of audio devices which will be tried in sequence. The first device in the list for a particular category of audio or video event will be attempted, and if that device is not available, the next device will be attempted, etc. | ||
The | <!--T:12--> | ||
The <menuchoice>Prefer</menuchoice> and <menuchoice>Deny</menuchoice> buttons can be used to order the items, as well as simply dragging and dropping the list. You can use the <menuchoice>Apply Device List To</menuchoice> button to copy preferences to other categories. | |||
You can also test audio and video devices with the | <!--T:13--> | ||
You can also test audio and video devices with the <menuchoice>Test</menuchoice> button when a device on the right is selected. Note that the test button is a toggle. | |||
=== Audio Hardware Setup === | === Audio Hardware Setup === <!--T:14--> | ||
<!--T:15--> | |||
[[File:Phonon-Audio-Hardware.png|500px]] | [[File:Phonon-Audio-Hardware.png|500px]] | ||
In this tab, you can modify the profiles for sound cards and control the connector that is used for sound devices, as well as view the input levels in real time. You can change the input and output formats, such as analog or digital, surround or stereo. It is also possible to disable the device entirely by setting the profile to | <!--T:16--> | ||
In this tab, you can modify the profiles for sound cards and control the connector that is used for sound devices, as well as view the input levels in real time. You can change the input and output formats, such as analog or digital, surround or stereo. It is also possible to disable the device entirely by setting the profile to <menuchoice>Off</menuchoice>. | |||
<!--T:17--> | |||
The connector should default to speakers and automatically change to headphones if it is plugged in. However, you may adjust it to play through the speakers with headphones plugged in. | The connector should default to speakers and automatically change to headphones if it is plugged in. However, you may adjust it to play through the speakers with headphones plugged in. | ||
The | <!--T:18--> | ||
When a playback device is selected, the speaker placement and testing module is a group of buttons to help you place multiple speakers in the appropriate positions. Pressing a button will emit a sound clip from the specified speaker. | |||
<!--T:19--> | |||
When a recording device is selected, the input level is shown in real time. The levels cannot be set through this panel, and instead can be set through the '''KDE Mixer'''. | |||
=== Backends === | === Backends === <!--T:20--> | ||
<!--T:21--> | |||
[[File:Phonon-backends.png|500px]] | [[File:Phonon-backends.png|500px]] | ||
You can control which backends are used by Phonon. Available backends supported by Phonon will show up in the list. One of the purposes of Phonon is that the developer does not have to manage which backend | <!--T:22--> | ||
You can control which backends are used by Phonon. Available backends supported by Phonon will show up in the list. Phonon will attempt to use the first backend in the list, and if that fails, continue down the list until one is working. The first backend is generally what is used. One of the purposes of Phonon is that the developer does not have to manage which backend is selected. | |||
Additional configuration options are available for certain backends. | <!--T:23--> | ||
Alternate backends need to be installed by the user to show up, and a restart of '''System Settings''' is needed. Additional configuration options are available for certain backends, which will show up in the bottom panel once you have it selected. | |||
<!--T:24--> | |||
[[Category:Multimedia]] | [[Category:Multimedia]] | ||
[[Category:Tutorials]] | [[Category:Tutorials]] | ||
[[Category:Advanced Users]] | |||
</translate> | |||
Latest revision as of 16:29, 21 December 2013
Phonon is a multimedia, multi-platform sound framework for the application developer. This short guide aims to document the various options available in the System Settings. Out of the box, the default settings should be suitable for most users, however there are configuration available for users who have particular hardware or multiple pieces of multimedia equipment.
Revision 0.1
Refers to Phonon Configuration Module 4.11.2
Access the settings
The Phonon Configuration Module can be accessed through .
It is divided into 3 tabs, , and . Settings need to be applied before they take effect.
Device Preference
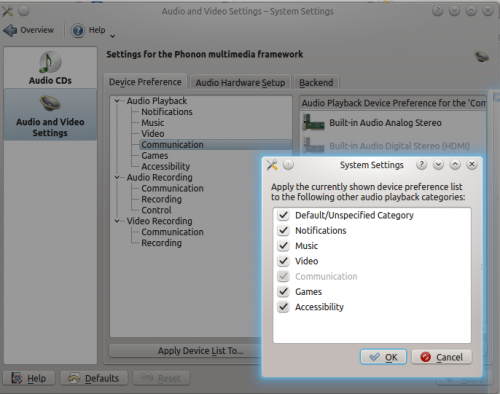
Device preference allows you to set a sequential list of audio devices which will be tried in sequence. The first device in the list for a particular category of audio or video event will be attempted, and if that device is not available, the next device will be attempted, etc.
The and buttons can be used to order the items, as well as simply dragging and dropping the list. You can use the button to copy preferences to other categories.
You can also test audio and video devices with the button when a device on the right is selected. Note that the test button is a toggle.
Audio Hardware Setup
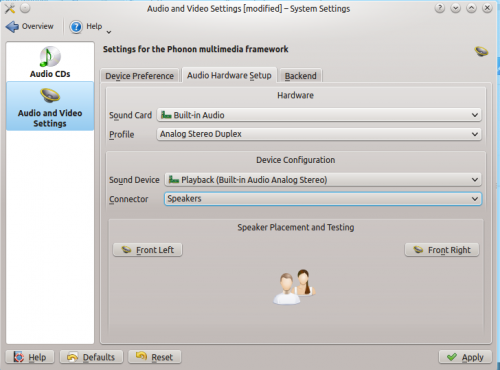
In this tab, you can modify the profiles for sound cards and control the connector that is used for sound devices, as well as view the input levels in real time. You can change the input and output formats, such as analog or digital, surround or stereo. It is also possible to disable the device entirely by setting the profile to .
The connector should default to speakers and automatically change to headphones if it is plugged in. However, you may adjust it to play through the speakers with headphones plugged in.
When a playback device is selected, the speaker placement and testing module is a group of buttons to help you place multiple speakers in the appropriate positions. Pressing a button will emit a sound clip from the specified speaker.
When a recording device is selected, the input level is shown in real time. The levels cannot be set through this panel, and instead can be set through the KDE Mixer.
Backends
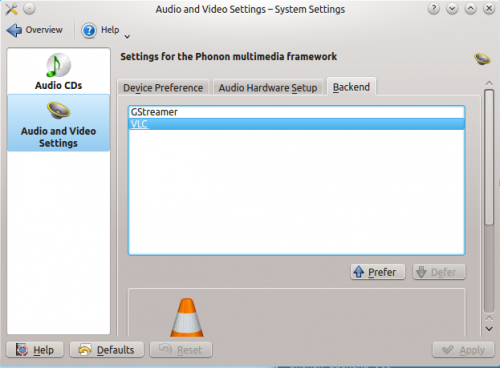
You can control which backends are used by Phonon. Available backends supported by Phonon will show up in the list. Phonon will attempt to use the first backend in the list, and if that fails, continue down the list until one is working. The first backend is generally what is used. One of the purposes of Phonon is that the developer does not have to manage which backend is selected.
Alternate backends need to be installed by the user to show up, and a restart of System Settings is needed. Additional configuration options are available for certain backends, which will show up in the bottom panel once you have it selected.


