Klipper/pt-br: Difference between revisions
Created page with "'''Klipper é a sua área de transferência turbinada'''" |
Updating to match new version of source page |
||
| (11 intermediate revisions by 2 users not shown) | |||
| Line 2: | Line 2: | ||
{|class="tablecenter vertical-centered" | {|class="tablecenter vertical-centered" | ||
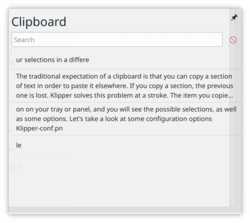
|[[Image:Klipper2.png|250px]]|| ||'''Klipper é a sua área de transferência | |[[Image:Klipper2.png|250px]]|| ||'''Klipper é a sua área de transferência com recursos adicionais''' | ||
|} | |} | ||
A expectativa que se tem de uma área de transferência é a possibilidade de copiar um trecho de texto e depois colá-lo em algum lugar. No entanto, ao copiar um novo trecho, o anterior será perdido. O '''Klipper''' resolve esse problema de uma só vez. O último item copiado ainda será o padrão a ser colado, mas os outros ainda ficarão armazenados, de forma que possam ser usados na ordem que quiser. Até mesmo a quantidade de itens armazenados pode ser configurada! Clique no ícone na área de notificação para visualizar as seleções possíveis, assim como algumas opções. Vejamos algumas das opções de configuração. | |||
{{Note|Within Plasma there are two different buffers. One is the ''clipboard'' and the other is the ''selection''. The ''clipboard'' buffer is filled when you press <keycap>Ctrl + X</keycap> or <keycap>Ctrl + C</keycap> and pasted by using <keycap>Ctrl + V</keycap>. The ''selection'' buffer is filled by simply marking some text and pasted by pressing the middle mouse button. Having said that it is important to know that Klipper can be configured to hold both buffers.}} | |||
<div class="mw-translate-fuzzy"> | |||
{|class="vertical-centered" | {|class="vertical-centered" | ||
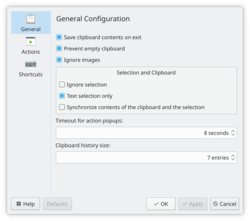
|[[Image:Klipper-conf.png|thumb|250px]]|| || | |[[Image:Klipper-conf.png|thumb|250px]]|| ||Provavelmente os dois itens mais importantes da aba <menuchoice>Geral</menuchoice> estão relacionados à possibilidade de iniciar a área de transferência sem nenhuma informação ou armazenar o conteúdo em todas as sessões; e também <menuchoice>sincronizar</menuchoice> o conteúdo da área de transferência com a seleção. O significado disso não parece óbvio num primeiro momento, mas uma explicação mais ampla está disponível no Manual. Você precisa entender isso, pois a escolha errada parecerá frustrante. | ||
|} | |} | ||
</div> | |||
<div class="mw-translate-fuzzy"> | |||
{|class="vertical-centered" | {|class="vertical-centered" | ||
|[[Image:Klipper-actions.png|thumb|250px]]|| || | |[[Image:Klipper-actions.png|thumb|250px]]|| ||Se gosta de criar scripts ou trabalha com programação, esta seção é para você. As ações baseadas em expressões regulares poder ser definidas aqui. | ||
|} | |} | ||
</div> | |||
{|class="vertical-centered" | {|class="vertical-centered" | ||
|[[Image:Klipper-shortcuts.png|thumb|250px]]|| || | |[[Image:Klipper-shortcuts.png|thumb|250px]]|| ||Aqui podem ser personalizados os atalhos existentes. No momento, não é possível criar atalhos adicionais. | ||
|} | |} | ||
<div class="mw-translate-fuzzy"> | |||
O ''Manual'' está disponível a partir do item específico do menu Ajuda. | |||
</div> | |||
== Tutorial == | == Tutorial == | ||
| Line 24: | Line 33: | ||
* [[Special:myLanguage/Klipper/Pastebins|Klipper can send your clips straight to a paste-bin]] | * [[Special:myLanguage/Klipper/Pastebins|Klipper can send your clips straight to a paste-bin]] | ||
== | <div class="mw-translate-fuzzy"> | ||
== Links externos == | |||
* http://linux-blog.org/make-klipper-work-for-you/ | * http://linux-blog.org/make-klipper-work-for-you/ | ||
</div> | |||
Klipper can be accessed from the command line using ''xclip'' . To copy to the ctl+C/V buffer use ''xclip -selection clipboard'' | |||
[[Category: | [[Category:Utilitários/pt-br]] | ||
[[Category: | [[Category:Sistema/pt-br]] | ||
Latest revision as of 06:44, 11 November 2022
 |
Klipper é a sua área de transferência com recursos adicionais |
A expectativa que se tem de uma área de transferência é a possibilidade de copiar um trecho de texto e depois colá-lo em algum lugar. No entanto, ao copiar um novo trecho, o anterior será perdido. O Klipper resolve esse problema de uma só vez. O último item copiado ainda será o padrão a ser colado, mas os outros ainda ficarão armazenados, de forma que possam ser usados na ordem que quiser. Até mesmo a quantidade de itens armazenados pode ser configurada! Clique no ícone na área de notificação para visualizar as seleções possíveis, assim como algumas opções. Vejamos algumas das opções de configuração.
 |
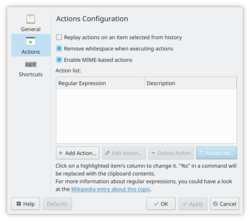
Se gosta de criar scripts ou trabalha com programação, esta seção é para você. As ações baseadas em expressões regulares poder ser definidas aqui. |
 |
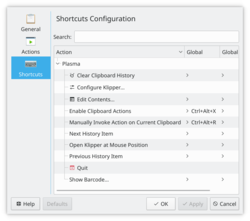
Aqui podem ser personalizados os atalhos existentes. No momento, não é possível criar atalhos adicionais. |
O Manual está disponível a partir do item específico do menu Ajuda.
Tutorial
Links externos
Klipper can be accessed from the command line using xclip . To copy to the ctl+C/V buffer use xclip -selection clipboard


