Kubuntu/Installation/el: Difference between revisions
Updating to match new version of source page |
Updating to match new version of source page |
||
| (5 intermediate revisions by the same user not shown) | |||
| Line 2: | Line 2: | ||
<languages /> | <languages /> | ||
==Why try Kubuntu? == | |||
== | |||
There are many good reasons to install '''Kubuntu''', such as: | |||
*'''Kubuntu''' makes your PC easier to use. | |||
*'''Kubuntu''' is an operating system built by a friendly worldwide team of expert developers. It contains all the applications you need, including a web browser, office suite, media apps, instant messaging, in addition to many others. For a list of the included software, see the [[Special:myLanguage/Kubuntu/Software|Software]] page. | |||
* | *'''Kubuntu''' is a free, open-source alternative to Windows and Mac OS X. | ||
* | *It can be easily installed alongside, or instead of, Windows. | ||
* | |||
* | |||
==Preparing the installation media== | ==Preparing the installation media== | ||
| Line 19: | Line 14: | ||
=== Checking the MD5SUM === | === Checking the MD5SUM === | ||
Doing this will | Doing this will ensure that your download is complete and that it has given you a fully working ISO to boot, which can be later installed from. | ||
==== From Windows XP -> 7 -> 8 -> 10 ==== | ==== From Windows XP -> 7 -> 8 -> 10 ==== | ||
Microsoft Windows does not have any built in tools for MD5SUM but they do provide | Microsoft Windows does not have any built-in tools for MD5SUM but they do provide [https://support.microsoft.com/en-us/kb/841290 a tool] for checking the MD5SUM. How-To-Geek also provides some information regarding MD5SUM [http://www.howtogeek.com/67241/htg-explains-what-are-md5-sha-1-hashes-and-how-do-i-check-them reading material] or [https://cygwin.com/install.html Cygwin] can be installed and UNIX utilities used instead. | ||
==== From Mac OS X ==== | ==== From Mac OS X ==== | ||
Open the Terminal app, then navigate to the directory where the ISO is saved. Run: | |||
{{Input|1=<nowiki> md5 -r kubuntu-15.10-desktop-amd64.iso </nowiki>}} | |||
And compare the output to the hashes page for the ISO file. | |||
List of UbuntuHashes can be found here: https://help.ubuntu.com/community/UbuntuHashes | |||
List of UbuntuHashes: https://help.ubuntu.com/community/UbuntuHashes | |||
==== From Ubuntu Linux ==== | ==== From Ubuntu Linux ==== | ||
| Line 44: | Line 34: | ||
The first thing to do is to make sure you're in the directory with the .iso file (It will most likely be found in the Downloads directory). Then run the command 'md5sum': For more a more detailed explanation of MD5SUM: [https://help.ubuntu.com/community/HowToMD5SUM ] | The first thing to do is to make sure you're in the directory with the .iso file (It will most likely be found in the Downloads directory). Then run the command 'md5sum': For more a more detailed explanation of MD5SUM: [https://help.ubuntu.com/community/HowToMD5SUM ] | ||
md5sum kubuntu-15.10-desktop-amd64.iso | {{Input|1=<nowiki> md5sum kubuntu-15.10-desktop-amd64.iso </nowiki>}} | ||
===Windows 7/8=== | ===Windows 7/8=== | ||
| Line 50: | Line 40: | ||
====USB/Flash Drives==== | ====USB/Flash Drives==== | ||
For a GUI (Graphic User Interface) we use [ | For a GUI (Graphic User Interface) we use [https://unetbootin.github.io/ UNetBootin]. | ||
You can use UNetBootin to download the ISO(image file) automatically or it can be downloaded | You can use UNetBootin to download the ISO(image file) automatically or it can be downloaded: [http://www.kubuntu.org/getkubuntu/ Get Kubuntu]. | ||
If you choose the 'Diskimage' option you use the <menuchoice>...</menuchoice> button to select your downloaded ISO. Then click <menuchoice>OK</menuchoice>. | If you choose the 'Diskimage' option you use the <menuchoice>...</menuchoice> button to select your downloaded ISO. Then click <menuchoice>OK</menuchoice>. | ||
[[Image:unetbootin-win8.png|thumb|500px|center|UNetBootin Windows 8]] | [[Image:unetbootin-win8.png|thumb|500px|center|UNetBootin Windows 8]] | ||
{{Warning| Pay special attention when selecting the right USB device under 'Drive'}} | {{Warning| Pay special attention when selecting the right USB device under 'Drive'.}} | ||
====DVD==== | ====DVD==== | ||
The recommended tool for you to use is [ | The recommended tool for you to use is [http://www.imgburn.com/ ImgBurn]. | ||
There is an excellent tutorial written by the Admin on the ImgBurn forums. It can be found [http://forum.imgburn.com/index.php?/topic/61-how-to-write-an-image-file-to-a-disc-using-imgburn/ here]. | |||
===Existing Kubuntu Install=== | ===Existing Kubuntu Install=== | ||
====USB/Flash Drives==== | ====USB/Flash Drives==== | ||
For a GUI (Graphic User Interface) we use [ | For a GUI (Graphic User Interface) we use [https://unetbootin.github.io/ UNetBootin]. | ||
You can use UNetBootin to download the ISO(image file) automatically or it can be downloaded here: [http://www.kubuntu.org/getkubuntu/ | You can use UNetBootin to download the ISO(image file) automatically or it can be downloaded here: [http://www.kubuntu.org/getkubuntu/ Get Kubuntu]. | ||
Using the command line we use the 'dd' command. | Using the command line we use the 'dd' command. | ||
| Line 81: | Line 71: | ||
====DVD==== | ====DVD==== | ||
For making a DVD we recommend this KDE tool [https://userbase.kde.org/K3b | For making a DVD we recommend this KDE tool called k3b, which can be found [https://userbase.kde.org/K3b here.] | ||
[[Image:K3b.png|thumb|500px|center|K3b]] | [[Image:K3b.png|thumb|500px|center|K3b]] | ||
Look for <menuchoice>More actions...</menuchoice>, click it then pick <menuchoice>Burn Image...</menuchoice> from the list of actions. | Look for <menuchoice>More actions...</menuchoice>, click it and then pick <menuchoice>Burn Image...</menuchoice> from the list of actions. | ||
[[Image:K3b-1.png|thumb|500px|center|K3b Image Selection]] | [[Image:K3b-1.png|thumb|500px|center|K3b Image Selection]] | ||
| Line 91: | Line 81: | ||
Then you select the image (iso) that you want to burn to the DVD from your computer. | Then you select the image (iso) that you want to burn to the DVD from your computer. | ||
{{Note| Most torrent and browsers store your downloads in the 'Download' directory.}} | {{Note| Most torrent clients and browsers store your downloads in the 'Download' directory.}} | ||
{{Note| Most of the default | {{Note| Most of the default settings for K3b for DVD burning do not require any changes.}} | ||
===Other Linux Distributions=== | ===Other Linux Distributions=== | ||
| Line 101: | Line 91: | ||
=====USB/Flash Drives===== | =====USB/Flash Drives===== | ||
For a GUI (Graphic User Interface) we use [ | For a GUI (Graphic User Interface) we use [https://unetbootin.github.io/ UNetBootin]. | ||
You can use UNetBootin to download the ISO(image file) automatically or it can be downloaded | You can use UNetBootin to download the ISO(image file) automatically or it can be downloaded through [http://www.kubuntu.org/getkubuntu/ Get Kubuntu]. | ||
=====DVD===== | =====DVD===== | ||
| Line 113: | Line 101: | ||
====KDE based==== | ====KDE based==== | ||
If | If you're using a Linux Distribution that uses KDE you can follow the [[Special:MyLanguage/Kubuntu/Installation#Existing_Kubuntu_Install|Kubuntu instructions]] as K3b is provided in every KDE based distribution. | ||
===Διαδικασία εγκατάστασης=== | ===Διαδικασία εγκατάστασης=== | ||
First, you will need to download '''Kubuntu'''. See [http://www.kubuntu.org/getkubuntu/ Get Kubuntu] | |||
{{Note|You will need to press a special key on the keyboard in order to boot from your chosen Installation Media. Ex: Esc, F2, F10, F12, or Del , depending on the OEM(Original Equipment Manufacturer)}} | {{Note|You will need to press a special key on the keyboard in order to boot from your chosen Installation Media. Ex: Esc, F2, F10, F12, or Del , depending on the OEM (Original Equipment Manufacturer).}} | ||
[[Image:Welcome_15-10.png|thumb|500px|center|Install Welcome Screen]] | |||
[[Image: | <br clear=all> | ||
<br clear=all> | When the installer starts you will see these options: | ||
* Try out '''Kubuntu''' without changing anything on your computer. | |||
* | * Install '''Kubuntu''' on your computer. | ||
* | |||
====Προετοιμασία==== | ====Προετοιμασία==== | ||
| Line 134: | Line 120: | ||
* Ο υπολογιστής σας είναι συνδεδεμένος στο διαδίκτυο έτσι ώστε να μπορείτε να λάβετε ενημερώσεις και λογισμικό από τρίτους όσο το το '''Kubuntu''' εγκαθίσταται. | * Ο υπολογιστής σας είναι συνδεδεμένος στο διαδίκτυο έτσι ώστε να μπορείτε να λάβετε ενημερώσεις και λογισμικό από τρίτους όσο το το '''Kubuntu''' εγκαθίσταται. | ||
[[Image:Prepare-15_10.png|thumb|600px|center|Install Prepare Screen]] | |||
[[Image: | |||
<br clear=all> | <br clear=all> | ||
Η <menuchoice>Εγκατάσταση αυτού του λογισμικού τρίτων</menuchoice> περιέχει λογισμικό που είτε δεν ακολουθεί το μοντέλο ανοιχτού λογισμικού είτε τη [http://www.ubuntu.com/about/about-ubuntu/our-philosophy Φιλοσοφία του Ubuntu], αλλά είναι ασφαλές για χρήση στον υπολογιστή σας. | Η <menuchoice>Εγκατάσταση αυτού του λογισμικού τρίτων</menuchoice> περιέχει λογισμικό που είτε δεν ακολουθεί το μοντέλο ανοιχτού λογισμικού είτε τη [http://www.ubuntu.com/about/about-ubuntu/our-philosophy Φιλοσοφία του Ubuntu], αλλά είναι ασφαλές για χρήση στον υπολογιστή σας. | ||
| Line 149: | Line 133: | ||
Οι ακόλουθες ενότητες αποτελούν μερικά από τα διάφορα σενάρια εγκατάστασης που μπορείτε να επιλέξετε. Κάθε μια από αυτές τις ενότητες δείχνει σε μια ή περισσότερες σελίδες με περαιτέρω λεπτομέρειες. Για κάθε επιλογή (εκτός της Διαχείρισης με το χέρι), ο εγκαταστάτης ρωτά ποιον δίσκο να χρησιμοποιήσει. Μετά την επιλογή, θα δείτε τη διάταξη του δίσκου πριν και μετά. | Οι ακόλουθες ενότητες αποτελούν μερικά από τα διάφορα σενάρια εγκατάστασης που μπορείτε να επιλέξετε. Κάθε μια από αυτές τις ενότητες δείχνει σε μια ή περισσότερες σελίδες με περαιτέρω λεπτομέρειες. Για κάθε επιλογή (εκτός της Διαχείρισης με το χέρι), ο εγκαταστάτης ρωτά ποιον δίσκο να χρησιμοποιήσει. Μετά την επιλογή, θα δείτε τη διάταξη του δίσκου πριν και μετά. | ||
=====Resize===== | |||
==== | This will resize the partitions for you and install '''Kubuntu''' on the free space. With this option, you can create what is called a dual-boot and choose which OS to boot into at startup. | ||
{{Note|This is available only if at least 25GB are free.}} | |||
{{Note | |||
=====Use entire disk===== | |||
===== | Using this option the installer will create two partitions on your hard drive; one for most of the content, including the root and home directories, and one partition for the swap. | ||
[[Image:Disksetup-15_10.png|thumb|600px|center|Entire Disk option]] | [[Image:Disksetup-15_10.png|thumb|600px|center|Entire Disk option]] | ||
| Line 167: | Line 145: | ||
{{Warning-el|Η επιλογή αυτή θα σβήσει εντελώς τον σκληρό σας δίσκο. Θα χάσετε οποιοδήποτε λειτουργικό (Windows, Mac OS X, Linux, κλπ.) και όλα τα δεδομένα που βρίσκονται σε αυτόν τον δίσκο.}} | {{Warning-el|Η επιλογή αυτή θα σβήσει εντελώς τον σκληρό σας δίσκο. Θα χάσετε οποιοδήποτε λειτουργικό (Windows, Mac OS X, Linux, κλπ.) και όλα τα δεδομένα που βρίσκονται σε αυτόν τον δίσκο.}} | ||
=====Use entire disk and set up LVM===== | |||
===== | More about [https://wiki.ubuntu.com/Lvm LVM] | ||
=====Use entire disk and set up encrypted LVM===== | |||
===== | More about [https://help.ubuntu.com/community/EncryptedFilesystems encrypted file systems] | ||
=====Manual===== | |||
===== | When using <menuchoice>Manual</menuchoice> to set up your system as you would like it, keep these thoughts in mind: | ||
[[Image:Disksetup_part2-15_10.png|thumb|600px|center|Manually setting up your hard drive]] | [[Image:Disksetup_part2-15_10.png|thumb|600px|center|Manually setting up your hard drive]] | ||
* | * The root ( '''/''' ) directory needs at least 25 GB of space. | ||
* | * The home ( '''/home''' ) directory needs as much space as you will need for your files, music, pictures, and documents. So it is best to use the remaining space for the home partition, unless you are going to have a dual boot. | ||
* | * Swap space of at least half of the available RAM is recommended. For instance, with 8 GB of RAM, you should make the swap have at least 4 GB. | ||
{{Note|If you have a Windows 8 sticker on your machine you might need to make a separate EFI partition with a fat32 filesystem.}} | {{Note|If you have a Windows 8 sticker on your machine you might need to make a separate EFI partition with a fat32 filesystem.}} | ||
| Line 192: | Line 164: | ||
Για πιο λεπτομερείς πληροφορίες σχετικά με τη ρύθμιση του δίσκου ενός συστήματος linux μπορείτε να δείτε τη σελίδα [https://help.ubuntu.com/community/DiskSpace Χώρος δίσκου]. | Για πιο λεπτομερείς πληροφορίες σχετικά με τη ρύθμιση του δίσκου ενός συστήματος linux μπορείτε να δείτε τη σελίδα [https://help.ubuntu.com/community/DiskSpace Χώρος δίσκου]. | ||
==== Timezone ==== | |||
=== | During this step you get to pick the Region where you live and then the Timezone of the location in that Region. An example would be that I live in New York, so my Region is North America and my Timezone is New York (EST). | ||
[[Image:Timezone-15_10.png|thumb|600px|center|Setting your timezone]] | |||
[[Image: | |||
==== Keyboard ==== | |||
==== | This is the step that will set up your keyboard's language or, if applicable, a different version of the language. For example, there is a Cherokee American English setting as well as different setups with special keys used in certain languages; in '''Kubuntu''' we try to make the use of the system easy for everyone! | ||
[[Image:Keyboard-15_10.png|thumb|600px|center|Keyboard Screen]] | |||
[[Image: | |||
==== Πληροφορίες χρήστη ==== | ==== Πληροφορίες χρήστη ==== | ||
Σε αυτό το βήμα της εγκατάστασης θα εισάγετε πληροφορίες χρήστη όπως το όνομά σας, το όνομα χρήστη και τον κωδικό πρόσβασης. Ο κωδικός πρόσβασης θα αποτελεί το κλειδί για να συνδέεστε στη νέα σας εγκατάσταση όπως επίσης και για να εγκαθιστάτε νέο λογισμικό, να ενημερώνετε το σύστημά σας, και πολλά άλλα, για αυτό σημειώστε τον κάπου! | Σε αυτό το βήμα της εγκατάστασης θα εισάγετε πληροφορίες χρήστη όπως το όνομά σας, το όνομα χρήστη και τον κωδικό πρόσβασης. Ο κωδικός πρόσβασης θα αποτελεί το κλειδί για να συνδέεστε στη νέα σας εγκατάσταση όπως επίσης και για να εγκαθιστάτε νέο λογισμικό, να ενημερώνετε το σύστημά σας, και πολλά άλλα, για αυτό σημειώστε τον κάπου! | ||
[[Image:Userinfo-15_10.png|thumb|600px|center|Entering your username, password, and hostname]] | |||
[[Image: | |||
[[Special:myLanguage/Kubuntu| Επιστροφή στην αρχική σελίδα του Kubuntu]] | [[Special:myLanguage/Kubuntu| Επιστροφή στην αρχική σελίδα του Kubuntu]] | ||
[[Category:Kubuntu/el]] | [[Category:Kubuntu/el]] | ||
Latest revision as of 16:10, 29 May 2019
Why try Kubuntu?
There are many good reasons to install Kubuntu, such as:
- Kubuntu makes your PC easier to use.
- Kubuntu is an operating system built by a friendly worldwide team of expert developers. It contains all the applications you need, including a web browser, office suite, media apps, instant messaging, in addition to many others. For a list of the included software, see the Software page.
- Kubuntu is a free, open-source alternative to Windows and Mac OS X.
- It can be easily installed alongside, or instead of, Windows.
Preparing the installation media
Checking the MD5SUM
Doing this will ensure that your download is complete and that it has given you a fully working ISO to boot, which can be later installed from.
From Windows XP -> 7 -> 8 -> 10
Microsoft Windows does not have any built-in tools for MD5SUM but they do provide a tool for checking the MD5SUM. How-To-Geek also provides some information regarding MD5SUM reading material or Cygwin can be installed and UNIX utilities used instead.
From Mac OS X
Open the Terminal app, then navigate to the directory where the ISO is saved. Run:
md5 -r kubuntu-15.10-desktop-amd64.iso
And compare the output to the hashes page for the ISO file.
List of UbuntuHashes can be found here: https://help.ubuntu.com/community/UbuntuHashes
From Ubuntu Linux
The first thing to do is to make sure you're in the directory with the .iso file (It will most likely be found in the Downloads directory). Then run the command 'md5sum': For more a more detailed explanation of MD5SUM: [1]
md5sum kubuntu-15.10-desktop-amd64.iso
Windows 7/8
USB/Flash Drives
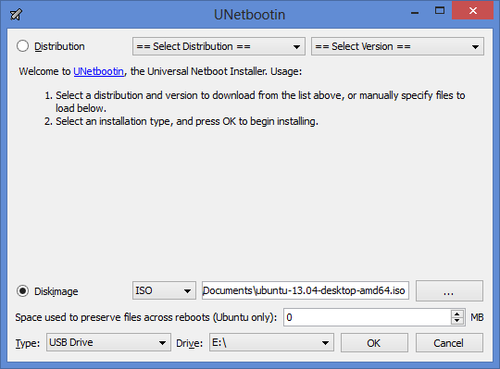
For a GUI (Graphic User Interface) we use UNetBootin.
You can use UNetBootin to download the ISO(image file) automatically or it can be downloaded: Get Kubuntu.
If you choose the 'Diskimage' option you use the button to select your downloaded ISO. Then click .
DVD
The recommended tool for you to use is ImgBurn. There is an excellent tutorial written by the Admin on the ImgBurn forums. It can be found here.
Existing Kubuntu Install
USB/Flash Drives
For a GUI (Graphic User Interface) we use UNetBootin.
You can use UNetBootin to download the ISO(image file) automatically or it can be downloaded here: Get Kubuntu.
Using the command line we use the 'dd' command.
Insert your USB drive into your computer and find the corresponding drive using:
lsblk
Then format the USB drive with the 'dd' command:
sudo dd if=Downloads/kubuntu-15.04-desktop-amd64.iso of=/dev/sdX
DVD
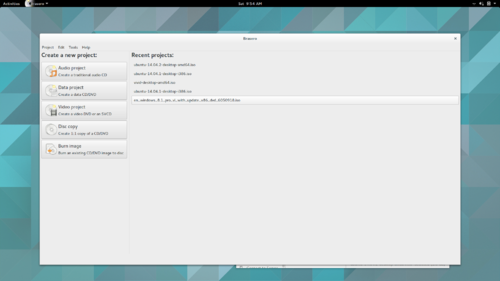
For making a DVD we recommend this KDE tool called k3b, which can be found here.

Look for , click it and then pick from the list of actions.
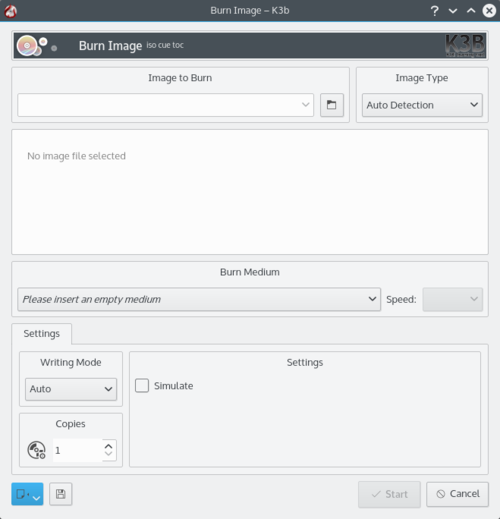
Then you select the image (iso) that you want to burn to the DVD from your computer.
Other Linux Distributions
GNOME based
USB/Flash Drives
For a GUI (Graphic User Interface) we use UNetBootin.
You can use UNetBootin to download the ISO(image file) automatically or it can be downloaded through Get Kubuntu.
DVD
KDE based
If you're using a Linux Distribution that uses KDE you can follow the Kubuntu instructions as K3b is provided in every KDE based distribution.
Διαδικασία εγκατάστασης
First, you will need to download Kubuntu. See Get Kubuntu
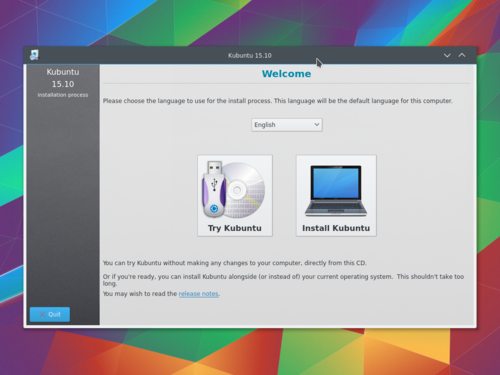
When the installer starts you will see these options:
- Try out Kubuntu without changing anything on your computer.
- Install Kubuntu on your computer.
Προετοιμασία
Για το καλύτερο αποτέλεσμα, σιγουρευτείτε ότι:
- Ο υπολογιστής σας έχει αρκετό χώρο για το Kubuntu και τα δεδομένα σας - τα τραγούδια σας, τις φωτογραφίες, τα βίντεο και τα έγγραφα.
- Ο υπολογιστής σας είναι συνδεδεμένος στο διαδίκτυο έτσι ώστε να μπορείτε να λάβετε ενημερώσεις και λογισμικό από τρίτους όσο το το Kubuntu εγκαθίσταται.
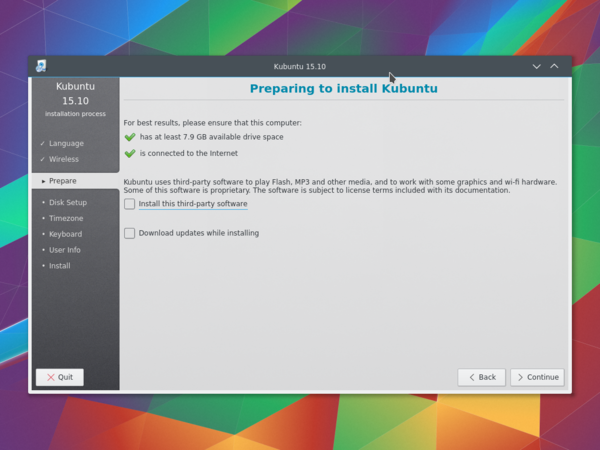
Η περιέχει λογισμικό που είτε δεν ακολουθεί το μοντέλο ανοιχτού λογισμικού είτε τη Φιλοσοφία του Ubuntu, αλλά είναι ασφαλές για χρήση στον υπολογιστή σας.
Η θα εξασφαλίσει ότι οι τελευταίες επιδιορθώσεις σφαλμάτων και ασφαλείας θα έχουν περιληφθεί και εφαρμοστεί όταν η εγκατάσταση θα έχει ολοκληρωθεί.
Εγκατάσταση στο δίσκο
Εδώ είναι που επιλέγετε πώς να οργανώσετε τον σκληρό σας δίσκο. Το βήμα αυτό είναι το πιο περίπλοκο και το πιο σοβαρό σε όλη τη διαδικασία της εγκατάστασης, για αυτό πάρτε τον χρόνο σας.
Οι ακόλουθες ενότητες αποτελούν μερικά από τα διάφορα σενάρια εγκατάστασης που μπορείτε να επιλέξετε. Κάθε μια από αυτές τις ενότητες δείχνει σε μια ή περισσότερες σελίδες με περαιτέρω λεπτομέρειες. Για κάθε επιλογή (εκτός της Διαχείρισης με το χέρι), ο εγκαταστάτης ρωτά ποιον δίσκο να χρησιμοποιήσει. Μετά την επιλογή, θα δείτε τη διάταξη του δίσκου πριν και μετά.
Resize
This will resize the partitions for you and install Kubuntu on the free space. With this option, you can create what is called a dual-boot and choose which OS to boot into at startup.
Use entire disk
Using this option the installer will create two partitions on your hard drive; one for most of the content, including the root and home directories, and one partition for the swap.
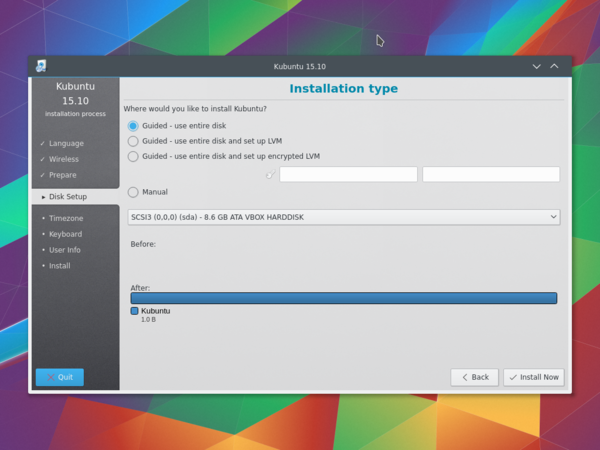
Use entire disk and set up LVM
More about LVM
Use entire disk and set up encrypted LVM
More about encrypted file systems
Manual
When using to set up your system as you would like it, keep these thoughts in mind:
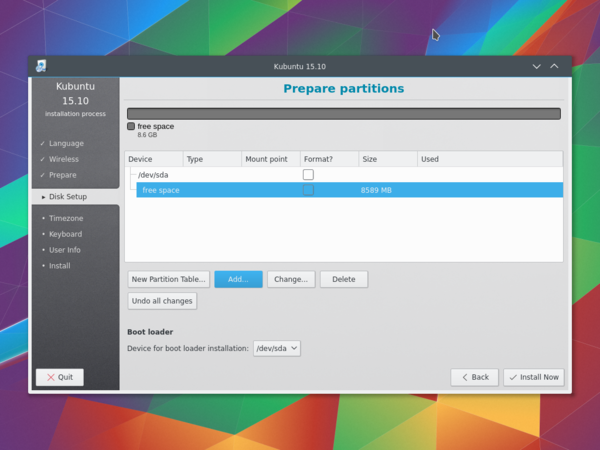
- The root ( / ) directory needs at least 25 GB of space.
- The home ( /home ) directory needs as much space as you will need for your files, music, pictures, and documents. So it is best to use the remaining space for the home partition, unless you are going to have a dual boot.
- Swap space of at least half of the available RAM is recommended. For instance, with 8 GB of RAM, you should make the swap have at least 4 GB.
Για πιο λεπτομερείς πληροφορίες σχετικά με τη ρύθμιση του δίσκου ενός συστήματος linux μπορείτε να δείτε τη σελίδα Χώρος δίσκου.
Timezone
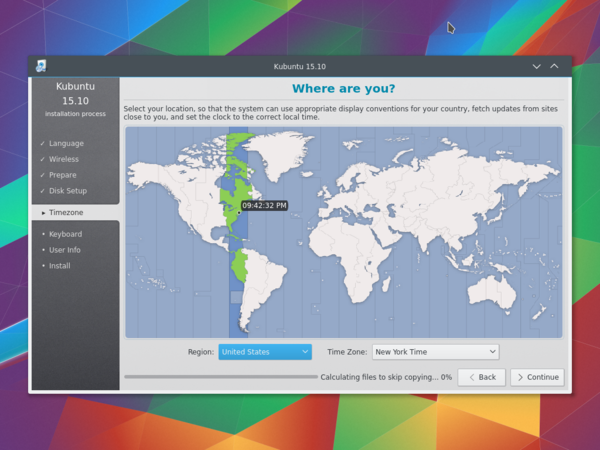
During this step you get to pick the Region where you live and then the Timezone of the location in that Region. An example would be that I live in New York, so my Region is North America and my Timezone is New York (EST).
Keyboard
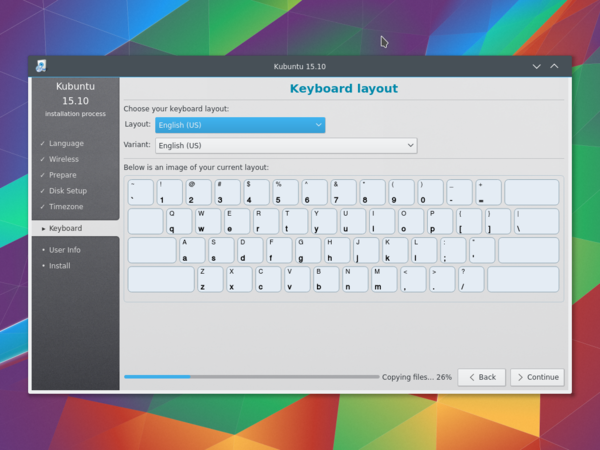
This is the step that will set up your keyboard's language or, if applicable, a different version of the language. For example, there is a Cherokee American English setting as well as different setups with special keys used in certain languages; in Kubuntu we try to make the use of the system easy for everyone!
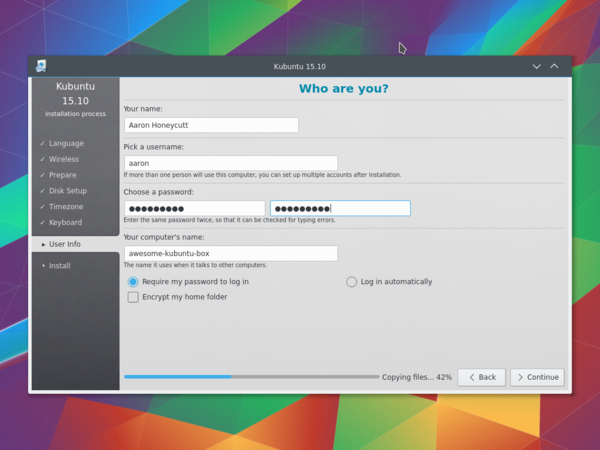
Πληροφορίες χρήστη
Σε αυτό το βήμα της εγκατάστασης θα εισάγετε πληροφορίες χρήστη όπως το όνομά σας, το όνομα χρήστη και τον κωδικό πρόσβασης. Ο κωδικός πρόσβασης θα αποτελεί το κλειδί για να συνδέεστε στη νέα σας εγκατάσταση όπως επίσης και για να εγκαθιστάτε νέο λογισμικό, να ενημερώνετε το σύστημά σας, και πολλά άλλα, για αυτό σημειώστε τον κάπου!
