Discover/en: Difference between revisions
Importing a new version from external source |
Updating to match new version of source page |
||
| (21 intermediate revisions by the same user not shown) | |||
| Line 5: | Line 5: | ||
[[File:Discoverfront.png | 900px]] | [[File:Discoverfront.png | 900px]] | ||
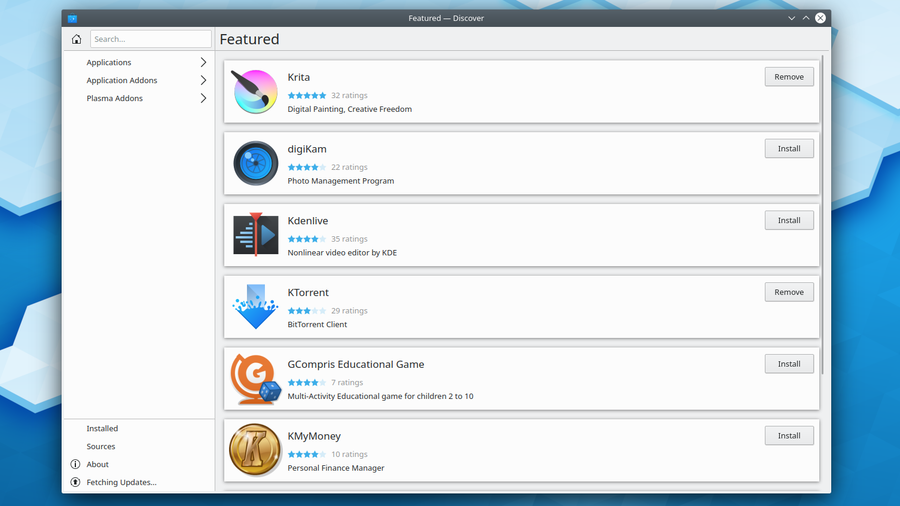
Discover is your new one stop shop for all things app- and addon-related. Designed from the ground up to be easily handled by users as well as easily integrated for distributions. A place where skill level isn't blocking | '''Discover''' is your new one-stop shop for all things app- and addon-related. Designed from the ground up to be easily handled by users as well as easily integrated for distributions. A place where skill level isn't blocking you from executing the action you want, in this case installing new apps and add-ons! | ||
Discover was redesigned from the ground up to make the experience of | '''Discover''' was redesigned from the ground up to make the experience of using intuitive and clear. We've based the work on the new Kirigami-technology, new app delivery technologies as well as the safe repository system to create an application for any distribution and any skill level - an application that is as much a joy to use as to provide to your users. | ||
===What Discover is=== | ===What Discover is=== | ||
Discover is intended for users and distros where the terminal isn't the optimal solution for installation of apps and add-ons or updates. Where we want something intuitive and simple to use and above all safe to use. | '''Discover''' is intended for users and distros where the terminal isn't the optimal solution for the installation of apps and add-ons or updates. Where we want something intuitive and simple to use and above all safe to use. | ||
We've all been there, someone has copy pasted commands from some website and suddenly they destroyed their entire installation. From a | We've all been there, someone has copy-pasted commands from some website and suddenly they destroyed their entire installation. From a user perspective, especially a new user or a casual user this is disastrous and they will not be able to easily discern where the fault is: this shady website or your distro. | ||
With Discover the focus is to empower | With '''Discover''' the focus is to empower you to browse, test, install apps and update the installation without fear of disastrous misspellings and where trust is given, not taken. | ||
===What Discover isn't=== | ===What Discover isn't=== | ||
Discover may be much but it is not an | '''Discover''' may be much but it is not an expert application for minute control of repos. It is not a replacement intended to compete with the terminal for experienced expert users. Our goal has been to focus clearer on a certain set of users where an application such as this is not only needed but critical to their usage. To do this we have excluded other user groups entirely from the application goals. This doesn't mean they can't use '''Discover''' just that their specific use cases may not be perfectly covered. | ||
Discover is not perfectly "child safe". It will never be something with which you can force the hand of the user, we believe in empowerment and try to guide | '''Discover''' is not perfectly "child-safe". It will never be something with which you can force the hand of the user, we believe in empowerment and try to guide users through safe choices, but never force them into action. Do not expect '''Discover''' to remove those options from your users. | ||
==How to use Discover== | ==How to use Discover== | ||
Discover is made for usage - it was made to be intuitive. So try it out and see for yourself. | '''Discover''' is made for usage - it was made to be intuitive. So try it out and see for yourself. | ||
===How to search for applications=== | ===How to search for applications=== | ||
The easiest way to search for an app is to simply start typing in the name or what the app is intended to do. The search field will always be selected by default and the only times it | The easiest way to search for an app is to simply start typing in the name or what the app is intended to do. The search field will always be selected by default and the only times it is nothing will happen, the search field is greyed out and when you click it you are brought back to the application search. So don't be scared of the keyboard! | ||
The search is always performed within the category you are currently in (this is also indicated in the placeholder text of the search field), so be sure to navigate to the category you want to search in before entering your search term. | The search is always performed within the category you are currently in (this is also indicated in the placeholder text of the search field), so be sure to navigate to the category you want to search in before entering your search term. | ||
| Line 36: | Line 36: | ||
If you just want to browse or feel unclear on what the application name is or how to best define it in text simply click either "Applications", "Plasma Add-ons", or "Application Add-ons". You will find complete applications in the "Applications" category, Plasma widgets and extensions in "Plasma Add-ons" and extensions for your apps like snippets for coding apps in Application Add-ons. | If you just want to browse or feel unclear on what the application name is or how to best define it in the text simply click either "Applications", "Plasma Add-ons", or "Application Add-ons". You will find complete applications in the "Applications" category, Plasma widgets and extensions in "Plasma Add-ons" and extensions for your apps like snippets for coding apps in Application Add-ons. | ||
Let's focus on complete applications for now! Below you can see the category tree that is displayed when you click "Applications". Whenever you want to go back, the "Back" button underneath the search field and | Let's focus on complete applications for now! Below you can see the category tree that is displayed when you click "Applications". Whenever you want to go back, the "Back" button underneath the search field and at the top of the categories will bring you back to the previous section! From this list of six categories, you can go deeper into some categories to display subcategories by clicking them. | ||
| Line 44: | Line 44: | ||
By clicking "back" you can always reach the starting point. From here you can continue searching freely. In the column in the middle/to the right in the application you have all installable apps or extensions. When you click them a third column on the right will open with | By clicking "back" you can always reach the starting point. From here you can continue searching freely. In the column in the middle/to the right in the application, you have all installable apps or extensions. When you click them a third column on the right will open with detailed info about that application or extension as it is available. You can now scroll through the list and click other apps to display detailed information about them. To remove the right-hand column click on one of the categories in the left column to bring you back to the beginning of your search. | ||
Now try to resize the window. See what happens? '''Discover''', using Kirigami the widget library for convergent apps will react and change to the size of the screen you have available. Try resizing it to about the size of a cellphone. It reshapes to better fit that size. | |||
Now to you sitting on a computer, this means that if you have a smaller screen the right column will cover the center to give you the user more visual space for the application you chose to get more information on. To get back from that simply hit the back button in the left column! | |||
Now to you sitting on a computer this means that if you have a smaller screen the right column will cover the center to give you the user more visual space for the application you chose to get more information on. To get back from that simply hit the back button in the left column! | |||
===How to install applications=== | ===How to install applications=== | ||
Installing an application is easy! When you've found the application that you want, simply click the "Install" button in the middle column and it will begin to install. If you are checking out the detailed information like the image below, you can also click "Install" in the bottom right of the right hand column. | Installing an application is easy! When you've found the application that you want, simply click the "Install" button in the middle column and it will begin to install. If you are checking out the detailed information like the image below, you can also click "Install" in the bottom right of the right-hand column. | ||
[[File:Discoverappfocus.png | 500px]] | [[File:Discoverappfocus.png | 500px]] | ||
Installation with Discover is just as simple as that. | Sometimes applications are available from different sources like the repo, [https://en.wikipedia.org/wiki/Snap_(package_manager) snap] or [https://en.wikipedia.org/wiki/Flatpak flatpak]. In this case, right to the '''Install''' button there is a '''Sources''' button. Clicking on this button will give you the option to change the source from which you want to install. In the "Preferences" section you can choose which source to be used as the default source. | ||
[[File:Discover_select_source_de.png | 500px]] | |||
Installation with '''Discover''' is just as simple as that. | |||
===How to uninstall applications=== | ===How to uninstall applications=== | ||
| Line 67: | Line 69: | ||
[[File:Discoveruninstalling.png | 500px]] | [[File:Discoveruninstalling.png | 500px]] | ||
You can also easily click "Installed" in the left hand column to see all applications and extensions you have installed in your system! That way you can simply scroll through the entire list and look for the app or extensions you wish to uninstall and with ease click "remove". That's all that's needed! | You can also easily click "Installed" in the left-hand column to see all applications and extensions you have installed in your system! That way you can simply scroll through the entire list and look for the app or extensions you wish to uninstall and with ease click "remove". That's all that's needed! | ||
[[File:Discoveruninstall.png | 500px]] | [[File:Discoveruninstall.png | 500px]] | ||
| Line 73: | Line 75: | ||
===How to upgrade applications=== | ===How to upgrade applications=== | ||
Linux distributions come with upgrades, new releases of apps and system details, bugfixes and improvements. To be able to keep your system up to date and safe Discover has made it easier for you to upgrade. When the update section | Linux distributions come with upgrades, new releases of apps and system details, bugfixes and improvements. To be able to keep your system up to date and safe '''Discover''' has made it easier for you to upgrade. When the update section at the bottom of the left column is bright yellow, which means that you have updates waiting for you. Just click it and you will be moved to this screen (you can as usual simply click in another area in the left column to leave it) | ||
[[File:Discoverupdatelist.png | 500px]] | [[File:Discoverupdatelist.png | 500px]] | ||
In the list you can see all the software that will be updated when you click "Update" at the top right. You can click each individual row to get further information about it. | In the list, you can see all the software that will be updated when you click "Update" at the top right. You can click each individual row to get further information about it. | ||
If something is not to your liking, simply uncheck it on the left of the name of the software and it will be held back from the update. | If something is not to your liking, simply uncheck it on the left of the name of the software and it will be held back from the update. | ||
==How to master Discover== | ==How to master Discover== | ||
In this section we will bring up how to handle upgrades, repositories and how to file bugs. | In this section, we will bring up how to handle upgrades, repositories, and how to file bugs. | ||
===How to handle repositories=== | ===How to handle repositories=== | ||
To enable or disable repositories go to the "Settings" screen. Simply check the box, if you want the repositories to be available on your computer. Sometimes applications are available from different sources like the repo, snap or flatpak. By clicking on "Make default" you chose which source to be used as the default source, if an application is available via different sources. Clicking the "Software Sources" button leads you to an more advanced tool to handle your repositories. | |||
[[File:Discoverhandlerepos.png | 500px]] | [[File:Discoverhandlerepos.png | 500px]] | ||
| Line 92: | Line 94: | ||
===How to check for Upgrades manually=== | ===How to check for Upgrades manually=== | ||
Sometimes you may want to check the system for updates manually. Discover will check for you automatically, but perhaps you are waiting for something good and want to look to make sure it hasn't arrived yet. In that case go to " | Sometimes you may want to check the system for updates manually. '''Discover''' will check for you automatically, but perhaps you are waiting for something good and want to look to make sure it hasn't arrived yet. In that case, go to "Updates" in the left column and click on "Check for updates" on the top right. | ||
[[File:Discoverupdate.png | 500px]] | [[File:Discoverupdate.png | 500px]] | ||
| Line 102: | Line 104: | ||
===Navigating with the keyboard=== | ===Navigating with the keyboard=== | ||
While usually the user will be interacting with Discover by using the | While usually, the user will be interacting with '''Discover''' by using the mouse or touch interfaces, it's also possible to navigate it by using the keyboard. | ||
Here's some useful default key combinations: | Here's some useful default key combinations: | ||
Latest revision as of 17:23, 23 June 2021
Welcome to Discover
An Application Installer for the 22nd Century
Discover is your new one-stop shop for all things app- and addon-related. Designed from the ground up to be easily handled by users as well as easily integrated for distributions. A place where skill level isn't blocking you from executing the action you want, in this case installing new apps and add-ons!
Discover was redesigned from the ground up to make the experience of using intuitive and clear. We've based the work on the new Kirigami-technology, new app delivery technologies as well as the safe repository system to create an application for any distribution and any skill level - an application that is as much a joy to use as to provide to your users.
What Discover is
Discover is intended for users and distros where the terminal isn't the optimal solution for the installation of apps and add-ons or updates. Where we want something intuitive and simple to use and above all safe to use.
We've all been there, someone has copy-pasted commands from some website and suddenly they destroyed their entire installation. From a user perspective, especially a new user or a casual user this is disastrous and they will not be able to easily discern where the fault is: this shady website or your distro.
With Discover the focus is to empower you to browse, test, install apps and update the installation without fear of disastrous misspellings and where trust is given, not taken.
What Discover isn't
Discover may be much but it is not an expert application for minute control of repos. It is not a replacement intended to compete with the terminal for experienced expert users. Our goal has been to focus clearer on a certain set of users where an application such as this is not only needed but critical to their usage. To do this we have excluded other user groups entirely from the application goals. This doesn't mean they can't use Discover just that their specific use cases may not be perfectly covered.
Discover is not perfectly "child-safe". It will never be something with which you can force the hand of the user, we believe in empowerment and try to guide users through safe choices, but never force them into action. Do not expect Discover to remove those options from your users.
How to use Discover
Discover is made for usage - it was made to be intuitive. So try it out and see for yourself.
How to search for applications
The easiest way to search for an app is to simply start typing in the name or what the app is intended to do. The search field will always be selected by default and the only times it is nothing will happen, the search field is greyed out and when you click it you are brought back to the application search. So don't be scared of the keyboard!
The search is always performed within the category you are currently in (this is also indicated in the placeholder text of the search field), so be sure to navigate to the category you want to search in before entering your search term.
If you just want to browse or feel unclear on what the application name is or how to best define it in the text simply click either "Applications", "Plasma Add-ons", or "Application Add-ons". You will find complete applications in the "Applications" category, Plasma widgets and extensions in "Plasma Add-ons" and extensions for your apps like snippets for coding apps in Application Add-ons.
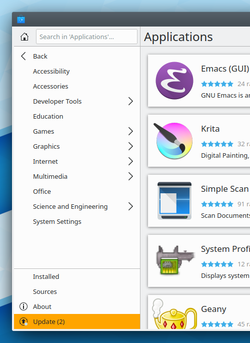
Let's focus on complete applications for now! Below you can see the category tree that is displayed when you click "Applications". Whenever you want to go back, the "Back" button underneath the search field and at the top of the categories will bring you back to the previous section! From this list of six categories, you can go deeper into some categories to display subcategories by clicking them.
By clicking "back" you can always reach the starting point. From here you can continue searching freely. In the column in the middle/to the right in the application, you have all installable apps or extensions. When you click them a third column on the right will open with detailed info about that application or extension as it is available. You can now scroll through the list and click other apps to display detailed information about them. To remove the right-hand column click on one of the categories in the left column to bring you back to the beginning of your search.
Now try to resize the window. See what happens? Discover, using Kirigami the widget library for convergent apps will react and change to the size of the screen you have available. Try resizing it to about the size of a cellphone. It reshapes to better fit that size.
Now to you sitting on a computer, this means that if you have a smaller screen the right column will cover the center to give you the user more visual space for the application you chose to get more information on. To get back from that simply hit the back button in the left column!
How to install applications
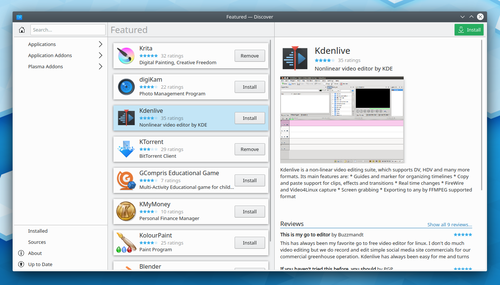
Installing an application is easy! When you've found the application that you want, simply click the "Install" button in the middle column and it will begin to install. If you are checking out the detailed information like the image below, you can also click "Install" in the bottom right of the right-hand column.
Sometimes applications are available from different sources like the repo, snap or flatpak. In this case, right to the Install button there is a Sources button. Clicking on this button will give you the option to change the source from which you want to install. In the "Preferences" section you can choose which source to be used as the default source.
Installation with Discover is just as simple as that.
How to uninstall applications
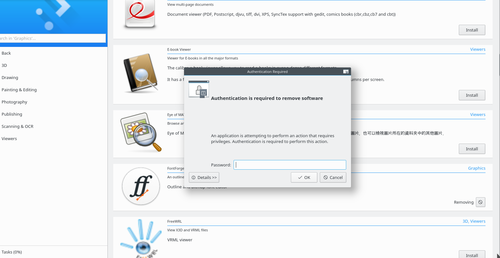
To uninstall apps is just as easy as installing them. Simply find the application that you wish to uninstall in the normal manner - you can note that it has "remove" instead of "install" in the little button next to it. Then click it! All you have to do then is fill in your password and the application is removed directly without fuss.
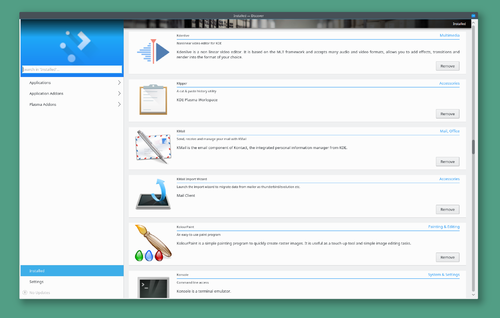
You can also easily click "Installed" in the left-hand column to see all applications and extensions you have installed in your system! That way you can simply scroll through the entire list and look for the app or extensions you wish to uninstall and with ease click "remove". That's all that's needed!
How to upgrade applications
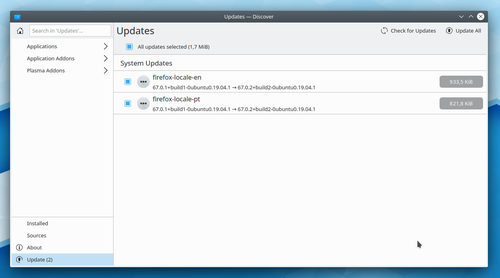
Linux distributions come with upgrades, new releases of apps and system details, bugfixes and improvements. To be able to keep your system up to date and safe Discover has made it easier for you to upgrade. When the update section at the bottom of the left column is bright yellow, which means that you have updates waiting for you. Just click it and you will be moved to this screen (you can as usual simply click in another area in the left column to leave it)
In the list, you can see all the software that will be updated when you click "Update" at the top right. You can click each individual row to get further information about it. If something is not to your liking, simply uncheck it on the left of the name of the software and it will be held back from the update.
How to master Discover
In this section, we will bring up how to handle upgrades, repositories, and how to file bugs.
How to handle repositories
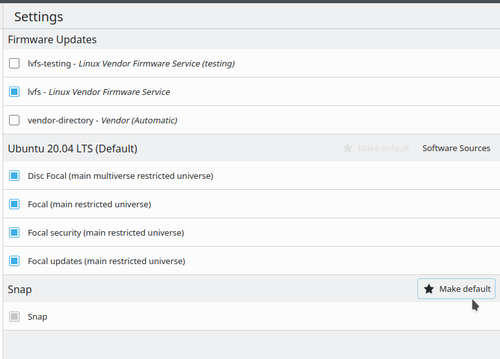
To enable or disable repositories go to the "Settings" screen. Simply check the box, if you want the repositories to be available on your computer. Sometimes applications are available from different sources like the repo, snap or flatpak. By clicking on "Make default" you chose which source to be used as the default source, if an application is available via different sources. Clicking the "Software Sources" button leads you to an more advanced tool to handle your repositories.
How to check for Upgrades manually
Sometimes you may want to check the system for updates manually. Discover will check for you automatically, but perhaps you are waiting for something good and want to look to make sure it hasn't arrived yet. In that case, go to "Updates" in the left column and click on "Check for updates" on the top right.
How to file a bug
While usually, the user will be interacting with Discover by using the mouse or touch interfaces, it's also possible to navigate it by using the keyboard.
Here's some useful default key combinations:
- Ctrl+F: focus the search text field where we can type
- Back/Forward or Alt+Left/Right: Navigates the panes horizontally
- Enter: opens selected resource on a list
- Up and down arrows: navigate vertical list pages
- Escape: closes the right-most application pane (since Plasma 5.10)

