Plasma/Panels/fr: Difference between revisions
ChristianW (talk | contribs) No edit summary |
Created page with "*<menuchoice>Supprimer panneau</menuchoice>: Supprimer le panneau." |
||
| (62 intermediate revisions by 4 users not shown) | |||
| Line 1: | Line 1: | ||
<languages/> | <languages/> | ||
== | <span id="Panels_in_Plasma_Desktop"></span> | ||
== Panneaux du bureau Plasma == | |||
[[Image: | [[Image:Panel v5.26.png|thumb|512px|center|Le panneau par défaut]] | ||
<div class="mw-translate-fuzzy"> | |||
Un panneau est un conteneur d'application (widget) qui peut se trouver sur le bureau, de n'importe quel côté. On peut trouver plusieurs panneaux d'un même côté. Par défaut l'affichage est de un panneau qui s'étire en bas sur toute la largeur du bureau avec les widgets suivants à l'intérieur : | |||
[[Special:myLanguage/Plasma/Kickoff|menu application ]], [[Special:myLanguage/Plasma/Pager|desktop pager]], [[Special:myLanguage/Plasma/Tasks|gestionnaire des tâches]] (liste des fenêtres ouvertes), [[Special:myLanguage/Plasma/SystemTray|barre d'état]] (avec dedans, des éléments comme un [[Special:myLanguage/Plasma/DeviceNotifier|détecteur d'appareils]]) et une [[Special:myLanguage/Plasma/Clocks|horloge]]. Si vous utilisez un ordinateur portable, un netbook ou tout autre ordinateur utilisant une batterie il y aura aussi un widget de [[Special:mylanguage/Plasma/Plasmoids#PowerDevil|gestion d'alimentation]] dans la barre d'état. Au bout du panneau il y a une boîte à outils qui peut être activée pour accéder aux options de configuration. | |||
</div> | |||
== Configuration == | == Configuration == | ||
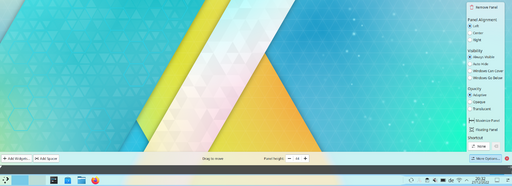
La configuration du panneau est accessible via le menu contextuel (clic droit) dans le panneau. À ce stade, le panneau sera en mode édition. | |||
[[Image: | [[Image:Panel edit mode v5-26.png|thumb|512px|center|Panneau en mode édition, avec le sous menu <menuchoice>"Plus d'options"</menuchoice> ouvert]] | ||
Widgets | === Agencer les Widgets === | ||
Les widgets du panneau peuvent être triés en les faisant glisser quand vous êtes en mode configuration. Les widgets s'alignent à partir de la gauche dans le panneau horizontal et à partir du haut dans le panneau vertical. Vous pouvez centrer les widgets dans le panneau en ajoutant des espaces séparateurs de taille flexible des deux côtés (voir la section concernant la panneau boîte à outils). | |||
<span id="The Panel Toolbox"></span> | <span id="The Panel Toolbox"></span> | ||
=== | <span id="The_Panel_Toolbox"></span> | ||
=== Boîte à outils des panneaux === | |||
*<menuchoice> | * Flèches de taille : Les flèches de la barre du milieu permettent de régler la taille du panneau. | ||
** Les flèches pointant vers la gauche modifient la taille minimale du panneau. | |||
** Les flèches pointant vers la droite modifient la taille maximale du panneau. | |||
** La flèche pointant vers le haut est le centre du panneau. | |||
** Pour régler la hauteur d’un panneau horizontal ou la largeur d’un panneau vertical, utilisez la spinbox dans la boîte à outils. | |||
** Après avoir redimensionné un panneau, vous pouvez le réinitialiser en grand le menu <menuchoice>Plus d'options</menuchoice>. | |||
*<menuchoice> | *<menuchoice>Ajouter des composants graphiques</menuchoice>: permet d'ajouter des widgets au panneau. Cela ouvrira une barre latérale à partir de laquelle vous pourrez faire glisser des widgets dans le panneau. | ||
*<menuchoice> | *<menuchoice>Ajouter séparateur</menuchoice>: vous permet d'ajouter un séparateur dans le panneau pour séparer les éléments qui sont à l'intérieur. | ||
**Le comportement standard d'un séparateur est d'occuper autant de place possible (taille variable), mais vous pouvez aussi lui donner une <menuchoice>taille fixe :</menuchoice>. Ouvrir le menu contextuel (clic droit) et désactivez <menuchoice>Utiliser la taille variable</menuchoice>. | |||
*<menuchoice> | *<menuchoice>Glisser pour déplacer</menuchoice>: vous pouvez cliquer dans l’espace vide et faire glisser le panneau sur l’un des quatre bords de l’écran. | ||
*<menuchoice> | *<menuchoice>Supprimer ce panneau</menuchoice>: supprime le panneau courant avec tous ses widgets. | ||
*<menuchoice>Hauteur</menuchoice> (pour le panneau horizontal) / <menuchoice>Largeur</menuchoice> (pour le menu vertical): permet d'ajuster la hauteur ou largeur du panneau. Pour modifier la largeur d’un panneau horizontal ou la hauteur d’un panneau vertical, utilisez les flèches. | |||
*<menuchoice> | *<menuchoice>Plus d'options</menuchoice>: ouvre des paramètres supplémentaires pour le panneau (voir la section suivante). | ||
<span id="The_"More_Settings"_Menu"></span> | |||
=== Menu "Plus d'options" === | |||
*<menuchoice> | *<menuchoice>Alignement panneau</menuchoice> : autorise l'alignement des panneaux sur trois positions prédéfinies. | ||
**<menuchoice>Gauche/Haut</menuchoice> | |||
**<menuchoice>Centre</menuchoice> | |||
**<menuchoice>Droite/En bas</menuchoice> | |||
*<menuchoice> | *<menuchoice>Visibilité</menuchoice> | ||
**<menuchoice>Toujours visible</menuchoice>: laisse le panneau toujours visible, même si les fen^tres sont maximisées. | |||
**<menuchoice>Cacher automatiquement</menuchoice>: cache l'écran de disparition du panneau jusqu'à ce que la souris revienne à proximité des bords de l'écran. | |||
**<menuchoice>Recouvrable par fenêtre</menuchoice>: ceci autorise les fenêtres à recouvrir le panneau et même intégralement si elles sont maximisées. | |||
**<menuchoice>Fenêtres dessous</menuchoice>: ceci autorise les fenêtres à se placer sous le panneau, même si elles sont maximisées. | |||
*<menuchoice> | *<menuchoice>Opacité</menuchoice> | ||
**<menuchoice>Adaptatif</menuchoice> : rend le panneau opaque lorsqu'une fenêtre le touche, et translucide dans le cas contraire. | |||
**<menuchoice>Opaque</menuchoice> : rend le panneau toujours opaque, | |||
**<menuchoice>Translucent</menuchoice> : rend le panneau toujours translucide. | |||
*<menuchoice>Maximiser Panneau</menuchoice>: ajuste le panneau aux bords de l'écran, s'il a été redimensionné. | |||
*<menuchoice>Panneau flottant</menuchoice> : ajoute une marge autour du panneau lorsqu'aucune fenêtre ne le touche. | |||
*<menuchoice>Supprimer panneau</menuchoice>: Supprimer le panneau. | |||
*<menuchoice>Raccourci</menuchoice> : vous permet de définir un raccourci pour focaliser le panneau lorsqu'il n'est pas actuellement visible. | |||
== | <span id="Adding_Panels"></span> | ||
== Ajouter des panneaux == | |||
Il est également possible d'avoir plus d'un panneau sur votre bureau. Cela s'avère utile si vous voulez avoir un affichage plus flexible : | |||
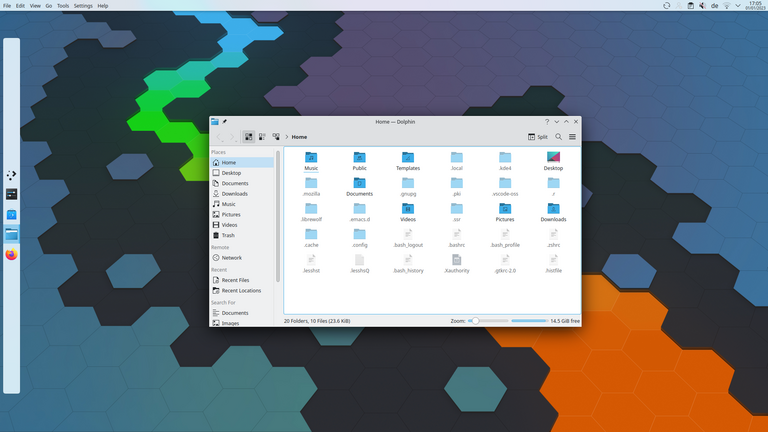
[[Image: | [[Image:Panel_multi.png|thumb|768px|center|Capture d'écran montrant un bureau avec plusieurs panneaux : un panneau vertical centré flottant et un lanceur d'applications et un gestionnaire de tâches contenant uniquement des icônes, et un deuxième panneau placé horizontalement en haut de l'écran avec un menu d'application global, une barre d'état système et une horloge.]] | ||
Pour ajouter un nouveau panneau vous pouvez soit cliquer sur le bouton de la boîte à outils du bureau puis choisir <menuchoice>Ajouter panneau</menuchoice> ou bien ouvrir le menu contextuel (clic droit) sur le bureau et choisir <menuchoice>Ajouter panneau</menuchoice> dans le menu. | |||
Si plus d'un type de panneau est installé, vous pourrez choisir parmi eux celui que vous préférez. Par défaut, deux types de paneaux sont disponibles: <menuchoice> Panneau par défaut </menuchoice>, qui crée un panneau contenant tous les widgets par défaut (lanceur, pager, tâches, barre d'état système, horloge, etc.), et <menuchoice> Panneau vide </menuchoice>, qui ajoute un panneau vide sans aucun widget préconfiguré. | |||
<span id="Under_the_Hood"></span> | |||
=== Sous le manteau === | |||
Si quelque chose de «malencontreux» devait arriver à votre panneau, intéressez vous à <tt>~/.config/plasma-org.kde.plasma.desktop-appletsrc</tt> - le panneau lui-même est classé comme un conteneur (il y en a au moins deux, le bureau et le panneau) qui abrite tous les différents widgets que vous avez mis là. | |||
{{Remember|2=Manque information|1=Ici la section relative à <tt>plasma-desktop-appletsrc</tt> pour un positionnemnt de panneau par défaut devrait suffire. - S'il vous plaît aidez-nous à fournir l'information si vous connaissez quelque chose sur ce sujet -.}} | |||
[[Category: | [[Category:Bureau/fr]] | ||
[[Category:Plasma]] | [[Category:Plasma/fr]] | ||
Latest revision as of 10:08, 28 February 2024
Panneaux du bureau Plasma

Un panneau est un conteneur d'application (widget) qui peut se trouver sur le bureau, de n'importe quel côté. On peut trouver plusieurs panneaux d'un même côté. Par défaut l'affichage est de un panneau qui s'étire en bas sur toute la largeur du bureau avec les widgets suivants à l'intérieur : menu application , desktop pager, gestionnaire des tâches (liste des fenêtres ouvertes), barre d'état (avec dedans, des éléments comme un détecteur d'appareils) et une horloge. Si vous utilisez un ordinateur portable, un netbook ou tout autre ordinateur utilisant une batterie il y aura aussi un widget de gestion d'alimentation dans la barre d'état. Au bout du panneau il y a une boîte à outils qui peut être activée pour accéder aux options de configuration.
Configuration
La configuration du panneau est accessible via le menu contextuel (clic droit) dans le panneau. À ce stade, le panneau sera en mode édition.

Agencer les Widgets
Les widgets du panneau peuvent être triés en les faisant glisser quand vous êtes en mode configuration. Les widgets s'alignent à partir de la gauche dans le panneau horizontal et à partir du haut dans le panneau vertical. Vous pouvez centrer les widgets dans le panneau en ajoutant des espaces séparateurs de taille flexible des deux côtés (voir la section concernant la panneau boîte à outils).
Boîte à outils des panneaux
- Flèches de taille : Les flèches de la barre du milieu permettent de régler la taille du panneau.
- Les flèches pointant vers la gauche modifient la taille minimale du panneau.
- Les flèches pointant vers la droite modifient la taille maximale du panneau.
- La flèche pointant vers le haut est le centre du panneau.
- Pour régler la hauteur d’un panneau horizontal ou la largeur d’un panneau vertical, utilisez la spinbox dans la boîte à outils.
- Après avoir redimensionné un panneau, vous pouvez le réinitialiser en grand le menu .
- : permet d'ajouter des widgets au panneau. Cela ouvrira une barre latérale à partir de laquelle vous pourrez faire glisser des widgets dans le panneau.
- : vous permet d'ajouter un séparateur dans le panneau pour séparer les éléments qui sont à l'intérieur.
- Le comportement standard d'un séparateur est d'occuper autant de place possible (taille variable), mais vous pouvez aussi lui donner une . Ouvrir le menu contextuel (clic droit) et désactivez .
- : vous pouvez cliquer dans l’espace vide et faire glisser le panneau sur l’un des quatre bords de l’écran.
- : supprime le panneau courant avec tous ses widgets.
- (pour le panneau horizontal) / (pour le menu vertical): permet d'ajuster la hauteur ou largeur du panneau. Pour modifier la largeur d’un panneau horizontal ou la hauteur d’un panneau vertical, utilisez les flèches.
- : ouvre des paramètres supplémentaires pour le panneau (voir la section suivante).
Menu "Plus d'options"
- : autorise l'alignement des panneaux sur trois positions prédéfinies.
-
- : laisse le panneau toujours visible, même si les fen^tres sont maximisées.
- : cache l'écran de disparition du panneau jusqu'à ce que la souris revienne à proximité des bords de l'écran.
- : ceci autorise les fenêtres à recouvrir le panneau et même intégralement si elles sont maximisées.
- : ceci autorise les fenêtres à se placer sous le panneau, même si elles sont maximisées.
-
- : rend le panneau opaque lorsqu'une fenêtre le touche, et translucide dans le cas contraire.
- : rend le panneau toujours opaque,
- : rend le panneau toujours translucide.
- : ajuste le panneau aux bords de l'écran, s'il a été redimensionné.
- : ajoute une marge autour du panneau lorsqu'aucune fenêtre ne le touche.
- : Supprimer le panneau.
- : vous permet de définir un raccourci pour focaliser le panneau lorsqu'il n'est pas actuellement visible.
Ajouter des panneaux
Il est également possible d'avoir plus d'un panneau sur votre bureau. Cela s'avère utile si vous voulez avoir un affichage plus flexible :

Pour ajouter un nouveau panneau vous pouvez soit cliquer sur le bouton de la boîte à outils du bureau puis choisir ou bien ouvrir le menu contextuel (clic droit) sur le bureau et choisir dans le menu.
Si plus d'un type de panneau est installé, vous pourrez choisir parmi eux celui que vous préférez. Par défaut, deux types de paneaux sont disponibles: , qui crée un panneau contenant tous les widgets par défaut (lanceur, pager, tâches, barre d'état système, horloge, etc.), et , qui ajoute un panneau vide sans aucun widget préconfiguré.
Sous le manteau
Si quelque chose de «malencontreux» devait arriver à votre panneau, intéressez vous à ~/.config/plasma-org.kde.plasma.desktop-appletsrc - le panneau lui-même est classé comme un conteneur (il y en a au moins deux, le bureau et le panneau) qui abrite tous les différents widgets que vous avez mis là.

