Dolphin/File Management/ru: Difference between revisions
Updating to match new version of source page |
Updating to match new version of source page |
||
| (14 intermediate revisions by the same user not shown) | |||
| Line 1: | Line 1: | ||
<languages /> | <languages/> | ||
<span id="Discover Dolphin"></span> | <span id="Discover Dolphin"></span> | ||
== | <div class="mw-translate-fuzzy"> | ||
=== Dolphin или Konqueror? === | |||
</div> | |||
<div class="mw-translate-fuzzy"> | |||
Данное руководство описывает '''Dolphin''' для KDE SC 4. '''Konqueror''' был стандартным файловым менеджером в KDE 2 и 3. Вы также можете использовать ''Konqueror''' в качестве стандартного файлового менеджера в KDE SC 4. Чтобы сделать это (начиная с KDE SC 4.2) откройте '''Параметры системы''' и перейдите в модуль <menuchoice>Приложения по умолчанию</menuchoice>. Вы можете выбрать '''Konqueror''' или ряд других приложений для использования в качестве файлового менеджера по умолчанию. | |||
</div> | |||
[[Special:myLanguage/Konqueror|Konqueror]] was the default file manager in KDE 2 and 3, and is still available for those who prefer its interface. It is a web browser, a file manager, media viewer and more. For file management it uses the Dolphin KPart, and so has all of the functionality of Dolphin. | |||
=== Dolphin | <div class="mw-translate-fuzzy"> | ||
==Откройте для себя Dolphin== | |||
Первый раздел берет вас на экскурсию по возможностям '''Dolphin'''. Во втором разделе рассматриваются концепции различных типов закладок. В третьем разделе рассматривается управления архивами. Наконец, мы смотрим на 'Больше интересных вещей'. Изображения кликабельны - можно увидеть увеличенное изображение. | |||
</div> | |||
The first section takes you on a guided tour of '''Dolphin'''. The second section deals with the concepts of different types of bookmarks. The third section discusses archive management. Finally we look at 'More Cool Things'. The images are clickable - you can see the enlarged view. | |||
===Введение в Dolphin=== | ===Введение в Dolphin=== | ||
| Line 17: | Line 23: | ||
Я покажу вам, как использовать '''Dolphin''' для общих задач по управлению файлами и как настраивать его для ваших нужд. | Я покажу вам, как использовать '''Dolphin''' для общих задач по управлению файлами и как настраивать его для ваших нужд. | ||
[[Image:Dolphin_Plasma5_thumbnail.png|thumb|240px|center]] | [[Image:Dolphin_Plasma5_thumbnail.png|thumb|240px|center]] | ||
<div class="mw-translate-fuzzy"> | |||
Когда мы открыли '''Dolphin''' из [[Special:myLanguage/Plasma/Kickoff|меню Kickoff]] он отобразил ваш начальный каталог - по умолчанию ваша это ваша [[Special:myLanguage/Glossary#Home_Directory|Домашняя папка]]. | Когда мы открыли '''Dolphin''' из [[Special:myLanguage/Plasma/Kickoff|меню Kickoff]] он отобразил ваш начальный каталог - по умолчанию ваша это ваша [[Special:myLanguage/Glossary#Home_Directory|Домашняя папка]]. | ||
</div> | |||
<div class="mw-translate-fuzzy"> | |||
Просто щёлкните, чтобы открыть файл или папку. (Это может быть изменено на двойной клик в <menuchoice>Параметры -> Администрирование компьютера -> Клавиатура и Мышь</menuchoice>, по желанию. Некоторые дистрибутивы устанавливают двойной клик по умолчанию.) в KDE 4.5 это находится в <menuchoice>Параметры системы -> Оборудование -> Устройстива ввода -> Мышь</menuchoice> | |||
</div> | |||
Чтобы выделить или отменить выделение файлов и папок переместите указатель мыши над значком и щелкните на знаки плюс и минус соответственно. Как тут: | Чтобы выделить или отменить выделение файлов и папок переместите указатель мыши над значком и щелкните на знаки плюс и минус соответственно. Как тут: | ||
| Line 31: | Line 39: | ||
Многие выделенные файлы выглядит следующим образом: | Многие выделенные файлы выглядит следующим образом: | ||
[[Image:Dolphin folder hovered deselect.png|thumb|240px|center]] | [[Image:Dolphin folder hovered deselect.png|thumb|240px|center]] | ||
<div class="mw-translate-fuzzy"> | |||
'''Создание новой папки''': Вы можете создать новую папку в активном каталоге, используя <menuchoice>контекстное меню -> Создать</menuchoice> или комбинацию <keycap>F10</keycap>. | '''Создание новой папки''': Вы можете создать новую папку в активном каталоге, используя <menuchoice>контекстное меню -> Создать</menuchoice> или комбинацию <keycap>F10</keycap>. | ||
</div> | |||
'' | <div class="mw-translate-fuzzy"> | ||
''Вкладки'': '''Dolphin''' поддерживает просмотр с вкладками. Новую вкладку можно открыть, например из <menuchoice>Файл -> Новая вкладка</menuchoice>, <keycap>Ctrl + T</keycap> или нажатием средней кнопки мыши по значку папки и кнопками навигации. | |||
</div> | |||
{{Note|Starting from KDE 4.7, Dolphin's menu bar is hidden, but easy to reach and restore. If you prefer menu bar to be present, you can enable it by selecting <menuchoice> Control | {{Note|Starting from KDE 4.7, Dolphin's menu bar is hidden, but easy to reach and restore. If you prefer menu bar to be present, you can enable it by selecting <menuchoice>Control</menuchoice> → <menuchoice>Show Menubar</menuchoice> or pressing <keycap>Ctrl + M</keycap>.}} | ||
Когда мы щёлкаем на любую папку, по умолчанию открывается '''Dolphin''' . Кроме того, он также может быть запущен из [[Special:myLanguage/Plasma/Kickoff|меню Kickoff]]. | Когда мы щёлкаем на любую папку, по умолчанию открывается '''Dolphin''' . Кроме того, он также может быть запущен из [[Special:myLanguage/Plasma/Kickoff|меню Kickoff]]. | ||
== | == The Interface == | ||
<div class="mw-translate-fuzzy"> | |||
== Панель навигации == | |||
</div> | |||
'''Dolphin''' | <div class="mw-translate-fuzzy"> | ||
'''Dolphin''' объединяет в себе новую концепцию использования навигации более быстрым и более точным способом: Для достижения такого эффекта используется панель навигации в виде цепочки. Вместо отображения полного пути используется только навигация по пунктам, которые отображаются в виде кнопок. Щелкнув одну из этих кнопок, вы перейдете непосредственно в эту папку. Таким образом, вы можете получить доступ к родительскому каталогу с вложенной папке очень быстрым способом. | |||
</div> | |||
Между кнопками, которые представляют собой папки есть стрелка, которая также является кнопкой. Щелкнув на эту стрелку вы можете увидеть список всех подкаталогов на том же уровне, что и текущий, позволив вам быстро сменить каталог. | Между кнопками, которые представляют собой папки есть стрелка, которая также является кнопкой. Щелкнув на эту стрелку вы можете увидеть список всех подкаталогов на том же уровне, что и текущий, позволив вам быстро сменить каталог. | ||
| Line 51: | Line 68: | ||
<div class="mw-translate-fuzzy"> | |||
Существует также классическая навигационная панель, отображающая полный путь. Для использования этого стиля можно выбрать <menuchoice>Вид -> Панель навигации -> Отобразить полное расположение</menuchoice> или вызвать сочетанием клавиш <keycap>Ctrl + L</keycap>. Щелкнув на свободное место рядом с последней отображенной папкой в иерархической стиле, который вы также можете сменить на классический стиль. Если классический стиль выбран, галочка отображается в конце панели навигации. Этот флажок является кнопкой, которая может быть использована чтобы сменить обратно на предыдущий стиль "цепочки". Конечно же, также можно использовать меню и сочетания клавиш. | |||
</div> | |||
<div class="mw-translate-fuzzy"> | |||
== Раздельный просмотр == | == Раздельный просмотр == | ||
</div> | |||
<div class="mw-translate-fuzzy"> | |||
'''Dolphin''' предлагает возможность разделить текущую папку так, что две папки отображаются рядом друг с другом, как знакомо из [[:wikipedia:Midnight Commander|Midnight Commander]]. Это очень удобный вид для копирования или перемещения файлов из одной папки в другую. | '''Dolphin''' предлагает возможность разделить текущую папку так, что две папки отображаются рядом друг с другом, как знакомо из [[:wikipedia:Midnight Commander|Midnight Commander]]. Это очень удобный вид для копирования или перемещения файлов из одной папки в другую. | ||
</div> | |||
[[Image:Dolphin split view.png|thumb|350px|center]] | |||
<div class="mw-translate-fuzzy"> | |||
Вы можете разделить вид из <menuchoice>Вид -> Split</menuchoice> (сочетание клавиш <keycap>F3</keycap>). Чтобы вернуться к просмотру только одной папки Вы можете использовать <menuchoice>Вид -> Закрыть</menuchoice>. Символ покажет вам, какой вид будет закрыт. В зависимости от активного в данный момент вида знак минуса будет показан в левой или правой части символа. Активный вид будет закрыт. Это важно знать, если вы хотите использовать сочетания клавиш. Существует также кнопка для разделения и закрытия вида, расположенная на панели инструментов. Эта кнопка отображается в виде минуса, что помогает легко узнать, какой вид будет закрыт. | |||
</div> | |||
<div class="mw-translate-fuzzy"> | |||
Конечно, каждый вид имеет свою собственную панель навигации и с каждым из них можно использовать другой режим просмотра. | |||
</div> | |||
=== Sorting Files === | |||
<div class="mw-translate-fuzzy"> | |||
Файлы в текущей выбранной папке отсортированы по умолчанию в алфавитном порядке. Способ сортировки может быть изменен через меню <menuchoice>Вид -> Сортировать</menuchoice>. Доступны следующие критерии сортировки: | |||
</div> | |||
Files may be sorted by the following attributes | |||
<div class="mw-translate-fuzzy"> | |||
* Имя | |||
* Размер | |||
* Дата | |||
* Права доступа | |||
* Владелец | |||
* Группа | |||
* Тип | |||
* Адрес ссылки | |||
* Полный путь | |||
Кроме того, последовательность сортировки может быть определена при помощи меню <menuchoice>Вид -> Сортировать -> В порядке убывания </menuchoice> или <menuchoice>Вид -> Сортировать -> Сначала папки</menuchoice>. | |||
</div> | |||
The sorting method can be changed by selecting <menuchoice>Sort by</menuchoice> from the toolbar and then select <menuchoice>A-Z</menuchoice> or <menuchoice>Z-A</menuchoice>. Additionally you may choose whether folders should be listed first by selecting <menuchoice>Folders First</menuchoice>. | |||
<div class="mw-translate-fuzzy"> | |||
== Режим просмотра == | == Режим просмотра == | ||
</div> | |||
'''Dolphin''' | '''Dolphin''' features three different folder view modes: | ||
* {{Icon|breeze-dolphin-view-icons}} '''Icons''' shows each file or folder as an icon with its name | |||
* {{Icon|breeze-dolphin-view-compact}} '''Compact''' is the same as icons, but in a more compact form, allowing more folders and files to be displayed at once | |||
* {{Icon|breeze-dolphin-view-details}} '''Details''' presents a list of files and folders, giving information on each, including but not limited to size and date | |||
The mode can be changed from within Dolphin | |||
* Select <menuchoice>View Mode</menuchoice> from the <menuchoice>View</menuchoice> menu. This option is only available if the main Menubar is enabled | |||
* Select <menuchoice>View Mode</menuchoice> from the <menuchoice>Control</menuchoice> menu. This option is only available when the main Menubar is disabled | |||
* By selecting the appropriate icon from the main toolbar, if it is enabled | |||
* Using the default keyboard shortcuts: | |||
** <keycap>Ctrl+1</keycap> switches to the Icon display mode, | |||
** <keycap>Ctrl+2</keycap> switches to Compact and, | |||
** <keycap>Ctrl+3</keycap> switches to Detailed view. | |||
==== View as Icons ==== | |||
<div class="mw-translate-fuzzy"> | |||
Каждый файл или папка представляется ввиде значка в режиме ''"Значки"''. Вместо значка может быть отображена миниатюра файла. Это поведение можно активировать или деактивировать через меню <menuchoice>Вид -> Миниатюра</menuchoice> или соответствующим элементом на панели инструментов. Присутствует ограничение размера миниатюр файлов. Это ограничение может быть настроено через <menuchoice>Параметры -> Настроить Dolphin -> Режимы просмотра -> Главное</menuchoice> параметр <menuchoice>Миниатюры -> Максимальный размер файла</menuchoice>. Также пристутствует параметр для использования встроенных миниатюр в файлах. В KDE 4.5 миниатюры активируются (и указывается максимальный размер) при помощи <menuchoice>Параметры -> Настроить Dolphin -> Главное -> Миниатюры</menuchoice> | |||
</div> | |||
<div class="mw-translate-fuzzy"> | |||
Присутствует возможность отобразить дополнительные сведения под значками. Может быть активировано и деактивировано через меню <menuchoice>Вид -> Дополнительные сведения </menuchoice>. | |||
</div> | |||
<div class="mw-translate-fuzzy"> | |||
Вы можете сгруппировать значки для достижения наилучшего обзора. Активируется через <menuchoice>Вид -> Сортировать по группам</menuchoice>. Теперь значки сгруппированы, а группы делятся на горизонтальные строки, содержащие имя группы, как заголовок. Группировка связана с выбранным критериям поиска. | |||
</div> | |||
[[Image:Dolphin show in groups effect.png|thumb|240px|center]] | [[Image:Dolphin show in groups effect.png|thumb|240px|center]] | ||
=== Details === | === Details === | ||
| Line 104: | Line 165: | ||
Столбец ''"Имя''" уже отображается. При нажатии на заголовке одного из столбцов таблицы будут отсортированы по этому столбцу. При щелчке на том же заголовке столбца последовательность сортировки меняется на противоположную. | Столбец ''"Имя''" уже отображается. При нажатии на заголовке одного из столбцов таблицы будут отсортированы по этому столбцу. При щелчке на том же заголовке столбца последовательность сортировки меняется на противоположную. | ||
<div class="mw-translate-fuzzy"> | |||
Начиная с KDE 4.1 стало возможным отображать папки в древовидном виде. В этом режиме иконка плюса отображена рядом с папкой. Щелчок по этой иконке папки раскрывает все содержащиеся в ней папки и файлы, отображая их в виде таблицы, но они примут бледный вид. Щелчок по иконке минуса скрывает раскрытое содержимое. Конечно же, древовидная структура отображения каталогов может быть использована по вашему желанию. Древовидный вид по умолчанию отключен, но может быть задействован через <menuchoice>Настройки -> Настроить Dolphin -> Режимы просмотра -> Таблица</menuchoice> с опцией <menuchoice>Разворачиваемые папки</menuchoice>. | |||
</div> | |||
<div class="mw-translate-fuzzy"> | |||
===Задание стандартных настроек для всех папок=== | |||
Под пунктом меню <menuchoice>Вид -> Настроить режимы просмотра</menuchoice> вы можете установить любой из этих атрибутов в умолчательное положение для всех папок. | |||
</div> | |||
Under <menuchoice>Control</menuchoice> → <menuchoice>Adjust View Properties</menuchoice> (or under the menu item <menuchoice>View</menuchoice> → <menuchoice>Adjust View Properties</menuchoice> if you have enabled menu bar) you can set any of these attributes to be the default for all folder views. | |||
Under <menuchoice>Control | |||
== Панели == | == Панели == | ||
'''Dolphin''' contains several panels, which can be activated via menu <menuchoice>Control | '''Dolphin''' contains several panels, which can be activated via menu <menuchoice>Control</menuchoice> → <menuchoice>Panels</menuchoice>. A panel can be placed in either the left or right docking area. To move a panel, ensure that panels are unlocked (right-click on a panel and select <menuchoice>Unlock Panels</menuchoice>). Then click on the header of the panel you want to move and drag it to the desired location. The new location of the panel is highlighted as you move the cursor around, before releasing the mouse button. Dropping a panel on top of another combines them into a tabbed view. | ||
In the header of each panel | In some versions of Dolphin, the header of each panel contains two buttons. The button near to the caption undocks the panel. This makes the panel an independent window which "floats" above '''Dolphin'''. The window is still combined with '''Dolphin''' and cannot be displayed without '''Dolphin''' and cannot for example be minimized like normal windows. By clicking the button again the panel is docked again. The second button closes the panel. | ||
=== Non Modal Dialogs === | === Non Modal Dialogs === | ||
| Line 123: | Line 187: | ||
When Moving, Copying or Deleting files/directories the dialog disappears even when the operation has not yet completed. A progress bar then appears in the bottom right of the screen, this then disappears also, if you want see the progress you need to click a small (i) information icon in the system tray. | When Moving, Copying or Deleting files/directories the dialog disappears even when the operation has not yet completed. A progress bar then appears in the bottom right of the screen, this then disappears also, if you want see the progress you need to click a small (i) information icon in the system tray. | ||
{{Warning| | {{Warning|New users who are not used to this way of working (and even experienced users) can get caught out by this, if you are Moving, Copying or Deleting large directories then you need to use the icon to monitor the progress of your operation. | ||
If you don't then any subsequent actions you do, may well use an incomplete file structure resulting in corrupted files. '''You have been warned!'''}} | |||
=== Places === | === Places === | ||
'''Dolphin''' contains a new kind of bookmarks ''Places''. These are displayed in a panel which can be activated via <menuchoice>Control | '''Dolphin''' contains a new kind of bookmarks ''Places''. These are displayed in a panel which can be activated via <menuchoice>Control</menuchoice> → <menuchoice>Panels</menuchoice> → <menuchoice>Places</menuchoice> (keyboard shortcut <keycap>F9</keycap>). The default Places are identical to the ones shown in the category ''Computer'' of the K-Menu [[Special:myLanguage/Plasma/Kickoff|Kickoff]]. | ||
By clicking one of these places it will be opened in the current folder view. The context menu offers the possibility to edit the places or to remove them again. It is also possible to hide entries temporarily. | By clicking one of these places it will be opened in the current folder view. The context menu offers the possibility to edit the places or to remove them again. It is also possible to hide entries temporarily. | ||
| Line 141: | Line 204: | ||
=== Information === | === Information === | ||
The information panel can be activated via <menuchoice>Control | The information panel can be activated via <menuchoice>Control</menuchoice> → <menuchoice>Show Panels</menuchoice> → <menuchoice>Information</menuchoice> (keyboard shortcut <keycap>F11</keycap>). This panel displays a preview or an icon of the currently selected file/folder or of the file/folder below the mouse cursor. Some additional information like change date or size to the file/folder is displayed as well. | ||
The information panel offers the possibility to rate files, add a comment or tag a file. This is one of the interfaces to the semantic Desktop [[Special:myLanguage/Nepomuk|Nepomuk]] which provides the advantages of the semantic web for the desktop. Starting from KDE 4.2 it is possible to search for the semantic links given by the tags. | The information panel offers the possibility to rate files, add a comment or tag a file. This is one of the interfaces to the semantic Desktop [[Special:myLanguage/Nepomuk|Nepomuk]] which provides the advantages of the semantic web for the desktop. Starting from KDE 4.2 it is possible to search for the semantic links given by the tags. | ||
| Line 151: | Line 214: | ||
=== Folders === | === Folders === | ||
A panel providing a tree structure for the file system can be displayed via <menuchoice>Control | A panel providing a tree structure for the file system can be displayed via <menuchoice>Control</menuchoice> → <menuchoice>Panels</menuchoice> → <menuchoice>Folders</menuchoice> (keyboard shortcut <keycap>F7</keycap>). The tree structure offers the possibility by clicking the > and ↓ signs to expand/collapse sub folders. By clicking on one of the folders the content will be displayed in the current view. | ||
=== Terminal === | === Terminal === | ||
The terminal emulator [[Special:myLanguage/Konsole|Konsole]] can be displayed directly in '''Dolphin''' via <menuchoice>Control | The terminal emulator [[Special:myLanguage/Konsole|Konsole]] can be displayed directly in '''Dolphin''' via <menuchoice>Control</menuchoice> → <menuchoice>Panels</menuchoice> → <menuchoice>Terminal</menuchoice> (keyboard shortcut <keycap>F4</keycap>). This makes it possible to use shell commands directly in '''Dolphin'''. The terminal is opened in the folder which is displayed in the current view. <keycap>Shift + F4</keycap> opens [[Special:myLanguage/Konsole|Konsole]] in new window. | ||
[[Image:dolphin_terminal.png|thumb|240px|center|Dolphin with a Terminal]] | [[Image:dolphin_terminal.png|thumb|240px|center|Dolphin with a Terminal]] | ||
==Bookmarks and Places== | ==Bookmarks and Places== | ||
KDE Plasma offers two different systems of user-based links to different locations in the file system. One is called ''Places'' and the other one is called ''Bookmarks''. They reside in different files, and have different functions. This offers more flexibility, however, it makes it necessary to learn the differences. | |||
[[Image:Konq3bookmarks.png|350px|thumb|center|KDE3 Konqueror didn't share bookmarks]] | [[Image:Konq3bookmarks.png|350px|thumb|center|KDE3 Konqueror didn't share bookmarks]] | ||
In contrast to the way '''Konqueror''' stored the bookmarks back in KDE3, both ''Places'' and ''Bookmarks'' are available to all applications as well as the '''Dolphin''' file manager. More of that later. | |||
=== Places in applications === | |||
=== | ====Places for system-wide navigation==== | ||
There is a default set of ''Places'' - | There is a default set of ''Places'' - | ||
| Line 197: | Line 251: | ||
You can see the result of that command if you read ~/. | You can see the result of that command if you read {{Path|~/.local/share/apps/kfileplaces/bookmarks.xml}}. | ||
In some applications too there is an option in the File menu to add a folder to Places. At this stage, however, applications vary in which features are available. The important thing to remember is that ''the default is for Places items to be available to all applications in the <menuchoice>File</menuchoice> → <menuchoice>Open</menuchoice> dialogue. '' | |||
====Constraining to one application==== | |||
Some applications allow you to edit items in the Places menu. For instance, if in [[Special:myLanguage/Gwenview|Gwenview]] you right click on a folder in Places you can set an option to <menuchoice>Only show when using this application (Gwenview)</menuchoice>. | |||
[[Image:OnlyShowIn2.png|350px|thumb|center|Constraining a bookmark to an application]] | |||
If you need to constrain to an application that does not yet allow you to do that, the only way left is to edit the file ~/.local/share/kfile/bookmarks.xml. Immediately before the </metadata> tag you will need to add the line {{Input|1= <OnlyInApp>appname</OnlyInApp>}} | |||
===Bookmarks in applications=== | |||
=== | ====Enable bookmarks==== | ||
Bookmarks are not enabled in dialogs by default. To enable them | |||
* Open the <menuchoice>File</menuchoice> menu and select <menuchoice>Open</menuchoice> or <menuchoice>Save</menuchoice> | |||
* Click the '''Options''' {{icon|breeze-configure}} icon | |||
* Select <menuchoice>Show Bookmarks</menuchoice> | |||
[[Image:EnablingBookmarks.png|350px|thumb|center|Enabling Bookmarks]] | |||
==== Using bookmarks ==== | |||
Bookmarks are the second class of user-based links to the file system. Remember opening <menuchoice>File</menuchoice> → <menuchoice>Open</menuchoice> and using the spanner/wrench? Next to it is a yellow star. This is the ''bookmark management menu''. | |||
[[Image:BookmarkManagement.png|350px|thumb|center|Manage Application bookmarks here]] | |||
Here you can define bookmarks that will be visible in the same menu on any application. They are stored in one file, {{Path|~/.local/share/kfile/bookmarks.xml}}, which is used by all applications having that menu. | |||
<span id="Archive Management in Dolphin"></span> | <span id="Archive Management in Dolphin"></span> | ||
===Archive Management in Dolphin=== | ===Archive Management in Dolphin=== | ||
Managing archives now becomes simple. In any directory in '''Dolphin''', highlight the files that you want to compress, and right-click. Here, using the Compress option, you can elect to create a RAR archive, a Gzipped tar archive, or define another compression mode that you have already set up. | Managing archives now becomes simple. In any directory in '''Dolphin''', highlight the files that you want to compress, and right-click. Here, using the Compress option, you can elect to create a RAR archive, a Gzipped tar archive, or define another compression mode that you have already set up. | ||
[[Image:Compress.png|350px|thumb|center|Create a new archive]] | [[Image:Compress.png|350px|thumb|center|Create a new archive]] | ||
Similarly, if you right-click on an existing archived file you get a range of actions added to the right-click menu. You can extract the archive to the current folder, to an autodetected subfolder or to another place of your choosing. | Similarly, if you right-click on an existing archived file you get a range of actions added to the right-click menu. You can extract the archive to the current folder, to an autodetected subfolder or to another place of your choosing. | ||
Should you wish to add files to an existing archive, you can choose <menuchoice>Open with Ark</menuchoice>. | Should you wish to add files to an existing archive, you can choose <menuchoice>Open with Ark</menuchoice>. | ||
[[Image:ManageArchives.png|350px|thumb|center|Manage existing archives]] | [[Image:ManageArchives.png|350px|thumb|center|Manage existing archives]] | ||
==More Cool Actions== | ==More Cool Actions== | ||
===Change a File Association on-the-fly=== | ===Change a File Association on-the-fly=== | ||
You can, for one, alter this in <menuchoice>Kickoff | Have you ever wanted to open a file, only to find that it is [[Special:myLanguage/System_Settings/File_Associations|associated]] with an application that is not of your choice? | ||
You can, for one, alter this in <menuchoice>Kickoff</menuchoice> → <menuchoice>Computer</menuchoice> → <menuchoice>System Settings</menuchoice> → <menuchoice>Common Appearance and Behavior</menuchoice> → <menuchoice>File Associations</menuchoice>. This is the same as running '''kcmshell5 filetypes''' in a Konsole. | |||
Alternatively, if you want to change '''multiple''' associations right quick, you would edit the *.desktop file directly, e.g. the file | Alternatively, if you want to change '''multiple''' associations right quick, you would edit the *.desktop file directly, e.g. the file {{Path|/usr/share/applications/org.gnome.Builder.desktop}}. For example, Gnome Builder associates with a great number of file-types which may not be desirable. So the line | ||
MimeType=application/javascript; # we do not want all of these .... | MimeType=application/javascript; # we do not want all of these .... | ||
| Line 264: | Line 324: | ||
===The Actions sub-menu=== | ===The Actions sub-menu=== | ||
The <menuchoice>Actions</menuchoice> sub-menu opens up a whole lot more cool things to do from '''Dolphin'''. Some possibilities only appear when applicable to the file you have selected. An apps .desktop file below /usr/share/applications defines what actions are applicable for a particular type of file. Some of the options are | The <menuchoice>Actions</menuchoice> sub-menu opens up a whole lot more cool things to do from '''Dolphin'''. Some possibilities only appear when applicable to the file you have selected. An apps .desktop file below {{Path|/usr/share/applications}} defines what actions are applicable for a particular type of file. Some of the options are | ||
* Convert an image file to a different format | * Convert an image file to a different format | ||
* Preview the file | * Preview the file | ||
| Line 274: | Line 334: | ||
* Insert an audio CD | * Insert an audio CD | ||
* Navigate to this CD in '''Dolphin''': it must appear as "Volume" in your '''Dolphin''' 'Places' or you can reach it by typing audiocd:/ in the address bar. | * Navigate to this CD in '''Dolphin''': it must appear as "Volume" in your '''Dolphin''' 'Places' or you can reach it by typing audiocd:/ in the address bar. | ||
[[Image:Cdaudiodolphin.jpeg|550px|thumb|center|Dolphin presenting audio CD]] | [[Image:Cdaudiodolphin.jpeg|550px|thumb|center|Dolphin presenting audio CD]] | ||
You now notice that '''Dolphin''' is proposing a WAV file for each track, plus: | You now notice that '''Dolphin''' is proposing a WAV file for each track, plus: | ||
| Line 289: | Line 347: | ||
You then just have to copy the folder of your choice, in your preferred format to obtain the relative encoded version of your CD! | You then just have to copy the folder of your choice, in your preferred format to obtain the relative encoded version of your CD! | ||
=== Using <tt>timeline</tt> to have your recent files as startup folder === | |||
=== <tt>timeline | |||
[[File:Recent.jpg|400px|thumb|right|Have your recent files always in Dolphin]] | [[File:Recent.jpg|400px|thumb|right|Have your recent files always in Dolphin]] | ||
You can start up dolphin (with '''baloo''' up and running) with a view of ''recently modified files'': Just navigate to the address/location of <tt>timeline:/today/</tt> (copy paste it to the address bar) or use it as '''dolphin start-up-folder''' in dolphin-settings. | |||
== External links == | == External links == | ||
| Line 313: | Line 360: | ||
* [http://arstechnica.com/news.ars/post/20070405-afirst-look-at-dolphin-the-kde-4-file-manager.html Ars Technica: A First Look at Dolphin] | * [http://arstechnica.com/news.ars/post/20070405-afirst-look-at-dolphin-the-kde-4-file-manager.html Ars Technica: A First Look at Dolphin] | ||
* [http://introducingkde4.blogspot.com/2007/12/dolphin.html Introducing KDE 4 Blog - Dolphin] | * [http://introducingkde4.blogspot.com/2007/12/dolphin.html Introducing KDE 4 Blog - Dolphin] | ||
Latest revision as of 17:12, 23 June 2021
Dolphin или Konqueror?
Данное руководство описывает Dolphin' для KDE SC 4. Konqueror был стандартным файловым менеджером в KDE 2 и 3. Вы также можете использовать Konqueror в качестве стандартного файлового менеджера в KDE SC 4. Чтобы сделать это (начиная с KDE SC 4.2) откройте Параметры системы и перейдите в модуль . Вы можете выбрать Konqueror или ряд других приложений для использования в качестве файлового менеджера по умолчанию.
Konqueror was the default file manager in KDE 2 and 3, and is still available for those who prefer its interface. It is a web browser, a file manager, media viewer and more. For file management it uses the Dolphin KPart, and so has all of the functionality of Dolphin.
Откройте для себя Dolphin
Первый раздел берет вас на экскурсию по возможностям Dolphin. Во втором разделе рассматриваются концепции различных типов закладок. В третьем разделе рассматривается управления архивами. Наконец, мы смотрим на 'Больше интересных вещей'. Изображения кликабельны - можно увидеть увеличенное изображение.
The first section takes you on a guided tour of Dolphin. The second section deals with the concepts of different types of bookmarks. The third section discusses archive management. Finally we look at 'More Cool Things'. The images are clickable - you can see the enlarged view.
Введение в Dolphin
Dolphin файловый менеджер Программного обеспечения KDE.
Я покажу вам, как использовать Dolphin для общих задач по управлению файлами и как настраивать его для ваших нужд.
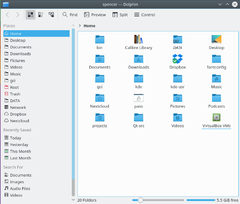
Когда мы открыли Dolphin из меню Kickoff он отобразил ваш начальный каталог - по умолчанию ваша это ваша Домашняя папка.
Просто щёлкните, чтобы открыть файл или папку. (Это может быть изменено на двойной клик в , по желанию. Некоторые дистрибутивы устанавливают двойной клик по умолчанию.) в KDE 4.5 это находится в
Чтобы выделить или отменить выделение файлов и папок переместите указатель мыши над значком и щелкните на знаки плюс и минус соответственно. Как тут:
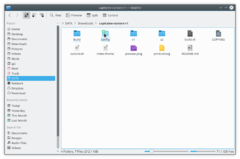
Когда вы щелкните на знак плюса, файл или папка будут добавлены выделенному. Выбор можно сделать также путем перетаскивания прямоугольника (иногда называемый "резинкой"), а также выбрать и отменить с помощью Ctrl + щелчок по одному и Shift + щелчок для последовательного диапазона.
Многие выделенные файлы выглядит следующим образом:

Создание новой папки: Вы можете создать новую папку в активном каталоге, используя или комбинацию F10.
Вкладки: Dolphin поддерживает просмотр с вкладками. Новую вкладку можно открыть, например из , Ctrl + T или нажатием средней кнопки мыши по значку папки и кнопками навигации.
Когда мы щёлкаем на любую папку, по умолчанию открывается Dolphin . Кроме того, он также может быть запущен из меню Kickoff.
The Interface
Панель навигации
Dolphin объединяет в себе новую концепцию использования навигации более быстрым и более точным способом: Для достижения такого эффекта используется панель навигации в виде цепочки. Вместо отображения полного пути используется только навигация по пунктам, которые отображаются в виде кнопок. Щелкнув одну из этих кнопок, вы перейдете непосредственно в эту папку. Таким образом, вы можете получить доступ к родительскому каталогу с вложенной папке очень быстрым способом.
Между кнопками, которые представляют собой папки есть стрелка, которая также является кнопкой. Щелкнув на эту стрелку вы можете увидеть список всех подкаталогов на том же уровне, что и текущий, позволив вам быстро сменить каталог.
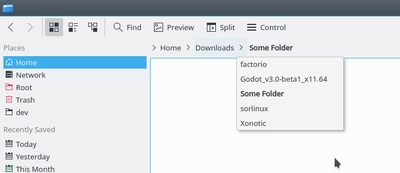
Существует также классическая навигационная панель, отображающая полный путь. Для использования этого стиля можно выбрать или вызвать сочетанием клавиш Ctrl + L. Щелкнув на свободное место рядом с последней отображенной папкой в иерархической стиле, который вы также можете сменить на классический стиль. Если классический стиль выбран, галочка отображается в конце панели навигации. Этот флажок является кнопкой, которая может быть использована чтобы сменить обратно на предыдущий стиль "цепочки". Конечно же, также можно использовать меню и сочетания клавиш.
Раздельный просмотр
Dolphin предлагает возможность разделить текущую папку так, что две папки отображаются рядом друг с другом, как знакомо из Midnight Commander. Это очень удобный вид для копирования или перемещения файлов из одной папки в другую.
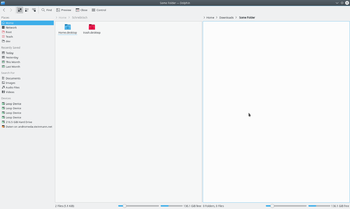
Вы можете разделить вид из (сочетание клавиш F3). Чтобы вернуться к просмотру только одной папки Вы можете использовать . Символ покажет вам, какой вид будет закрыт. В зависимости от активного в данный момент вида знак минуса будет показан в левой или правой части символа. Активный вид будет закрыт. Это важно знать, если вы хотите использовать сочетания клавиш. Существует также кнопка для разделения и закрытия вида, расположенная на панели инструментов. Эта кнопка отображается в виде минуса, что помогает легко узнать, какой вид будет закрыт.
Конечно, каждый вид имеет свою собственную панель навигации и с каждым из них можно использовать другой режим просмотра.
Sorting Files
Файлы в текущей выбранной папке отсортированы по умолчанию в алфавитном порядке. Способ сортировки может быть изменен через меню . Доступны следующие критерии сортировки:
Files may be sorted by the following attributes
- Имя
- Размер
- Дата
- Права доступа
- Владелец
- Группа
- Тип
- Адрес ссылки
- Полный путь
Кроме того, последовательность сортировки может быть определена при помощи меню или .
The sorting method can be changed by selecting from the toolbar and then select or . Additionally you may choose whether folders should be listed first by selecting .
Режим просмотра
Dolphin features three different folder view modes:
 Icons shows each file or folder as an icon with its name
 Compact is the same as icons, but in a more compact form, allowing more folders and files to be displayed at once
 Details presents a list of files and folders, giving information on each, including but not limited to size and date
The mode can be changed from within Dolphin
- Select from the menu. This option is only available if the main Menubar is enabled
- Select from the menu. This option is only available when the main Menubar is disabled
- By selecting the appropriate icon from the main toolbar, if it is enabled
- Using the default keyboard shortcuts:
- Ctrl+1 switches to the Icon display mode,
- Ctrl+2 switches to Compact and,
- Ctrl+3 switches to Detailed view.
View as Icons
Каждый файл или папка представляется ввиде значка в режиме "Значки". Вместо значка может быть отображена миниатюра файла. Это поведение можно активировать или деактивировать через меню или соответствующим элементом на панели инструментов. Присутствует ограничение размера миниатюр файлов. Это ограничение может быть настроено через параметр . Также пристутствует параметр для использования встроенных миниатюр в файлах. В KDE 4.5 миниатюры активируются (и указывается максимальный размер) при помощи
Присутствует возможность отобразить дополнительные сведения под значками. Может быть активировано и деактивировано через меню .
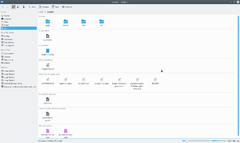
Вы можете сгруппировать значки для достижения наилучшего обзора. Активируется через . Теперь значки сгруппированы, а группы делятся на горизонтальные строки, содержащие имя группы, как заголовок. Группировка связана с выбранным критериям поиска.
Details
В режиме просмотра "Столбцы" дополнительные сведения отображаются по умолчанию в отличие от режима просмотра "Значки". Все файлы представлены в виде столбцов. Контекстное меню заголовка таблицы дает возможность добавить дополнительные столбцы. Доступны следующие столбцы:
- Размер
- Дата
- Права доступа
- Владелец
- Группа
- Тип
- Адрес ссылки
- Плный путь
Столбец "Имя" уже отображается. При нажатии на заголовке одного из столбцов таблицы будут отсортированы по этому столбцу. При щелчке на том же заголовке столбца последовательность сортировки меняется на противоположную.
Начиная с KDE 4.1 стало возможным отображать папки в древовидном виде. В этом режиме иконка плюса отображена рядом с папкой. Щелчок по этой иконке папки раскрывает все содержащиеся в ней папки и файлы, отображая их в виде таблицы, но они примут бледный вид. Щелчок по иконке минуса скрывает раскрытое содержимое. Конечно же, древовидная структура отображения каталогов может быть использована по вашему желанию. Древовидный вид по умолчанию отключен, но может быть задействован через с опцией .
Задание стандартных настроек для всех папок
Под пунктом меню вы можете установить любой из этих атрибутов в умолчательное положение для всех папок.
Under → (or under the menu item → if you have enabled menu bar) you can set any of these attributes to be the default for all folder views.
Панели
Dolphin contains several panels, which can be activated via menu → . A panel can be placed in either the left or right docking area. To move a panel, ensure that panels are unlocked (right-click on a panel and select ). Then click on the header of the panel you want to move and drag it to the desired location. The new location of the panel is highlighted as you move the cursor around, before releasing the mouse button. Dropping a panel on top of another combines them into a tabbed view.
In some versions of Dolphin, the header of each panel contains two buttons. The button near to the caption undocks the panel. This makes the panel an independent window which "floats" above Dolphin. The window is still combined with Dolphin and cannot be displayed without Dolphin and cannot for example be minimized like normal windows. By clicking the button again the panel is docked again. The second button closes the panel.
Non Modal Dialogs
When Moving, Copying or Deleting files/directories the dialog disappears even when the operation has not yet completed. A progress bar then appears in the bottom right of the screen, this then disappears also, if you want see the progress you need to click a small (i) information icon in the system tray.
Places
Dolphin contains a new kind of bookmarks Places. These are displayed in a panel which can be activated via → → (keyboard shortcut F9). The default Places are identical to the ones shown in the category Computer of the K-Menu Kickoff.
By clicking one of these places it will be opened in the current folder view. The context menu offers the possibility to edit the places or to remove them again. It is also possible to hide entries temporarily.
The context menu of a folder can be used to add this folder an another entry to the Places panel. Therefore there is a menu item . You can also Drag&Drop a folder to the Places panel.
The places panel also contains entries to connected removable devices like USB-keys or CDs. A small plug icon indicates if the device is mounted. The context menu offers the possibility to unmount the device.
The places are used as the basis in the breadcrumb navigation bar. Each address is shown in relation to the nearest parent folder which is one of the places.
Information
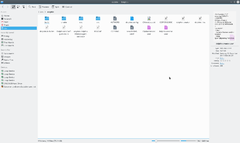
The information panel can be activated via → → (keyboard shortcut F11). This panel displays a preview or an icon of the currently selected file/folder or of the file/folder below the mouse cursor. Some additional information like change date or size to the file/folder is displayed as well.
The information panel offers the possibility to rate files, add a comment or tag a file. This is one of the interfaces to the semantic Desktop Nepomuk which provides the advantages of the semantic web for the desktop. Starting from KDE 4.2 it is possible to search for the semantic links given by the tags.
Folders
A panel providing a tree structure for the file system can be displayed via → → (keyboard shortcut F7). The tree structure offers the possibility by clicking the > and ↓ signs to expand/collapse sub folders. By clicking on one of the folders the content will be displayed in the current view.
Terminal
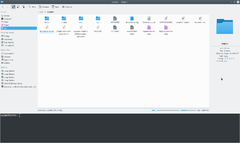
The terminal emulator Konsole can be displayed directly in Dolphin via → → (keyboard shortcut F4). This makes it possible to use shell commands directly in Dolphin. The terminal is opened in the folder which is displayed in the current view. Shift + F4 opens Konsole in new window.
Bookmarks and Places
KDE Plasma offers two different systems of user-based links to different locations in the file system. One is called Places and the other one is called Bookmarks. They reside in different files, and have different functions. This offers more flexibility, however, it makes it necessary to learn the differences.
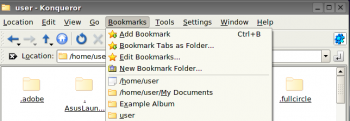
In contrast to the way Konqueror stored the bookmarks back in KDE3, both Places and Bookmarks are available to all applications as well as the Dolphin file manager. More of that later.
Places in applications
There is a default set of Places -
- Home
- Network
- Root
- Trash
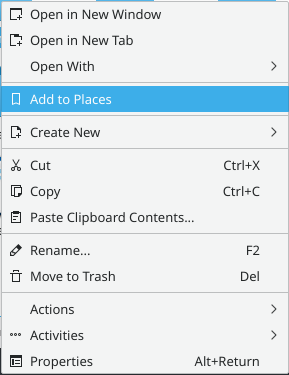
but you can add other places. In Dolphin, right-click on a folder and select , or just drag a folder onto Places.
By default this "Place" will be visible in all applications. If you want to keep it constrained to Dolphin, you need to right-click on the new name in the Places list, where you will find the option to Edit it. There is a check-box for .
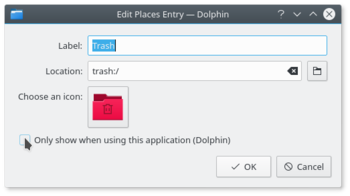
You can see the result of that command if you read ~/.local/share/apps/kfileplaces/bookmarks.xml.
In some applications too there is an option in the File menu to add a folder to Places. At this stage, however, applications vary in which features are available. The important thing to remember is that the default is for Places items to be available to all applications in the → dialogue.
Constraining to one application
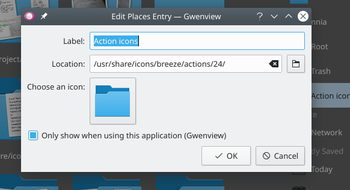
Some applications allow you to edit items in the Places menu. For instance, if in Gwenview you right click on a folder in Places you can set an option to .
If you need to constrain to an application that does not yet allow you to do that, the only way left is to edit the file ~/.local/share/kfile/bookmarks.xml. Immediately before the </metadata> tag you will need to add the line
<OnlyInApp>appname</OnlyInApp>
Bookmarks in applications
Enable bookmarks
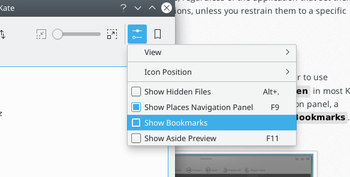
Bookmarks are not enabled in dialogs by default. To enable them
- Open the menu and select or
- Click the Options
 icon
icon - Select
Using bookmarks
Bookmarks are the second class of user-based links to the file system. Remember opening → and using the spanner/wrench? Next to it is a yellow star. This is the bookmark management menu.
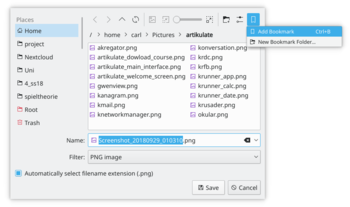
Here you can define bookmarks that will be visible in the same menu on any application. They are stored in one file, ~/.local/share/kfile/bookmarks.xml, which is used by all applications having that menu.
Archive Management in Dolphin
Managing archives now becomes simple. In any directory in Dolphin, highlight the files that you want to compress, and right-click. Here, using the Compress option, you can elect to create a RAR archive, a Gzipped tar archive, or define another compression mode that you have already set up.
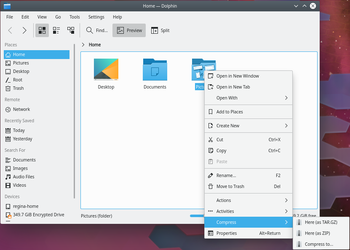
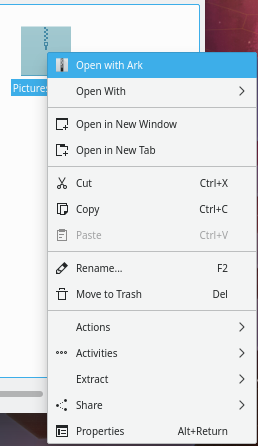
Similarly, if you right-click on an existing archived file you get a range of actions added to the right-click menu. You can extract the archive to the current folder, to an autodetected subfolder or to another place of your choosing.
Should you wish to add files to an existing archive, you can choose .
More Cool Actions
Change a File Association on-the-fly
Have you ever wanted to open a file, only to find that it is associated with an application that is not of your choice?
You can, for one, alter this in → → → → . This is the same as running kcmshell5 filetypes in a Konsole.
Alternatively, if you want to change multiple associations right quick, you would edit the *.desktop file directly, e.g. the file /usr/share/applications/org.gnome.Builder.desktop. For example, Gnome Builder associates with a great number of file-types which may not be desirable. So the line
MimeType=application/javascript; # we do not want all of these ....
may be shortened or commented out with # . Maybe a line
   InitialPreference=2
   X-KDE-InitialPreference=3
in the builder.desktop file helps to keep your previous default associated app, with builder being only secondary or tertiary option.
Thirdly, Dolphin and Konqueror offer a quick method for changing a single association:
Right-click on the file and select . The first line there is descriptive, something like:
Type: XML document
At the same level, on the right, there is a spanner (wrench). Click on that and you can add or change an association.
Similarly, by working on a folder, you can change the default file manager to/from Konqueror, if you choose, or add another image browser to the possible associations.
The sub-menu opens up a whole lot more cool things to do from Dolphin. Some possibilities only appear when applicable to the file you have selected. An apps .desktop file below /usr/share/applications defines what actions are applicable for a particular type of file. Some of the options are
- Convert an image file to a different format
- Preview the file
- Download a remote file with KGet
- Sign and/or encrypt the file, according to the encryption software installed
Encode and copy audio CD tracks
- Insert an audio CD
- Navigate to this CD in Dolphin: it must appear as "Volume" in your Dolphin 'Places' or you can reach it by typing audiocd:/ in the address bar.
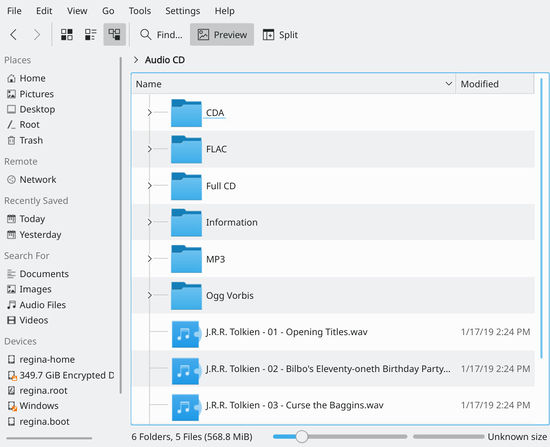
You now notice that Dolphin is proposing a WAV file for each track, plus:
- a CDA folder containing indexing information in the usual CDA format.
- a Whole CD folder, containing one file for each format (.cda, .flac, .mp3, .ogg, .wav) holding all the tracks
- a FLAC folder, containing the tracks encoded into FLAC format (lossless information format)
- an Information folder containing the CDDB informations
- an MP3 folder, containing all the tracks in MP3 format
- a Ogg Vorbis folder, containing the tracks encoded in OGG format
You then just have to copy the folder of your choice, in your preferred format to obtain the relative encoded version of your CD!
Using timeline to have your recent files as startup folder
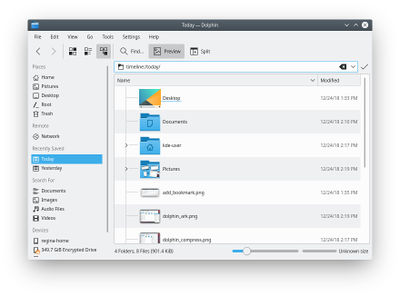
You can start up dolphin (with baloo up and running) with a view of recently modified files: Just navigate to the address/location of timeline:/today/ (copy paste it to the address bar) or use it as dolphin start-up-folder in dolphin-settings.


