System Settings/Task Scheduler: Difference between revisions
Appearance
Marked this version for translation |
|||
| (17 intermediate revisions by 4 users not shown) | |||
| Line 2: | Line 2: | ||
<translate> | <translate> | ||
== General Information == <!--T:1--> | |||
<!--T: | <!--T:31--> | ||
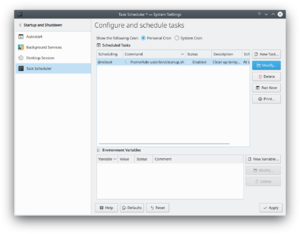
Task Scheduler is a graphical front end to the standard "cron" utility. With it, commands (or "tasks") can be run at specific times, on a certain day or date, or at specific intervals (time between execution). | |||
<!--T:32--> | |||
[[Image:Kcron-screenshot-de.png|thumb|300px|center|Task Scheduler in Plasma 5]] | |||
== Usage == <!--T:3--> | |||
<!--T:5--> | <!--T:5--> | ||
Task Scheduler can be started by starting the '''System Settings''' application | Task Scheduler can be started by starting the '''System Settings''' application. | ||
Select <menuchoice>Startup and Shutdown</menuchoice> follwed by <menuchoice>Task Scheduler</menuchoice>. | |||
=== Adding and Modifying tasks === <!--T:11--> | |||
* Click | |||
<!--T:12--> | |||
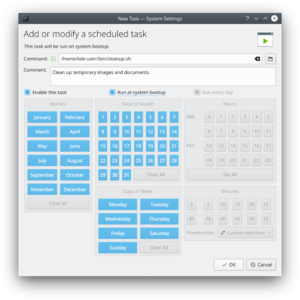
* Click <menuchoice>New Task...</menuchoice> to add a new task, or "Modify" to modify an existing task. The '''Add or modify existing task''' page will be displayed. | |||
<!--T:13--> | |||
[[Image:kcron-task-dialog.png|thumb|300px|center|The "Add or modify task" page of SystemSettings]] | [[Image:kcron-task-dialog.png|thumb|300px|center|The "Add or modify task" page of SystemSettings]] | ||
<!--T:14--> | |||
* Enter the command to be run. Click the folder icon to choose it from a dialog. | * Enter the command to be run. Click the folder icon to choose it from a dialog. | ||
<!--T:15--> | |||
* Enter a comment (optional). This should be descriptive, explaining what the task will do as the command may not always be obvious. | * Enter a comment (optional). This should be descriptive, explaining what the task will do as the command may not always be obvious. | ||
<!--T:16--> | |||
* Click '''Enable this task''' to enable the task to run. | * Click '''Enable this task''' to enable the task to run. | ||
<!--T:17--> | |||
* Click '''Run at system bootup''' to enable the script to run each time the system is booted. | * Click '''Run at system bootup''' to enable the script to run each time the system is booted. | ||
<!--T:18--> | |||
* Click '''Run every day''' to enable the script to run every day. This will automatically select the appropriate options. | * Click '''Run every day''' to enable the script to run every day. This will automatically select the appropriate options. | ||
* Using the buttons, choose when the command should be run. Not all parameters are required, those not needed may be left blank. | |||
<!--T:19--> | |||
* Using the buttons, choose when the command should be run. Not all parameters are required, those not needed may be left blank.</translate> | |||
<translate> | |||
<!--T:33--> | |||
** Hours and Minutes are the time of day to run the task, not an interval. | ** Hours and Minutes are the time of day to run the task, not an interval. | ||
=== Hints | <!--T:24--> | ||
* When done, click <menuchoice>OK</menuchoice>. The task will be added and scheduled if enabled. | |||
<!--T:25--> | |||
{{Tip|Click <menuchoice>Run Now</menuchoice> to run a task immediately after adding or modifying the task.}} | |||
=== Removing a task === <!--T:20--> | |||
<!--T:26--> | |||
To completely remove a task, select the task from the list and click the '''Delete''' button. This will permanently remove the task. | |||
== Environment Variables == <!--T:21--> | |||
<!--T:27--> | |||
Sometimes a task or multiple tasks need a specific variable set, it must be added in the '''Environment Variables''' section. The '''cron''' utility uses its own environment, system-wide and user-specific variables are not used. Click '''New Variable''' to add a new variable definition, or '''Modify''' to change an existing variable. | |||
<!--T:28--> | |||
* Enter the name of the variable to use. This name:</translate> | |||
<translate> | |||
<!--T:34--> | |||
** Must consist of letters, digits, and underscore ('_') only</translate> | |||
<translate> | |||
<!--T:35--> | |||
** Must start with a letter</translate> | |||
<translate> | |||
<!--T:36--> | |||
** Should not be a reserved or commonly used system variable. See https://pubs.opengroup.org/onlinepubs/000095399/basedefs/xbd_chap08.html for more information | |||
<!--T:29--> | |||
* The value the variable will contain. This can be a number or string. | |||
<!--T:30--> | |||
* Enter a brief description of the variable. | |||
== Hints == <!--T:7--> | |||
<!--T:8--> | <!--T:8--> | ||
| Line 36: | Line 86: | ||
<!--T:9--> | <!--T:9--> | ||
* The command-line tool that allows you to have a look at the currently installed cron-jobs is {{Input|1=crontab -l}} (that's the letter L). | * The command-line tool that allows you to have a look at the currently installed cron-jobs is {{Input|1=crontab -l}} (that's the letter L). | ||
==More Information== <!--T:22--> | |||
<!--T:23--> | |||
* [https://docs.kde.org/stable5/en/kdeadmin/kcontrol5/kcron/index.html KDE official documentation] | |||
* [https://en.wikipedia.org/wiki/Cron Cron] (Wikipedia) | |||
* [https://wiki.archlinux.org/index.php/cron Cron] (Arch Linux wiki) | |||
<!--T:10--> | <!--T:10--> | ||
[[Category:Desktop]] | |||
[[Category:System]] | [[Category:System]] | ||
[[Category:Configuration]] | |||
</translate> | </translate> | ||
Latest revision as of 08:22, 1 June 2019
General Information
Task Scheduler is a graphical front end to the standard "cron" utility. With it, commands (or "tasks") can be run at specific times, on a certain day or date, or at specific intervals (time between execution).

Usage
Task Scheduler can be started by starting the System Settings application. Select follwed by .
Adding and Modifying tasks
- Click to add a new task, or "Modify" to modify an existing task. The Add or modify existing task page will be displayed.

- Enter the command to be run. Click the folder icon to choose it from a dialog.
- Enter a comment (optional). This should be descriptive, explaining what the task will do as the command may not always be obvious.
- Click Enable this task to enable the task to run.
- Click Run at system bootup to enable the script to run each time the system is booted.
- Click Run every day to enable the script to run every day. This will automatically select the appropriate options.
- Using the buttons, choose when the command should be run. Not all parameters are required, those not needed may be left blank.
- Hours and Minutes are the time of day to run the task, not an interval.
- When done, click . The task will be added and scheduled if enabled.
Removing a task
To completely remove a task, select the task from the list and click the Delete button. This will permanently remove the task.
Environment Variables
Sometimes a task or multiple tasks need a specific variable set, it must be added in the Environment Variables section. The cron utility uses its own environment, system-wide and user-specific variables are not used. Click New Variable to add a new variable definition, or Modify to change an existing variable.
- Enter the name of the variable to use. This name:
- Must consist of letters, digits, and underscore ('_') only
- Must start with a letter
- Should not be a reserved or commonly used system variable. See https://pubs.opengroup.org/onlinepubs/000095399/basedefs/xbd_chap08.html for more information
- The value the variable will contain. This can be a number or string.
- Enter a brief description of the variable.
Hints
- All the files that are modified are located in the /etc/cron directory where there are numerous files to look at.
- The command-line tool that allows you to have a look at the currently installed cron-jobs is
crontab -l
(that's the letter L).
More Information
- KDE official documentation
- Cron (Wikipedia)
- Cron (Arch Linux wiki)

