Kdenlive/Manual/Timeline/Editing/ru: Difference between revisions
Smolyaninov (talk | contribs) No edit summary |
Updating to match new version of source page |
||
| (145 intermediate revisions by 2 users not shown) | |||
| Line 2: | Line 2: | ||
<!-- Please use level 3 top heading, i.e. "===" --> | <!-- Please use level 3 top heading, i.e. "===" --> | ||
= Редактирование = | === Редактирование === | ||
Редактирование выполняется на [[Special:myLanguage/Kdenlive/Manual/Timeline|монтажном столе]]. Добавьте клип, переместив его из [[Special:myLanguage/Kdenlive/Manual/Projects_and_Files/Project_Tree| | Редактирование выполняется на [[Special:myLanguage/Kdenlive/Manual/Timeline|монтажном столе]]. Добавьте клип, переместив его из [[Special:myLanguage/Kdenlive/Manual/Projects_and_Files/Project_Tree|дерева проекта]] или из [[Special:myLanguage/Kdenlive/Manual/Monitors|монитора клипа]]. Как только клип окажется на дорожке, его можно переместить (с помощью мыши) в другое место на той же дорожке, или на другую дорожку. | ||
[[File:Kdenlive-addcliptotimeline.gif|center]] | |||
With 19.08.0 editing with keyboard shortcuts was introduced. This will speed up the editing work and you can do editing steps that are not possible or not as quick and easy with the mouse. Working with keyboard shortcuts in 19.08 is different as in the former Kdenlive versions. Mouse operations have not changed and working as before. See [[Special:MyLanguage/Kdenlive/Manual/Timeline/Editing#3 point editing|3 point editing]]. | |||
==== Навигация в проекте ==== | ==== Навигация в проекте ==== | ||
| Line 10: | Line 14: | ||
Курсор монтажного стола показывает ваше текущее местоположение в проекте. Положение на линейке монтажного стола и мониторе проекта всегда синхронизированы. Позиция может быть перемещена следующими способами: | Курсор монтажного стола показывает ваше текущее местоположение в проекте. Положение на линейке монтажного стола и мониторе проекта всегда синхронизированы. Позиция может быть перемещена следующими способами: | ||
* С помощью сочетания клавиш: Клавиши со стрелкой вправо/влево перемещение на 1 кадр, Shift + вправо/влево на 1 секунду | * С помощью сочетания клавиш: Клавиши со стрелкой вправо/влево перемещение на 1 кадр, Shift + вправо/влево на 1 секунду. | ||
* | * Щелчком/перемещением курсора по [[Special:myLanguage/Kdenlive/Manual/Timeline|линейке монтажного стола]] или в пустой области монтажного стола. | ||
* | * Щелчком/перемещением курсора по линейке [[Special:myLanguage/Kdenlive/Manual/Monitors#Project Monitor|монитора проекта]]. | ||
* | * Прокруткой колёсика мыши, при нахождении указателя над линейкой [[Special:myLanguage/Kdenlive/Manual/Timeline|монтажного стола]] или [[Special:myLanguage/Kdenlive/Manual/Monitors#Project Monitor|монитора проекта]]. | ||
* | * Правкой с помощью цифровых клавиш тайм-кода [[Special:myLanguage/Kdenlive/Manual/Monitors#Project Monitor|монитора праекта]]. | ||
* | * Стрелками вверх/вниз на тайм-коде [[Special:myLanguage/Kdenlive/Manual/Monitors#Project Monitor|монитора проекта]] | ||
==== Резка клипа ==== | ==== Резка клипа ==== | ||
| Line 28: | Line 32: | ||
Или <menuchoice>Правой кнопкой -> Разрезать клип</menuchoice> | Или <menuchoice>Правой кнопкой -> Разрезать клип</menuchoice> | ||
Другой способ | Другой способ — используйте [[Special:myLanguage/Kdenlive/Manual/Timeline/Editing#Razor_Tool|Инструмент Резак]]. | ||
==== Изменение длительности клипа ==== | ==== Изменение длительности клипа ==== | ||
| Line 40: | Line 44: | ||
Вы также можете изменить длительность клипа, разрезав его с помощью [[Special:MyLanguage/Kdenlive/Manual/Timeline/Editing#Razor_Tool|Инструмента Резак]], затем удалив всё лишнее. | Вы также можете изменить длительность клипа, разрезав его с помощью [[Special:MyLanguage/Kdenlive/Manual/Timeline/Editing#Razor_Tool|Инструмента Резак]], затем удалив всё лишнее. | ||
==== Удаление | ==== Удаление пробелов между клипами ==== | ||
Щёлкните правой кнопкой мыши по пробелу между клипами и выберите <menuchoice>Удалить пробел</menuchoice>, клип который находится справа приклеится к левому. Однако, если у вас клипы размещены на нескольких дорожках и они не сгруппированы, удаление пробела нарушит синхронизацию между этими дорожками. Например, на нижней дорожке, находится клип с музыкальным сопровождением и после удаления пробела он останется на месте. В этой ситуации, возможно, безопаснее использовать инструмент [[Special:MyLanguage/Kdenlive/Manual/Timeline/Editing#Spacer_Tool|Вставка пробелов]]. | |||
[[File: | [[File:Kdenlive-removespace.gif|center]] | ||
==== | ==== Панель инструментов монтажного стола ==== | ||
<div class="mw-translate-fuzzy"> | |||
[[File:Kdenlive Top | Над монтажным столом расположена «панель инструментов монтажного стола», предназначенная для контроля различных аспектов редактора. | ||
[[File:Kdenlive Top toolbar18.12_ru.png|left|Панель инструментов монтажного стола 18.12]] | |||
<br clear=all> | <br clear=all> | ||
</div> | |||
1. '''Композитинг дорожек''' выпадающее меню | |||
1а. [[Special:MyLanguage/Kdenlive/Manual/Timeline/Editing#Track_Compositing_-_None|Отсутствует]] | |||
1б. [[Special:MyLanguage/Kdenlive/Manual/Timeline/Editing#Track_Compositing_-_Preview|Предпросмотр]] | |||
1в. [[Special:MyLanguage/Kdenlive/Manual/Timeline/Editing#Track_Compositing_-_HighQuality|Высокое качество]] | |||
1d. '''Mixed Audio tracks''' changes the order in which tracks are displayed to mixed audio and video tracks. For example, from the bottom of the timeline to the top of the timeline: A1, V1, A2, V2, A3, V3 | |||
1e. '''Split Audio tracks''' changes the order in which tracks are displayed to separate audio and video tracks. For example, from the bottom of the timeline to the top of the timeline: A1, A2, A1, V1, V2, V3 | |||
1f. '''Split Audio tracks (reverse)''' changes the order in which tracks are displayed to separate audio and video tracks with the audio tracks in reverse order. For example, from the bottom of the timeline to the top of the timeline: A1, A2, A3, V1, V2, V3 | |||
2. '''Режим редактирования на монтажном столе''' выпадающее меню | |||
2a. [[Special:MyLanguage/Kdenlive/Manual/Timeline/Editing#Timeline Edit Mode - Normal_Mode|Обычный режим]] | |||
2б. [[Special:MyLanguage/Kdenlive/Manual/Timeline/Editing#Timeline Edit Mode - Overwrite_Mode|Режим перезаписи]] | |||
2в. [[Special:MyLanguage/Kdenlive/Manual/Timeline/Editing#Timeline Edit Mode - Insert_Mode|Режим вставки]] | |||
Переключать режим композитинга дорожек и редактирования на монтажном столе, также можно через меню <menuchoice>Инструменты</menuchoice>. | |||
<div class="mw-translate-fuzzy"> | |||
23. Участок монтажного стола используется [[File:Kdenlive Use timeline zone for insert.png]] / Участок монтажного стола не используется [[File:Kdenlive Dont Use timeline zone for insert.png]] для вставки (переключается). См. [https://kdenlive.org/project/insert-overwrite-advanced-timeline-editing/ Insert & Overwrite Advanced Timeline Editing] на оф. сайте Kdenlive (en). | |||
</div> | |||
'''Группа Инструментов''' (активным может быть только один из трёх) | |||
Активные кнопки выделены серым. | |||
<div class="mw-translate-fuzzy"> | |||
3. [[Special:MyLanguage/Kdenlive/Manual/Timeline/Editing#Selection_Tool|Инструмент выбора]] | |||
</div> | |||
<div class="mw-translate-fuzzy"> | |||
4. [[Special:MyLanguage/Kdenlive/Manual/Timeline/Editing#Razor_Tool|Резак]] | |||
</div> | |||
<div class="mw-translate-fuzzy"> | |||
5. [[Special:MyLanguage/Kdenlive/Manual/Timeline/Editing#Spacer_Tool|Вставка пробелов]] | |||
</div> | |||
<div class="mw-translate-fuzzy"> | |||
6. Индикатор положения (тайм-код) — отображает временную точку или номер кадра на котором находится курсор монтажного стола (или курсор мыши в данный момент). Нажмите на виджет, чтобы выбрать отображение по времени или по номеру кадра | |||
</div> | |||
7a. '''hh:mm:ss:ff;''' Sets the position indicator to display time units | |||
7b. '''Frames''' Sets the position indicator to display frames | |||
8. '''Mix Clips''' - allows same-track transitions to be applied between two clips. See [[Special:MyLanguage/Kdenlive/Manual/Timeline/Editing#Same_track_transitions|Same Track Transitions]] for a detailed explination. | |||
<div class="mw-translate-fuzzy"> | |||
8. Вставить участок клипа на монтажный стол. См. [https://kdenlive.org/project/insert-overwrite-advanced-timeline-editing/ Insert & Overwrite Advanced Timeline Editing] на оф. сайте Kdenlive (en). | |||
</div> | |||
<div class="mw-translate-fuzzy"> | |||
9. Перезаписать участок клипа на монтажном столе. См. [https://kdenlive.org/project/insert-overwrite-advanced-timeline-editing/ Insert & Overwrite Advanced Timeline Editing] на оф. сайте Kdenlive (en). | |||
</div> | |||
<div class="mw-translate-fuzzy"> | |||
10. Удалить участок заполнив пробел | |||
</div> | |||
<div class="mw-translate-fuzzy"> | |||
11. Удалить участок сохранив пробел | |||
</div> | |||
<div class="mw-translate-fuzzy"> | |||
12. Избранные эффекты | |||
</div> | |||
<div class="mw-translate-fuzzy"> | |||
13. Собрать для предпросмотра | |||
</div> | |||
<div class="mw-translate-fuzzy"> | |||
14. Остановить сборку | |||
</div> | |||
<div class="mw-translate-fuzzy"> | |||
15. Добавить участок предпросмотра | |||
</div> | |||
<div class="mw-translate-fuzzy"> | |||
16. Удалить участок предпросмотра | |||
</div> | |||
<div class="mw-translate-fuzzy"> | |||
17. Удалить все участки предпросмотра | |||
</div> | |||
<div class="mw-translate-fuzzy"> | |||
18. Собирать автоматически | |||
</div> | |||
<div class="mw-translate-fuzzy"> | |||
19. Отключить предпросмотр монтажного стола | |||
</div> | |||
<div class="mw-translate-fuzzy"> | |||
20. Управление данными кэша | |||
</div> | |||
< | <div class="mw-translate-fuzzy"> | ||
Пункты с 13 по 20 рассматриваются в статье [https://kdenlive.org/project/timeline-preview-rendering/ Timeline preview rendering] на оф. сайте Kdenlive (en). | |||
</div> | |||
15. Show/Hide the '''Audio Mixer''' tool. The audio mixer tool allows audio to be managed in the project. | |||
16. Show/Hide the '''Subtitle Tool'''. This will show or hide the subtitle track where subtitles can be created or edited in the project. | |||
==== Нижняя панель инструментов ==== | |||
[[File:Kdenlive Bottom toolbar17 04b.png|left|frame|Нижняя панель инструментов, версия 17.04]] | |||
<br clear=all> | |||
24. [[Special:MyLanguage/Kdenlive/Manual/Timeline/Editing#Split_Audio_and_Video_Automatically|Автоматически отделять звук от видео]] | |||
25. [[Special:MyLanguage/Kdenlive/Manual/Timeline/Editing#Automatic_Transitions|Автоматические переходы]] | |||
26. [[Special:MyLanguage/Kdenlive/Manual/Timeline/Editing#Show_Video_Thumbnails|Показывать миниатюры видео]] | |||
27. [[Special:MyLanguage/Kdenlive/Manual/Timeline/Editing#Show_Audio_Thumbnails|Показывать миниатюры звука]] | |||
28. [[Special:MyLanguage/Kdenlive/Manual/Timeline/Editing#Show_marker_comments|Показывать комментарии к маркерам]] | |||
29. [[Special:MyLanguage/Kdenlive/Manual/Timeline/Editing#Snap|Привязка]] | |||
'''Инструменты масштабирования''' | |||
30. [[Special:MyLanguage/Kdenlive/Manual/Timeline/Editing#Fit_Zoom_to_Project|Выровнять по размеру проекта]] | |||
31. Уменьшить масштаб | |||
32. [[Special:MyLanguage/Kdenlive/Manual/Timeline/Editing#Zoom_project|Уровень масштабирования]] | |||
33. Увеличить масштаб | |||
==== Описание кнопок ==== | |||
<span id="Track Compositing - None"></span> | |||
===== Композитинг дорожек - Отсутствует ===== | |||
===== | Если для композиции дорожек установлено значение «Отсутствует», дорожки с информацией об альфа-канале не будут объединены с другими дорожками, если между клипами не добавлен явный композитный или аффинный переход. Это поведение старых версий kdenlive (<= ver 0.9.X). | ||
<span id="Track Compositing - Preview"></span> | |||
===== Композитинг дорожек - Предпросмотр ===== | |||
Если для композиции дорожек установлено значение «Предпросмотр», дорожки с информацией об альфа-канале будут автоматически объединены с другими дорожками с использованием алгоритма, который несколько быстрее, чем алгоритм, используемый с ''композитингом дорожек — Высокое качество'', но слегка ухудшающий цвета. | |||
<span id="Track Compositing - HighQuality"></span> | |||
===== Композитинг дорожек - Высокое качество ===== | |||
===== | Если для композиции дорожек установлено значение «Высокое качество», дорожками с информацией альфа-канала будут автоматически компоноваться с другими дорожками с использованием алгоритма (qtblend), который несколько медленнее, чем алгоритм, используемый с ''композитингом дорожек — Предпросмотр'', но который сохраняет информацию о цвете с более высокой точностью. | ||
<span id="Timeline Edit Mode - Normal Mode"></span> | |||
===== Режим редактирования - Обычный режим ===== | |||
В этом режиме редактирования нельзя размещать одни клипы на других на одной дорожке монтажного стола. Клипы можно переместить на другую дорожку над или под существующим клипом. Сравните этот режим с режимом перезаписи. | |||
<span id="Timeline Edit Mode - Overwrite Mode"></span> | |||
===== Режим редактирования - Режим перезаписи ===== | |||
В этом режиме редактирования можно размещать одни клипы на других на одной дорожке монтажного стола. Входящий клип перезапишет тот участок существующего клипа (или клипов), который покроется входящим клипом. | |||
[[File:kdenlive_overwrite_mode_before01.png|left|frame|До]] | |||
= | [[File:kdenlive_overwrite_mode_after01.png|left|frame|После]] | ||
<br clear=all> | |||
На приведенном выше снимке экрана «После» видно, что клип, перемещаемый с верхней дорожки, заменил часть клипа на нижней дорожке. | |||
<span id="Timeline Edit Mode - Insert Mode"></span> | |||
'''Rearrange clips in the timeline''' | |||
Performing a rearrange edit. This technique lets you quickly change the order of clips in the timeline. | |||
[[File: Overwrite-mode.mp4]] | |||
Drag a clip, as you drop it to a new location performs an overwrite edit that overwrites the existing clip. | |||
===== | ===== Режим редактирования - Режим вставки ===== | ||
При выбранном режиме вставки входящий клип будет вставлен, в то место на монтажном столе, куда вы его переместили, разрезая все клипы на всех дорожках (включая звуковые) от своего начала. Правая часть всех существующих клипов переместится вправо, для размещения входящего клипа. | |||
[[File:Kdenlive Insert | [[File:Kdenlive Insert mode0before_ru.png|left|frame|До]] | ||
[[File:Kdenlive Insert | [[File:Kdenlive Insert mode1before_ru.png|left|frame|Во время добавления]] | ||
[[File:Kdenlive Insert | [[File:Kdenlive Insert mode1after_ru.png|left|frame|После. Входящий клип вставлен. Клипы за точкой вставки смещены вправо]] | ||
<br clear=all> | <br clear=all> | ||
<span id="Selection Tool"></span> | |||
'''Rearrange edit in the timeline''' | |||
Performing a rearrange edit. Only clips in the destination track are shifted; clips in other tracks are not affected. This technique lets you quickly change the order of clips in the timeline. | |||
It always closes all space in the track. | |||
[[File: Insert-mode.mp4]] | |||
Drag a clip, as you drop it to a new location. Releasing the clip performs an insert edit that shifts clips in the destination track only. | |||
===== Инструмент выбора ===== | |||
=== | Используется для выбора клипов на монтажном столе. Когда инструмент активен, курсор преобразуется в руку. | ||
<span id="Razor Tool"></span> | |||
===== Резак ===== | |||
Используется, для резки клипов на монтажном столе. Когда инструмент активен, курсор преобразуется в ножницы. | |||
<span id="Spacer Tool"></span> | |||
=== | ===== Вставка пробелов ===== | ||
Используется для перемещения всех клипов на монтажном столе сразу на всех или только на одной дорожке, для создания или удаления пробелов между клипами. Для перемещения на всех дорожках выберите клип и переместите мышь в желаемом направлении, все клипы справа от него переместятся в новую позицию. | |||
[[File:Kdenlive_Spacer_tool_crop.png|600px |Перемещение клипов сразу на всех дорожках]] | |||
Для перемещения клипов на одной дорожке нажмите клавишу '''Control''' и переместите все элементы справа от выбранного клипа. | |||
<span id="Fit Zoom to Project"></span> | |||
===== Выровнять по размеру проекта ===== | |||
===== | Изменение масштаба содержимого монтажного стола, для просмотра проекта целиком. Эта же функция доступна из меню [[Special:MyLanguage/Kdenlive/Manual/Timeline Menu|Монтажный стол]], пункт <menuchoice>Выровнять по размеру проекта</menuchoice>. | ||
<span id="Zoom project"></span> | |||
===== Масштабирование проекта ===== | |||
Значки со стрелками служат для увеличения или уменьшения масштаба монтажного стола. Ползунок регулирует масштаб с крупным шагом. Эти же параметры, контролируются из меню <menuchoice>Монтажный стол</menuchoice> - пункты<menuchoice>Увеличить масштаб</menuchoice> и <menuchoice>Уменьшить масштаб</menuchoice>. | |||
<span id="Split Audio and Video Automatically"></span> | |||
===== Автоматически отделять звук от видео ===== | |||
=== | Если этот параметр включен и клип перемещён на монтажный стол, звук отделится от клипа и переместится на звуковую дорожку. Это производит то же действие, что и выбор из [[Special:MyLanguage/Kdenlive/Manual/Timeline/Right Click Menu|контекстного меню]] клипа <menuchoice>Отделить звук от видео</menuchoice>. Если этот параметр выключен и клип перемещён на монтажный стол, звук останется вместе с видео на видеодорожке. | ||
<span id="Automatic Transitions"></span> | |||
===== Автоматические переходы ===== | |||
Если этот параметр включен, то при добавлении любого перехода на монтажный стол длительность перехода будет автоматически подстраиваться под перекрываемую между клипами область. См. [[Special:MyLanguage/Kdenlive/Manual/Transitions#Automatic_Transitions|Автоматические переходы]] | |||
<span id="Show Video Thumbnails"></span> | |||
===== Показать миниатюры видео ===== | |||
<div class="mw-translate-fuzzy"> | |||
Если этот параметр включен, то на видеоклипах размещённых на монтажном столе, кроме имени файла будут отображаться миниатюры. Если выключен просто имя файла. | |||
</div> | |||
=== Показать миниатюры | При увеличении монтажного стола до максимума, на клипе в виде миниатюры будет отображён каждый кадр. В остальных режимах масштабирования монтажного стола на клипе будут отображены первый и последний кадры. | ||
<span id="Show Audio Thumbnails"></span> | |||
===== Показать миниатюры звука ===== | |||
Если этот параметр включен, то на звуковых клипах размещённых на монтажном столе, кроме имени файла будет отображаться форма звуковой волны. Если выключен просто имя файла. | |||
<span id="Show marker comments"></span> | <span id="Show marker comments"></span> | ||
=== Показать комментарии | ===== Показать комментарии к маркерам ===== | ||
С помощью этого параметра можно включить или выключить отображение комментариев к [[Special:MyLanguage/Kdenlive/Manual/Projects_and_Files/Clips#Markers|маркерам]] (текст с золотым фоном в примере ниже) и к [[Special:MyLanguage/Kdenlive/Manual/Timeline/Guides|направляющим]] (текст с фиолетовым фоном). | |||
[[File:Kdenlive_Markers_and_guides_crop.png]] | [[File:Kdenlive_Markers_and_guides_crop.png]] | ||
<span id="Snap"></span> | |||
===== Привязка ===== | |||
При включенном параметре, во время перемещения входящего клипа на монтажный стол и при сближении его среза со срезом существующего клипа, будет выполнятся простая склейка. Как только срезы обоих клипов будут находиться на определённо небольшом расстоянии, они склеятся, без зазора и пересечения друг с другом. Обратите внимание, что склейка происходит, даже если клипы будут находится на разных дорожках монтажного стола. | |||
Клипы будут также привязываться к позиции курсора, [[Special:MyLanguage/ | Клипы будут также привязываться к позиции курсора, к маркерам и [[Special:MyLanguage/Kdenlive/Manual/Timeline/Guides|направляющим]]. | ||
==== Cutting Footage from multiple aligned tracks - Ripple Delete ==== | ==== Cutting Footage from multiple aligned tracks - Ripple Delete ==== | ||
| Line 253: | Line 320: | ||
<b>Seems missing in Kdenlive 17.04 & 18.04</b> <br> | <b>Seems missing in Kdenlive 17.04 & 18.04</b> <br> | ||
Mark In and Out points in the Project Monitor, then choose <menuchoice>Timeline->All clips->Ripple Delete</menuchoice> (or <keycap>Ctrl-X</keycap>). Kdenlive deletes all footage between the In and Out points in unlocked tracks, slides everything else back to fill the gap, and puts the playhead on the In point. | Mark In and Out points in the Project Monitor, then choose <menuchoice>Timeline->All clips->Ripple Delete</menuchoice> (or <keycap>Ctrl-X</keycap>). Kdenlive deletes all footage between the In and Out points in unlocked tracks, slides everything else back to fill the gap, and puts the playhead on the In point. | ||
==== Subtitle ==== | |||
Since Version 20.12.0 | |||
[[File:subtitle-timeline-1.gif]] | |||
The subtitling tool allows you to add and edit subtitles directly in the timeline on a special subtitle track or by using the new subtitle window. You can also import (SRT/ASS) and export (SRT) subtitles. | |||
There are 3 ways to add subtitle: | |||
* ''' Menu ''' | |||
:* <menuchoice>Project -> Subtitle -> Add Subtitle</menuchoice> | |||
* ''' Keyboard ''' | |||
:* <keycap>Shift+S</keycap> adds a subtitle. | |||
* ''' Icon and Mouse''' | |||
:* Click the "subtitle" icon in the timeline toolbar to open the subtitle track in the timeline. | |||
:* Double-click in the subtitle track to add a subtitle. | |||
''' Adding and editing text''' | |||
Add or editing text either directly into the subtitle clip or in the subtitle window. | |||
''' Adjust the length of subtitle ''' | |||
Grab the end of a subtitle with the mouse and lengthen or shorten it as needed. | |||
Set subtitle in/out can be achieved with the same shortcut as to set clip in/out (left/right parenthesis shortcut). | |||
''' Subtitle window ''' | |||
[[File:subtitle-widget.gif]] | |||
* The subtitles window allows easier editing and also makes it possible to easily navigate between subtitles with the left/right button. | |||
* With the plus sign, you can add subtitles. | |||
* The scissors are mostly here for divide subtitles: let's say your subtitle text is too long and you want to make it 2 different subtitles. Put the cursor in the text widget where you want to cut and click the scissors, it will split the text between 2 different subtitle items. The scissors are only working when the playhead is over the subtitle itself. | |||
* The tick adds the text to the subtitle. | |||
'''Import and export subtitle''' | |||
Importing SRT and ASS subtitle file: <menuchoice>Project -> Subtitles -> Import subtitles file</menuchoice> | |||
Exporting SRT subtitles only: <menuchoice>Project -> Subtitles -> Export subtitles file</menuchoice> | |||
{{Tip| SRT supports markup for: bold, italic, underline, text color and line break. | |||
* <code><nowiki> <b>text in boldface</b> </nowiki></code> | |||
* <code><nowiki> <i>text in italics</i> </nowiki></code> | |||
* <code><nowiki> <u>text underlined</u> </nowiki></code> | |||
* <code><nowiki> <font color="#00ff00"> text in green</font> </nowiki></code> you can use the font tag only to change color. | |||
* And all combined: <nowiki> <font color="#00ff00"><b><i><u>All combined</u></i></b></font> </nowiki> | |||
<!--}}--> | |||
* '''Line break:''' Add on the end of each line a <code><nowiki><br></nowiki></code> (for break). Now the srt file is stored correct and reopened with the line break. The subtitle in the subtitle window will be all in 1 line after several save but the breaks is working. | |||
<keycap>Alt+arrow</keycap> jumps from subtitle to subtitle.}} <!--{{--> | |||
Since version 21.04.0 | |||
*''' Spelling check ''' | |||
Spelling check for subtitle is integrated and shows incorrect words by a red wiggly line. Right-click on the word and you get a list of possible words you can choose by click on it. | |||
[[File: Speech-to-text_Spell-Check.png]] | |||
==== Speech to text ==== | |||
Since version 21.04.0 | |||
*''' Install Python ''' | |||
Python needs to be installed on your computer. Download it from here https://www.python.org/downloads/ for installation on your computer. | |||
Speech recognition requires the vosk and srt python modules | |||
- On Linux open a terminal and put in and run: "pip3 install vosk;pip3 install srt". | |||
- On Windows, you can download this batch file ([[File: Install_vosk_srt.zip]]). After download double click starts the installations. | |||
*''' Install a language ''' | |||
Goto <menuchoice>Settings -> Configure Kdenlive -> Speech to Text</menuchoice> | |||
Click on the link to get a language model | |||
[[File: Speech-to-text_Download-link.png]] | |||
Drag & drop the language you want from the vosk-model download page to the model window, and it will download and extract it for you. | |||
[[File: Speech-to-text_Download-model.png]] | |||
If you have problems click on "Check configuration" button. | |||
''' Speech recognition ''' | |||
*''' Creating subtitle by speech recognition ''' | |||
1. Mark the timeline zone you want to recognize (adjust the blue line). | |||
2. Click on the "Speech recognition" icon. | |||
3. Choose the language. | |||
4. Choose how the selected zone should be applied. | |||
5. Click "Process" | |||
The subtitle gets created and inserted automatically. | |||
Remark: Only timeline zone is implemented for now in automatic subtitles. | |||
[[File: Speech-to-text_Subtitle.png]] | |||
*''' Creating clips by speech recognition ''' | |||
This is useful for interviews and other speech-related footage. | |||
Enable <menuchoice>View -> Text Edit</menuchoice> | |||
Select a clip in the project bin. | |||
1. If needed set in/out point in the clip monitor and enable "selected zone only". This will only recognize the text inside the zone. | |||
2. Choose the correct language | |||
3. Click "start recognition" | |||
4. Selecting the text you want to either | |||
5. Put into the timeline | |||
6. Save as a new clip | |||
7. Add a Bookmark. You can jump to these bookmarks in the timeline with <keycap>alt+arrow</keycap> or edit the bookmark by double click. | |||
8. Delete the selection. | |||
9. Here you can search in the text. | |||
10. And navigate up | |||
11. Or down in the text. | |||
[[File: Speech-to-text_Text-Edit.png]] | |||
{{Warning|Speech to text doesn't work with version 21.04.2 due to vosk API issues. Use version 21.04.1 or 21.04.3 and later versions.}} | |||
==== 3 point editing ==== | |||
Since version 19.08.0 | |||
3 important points to understand the 3 point editing concept (with keyboard shortcuts): | |||
[[File:3p-Source-1.gif]] | |||
'''Source''' | |||
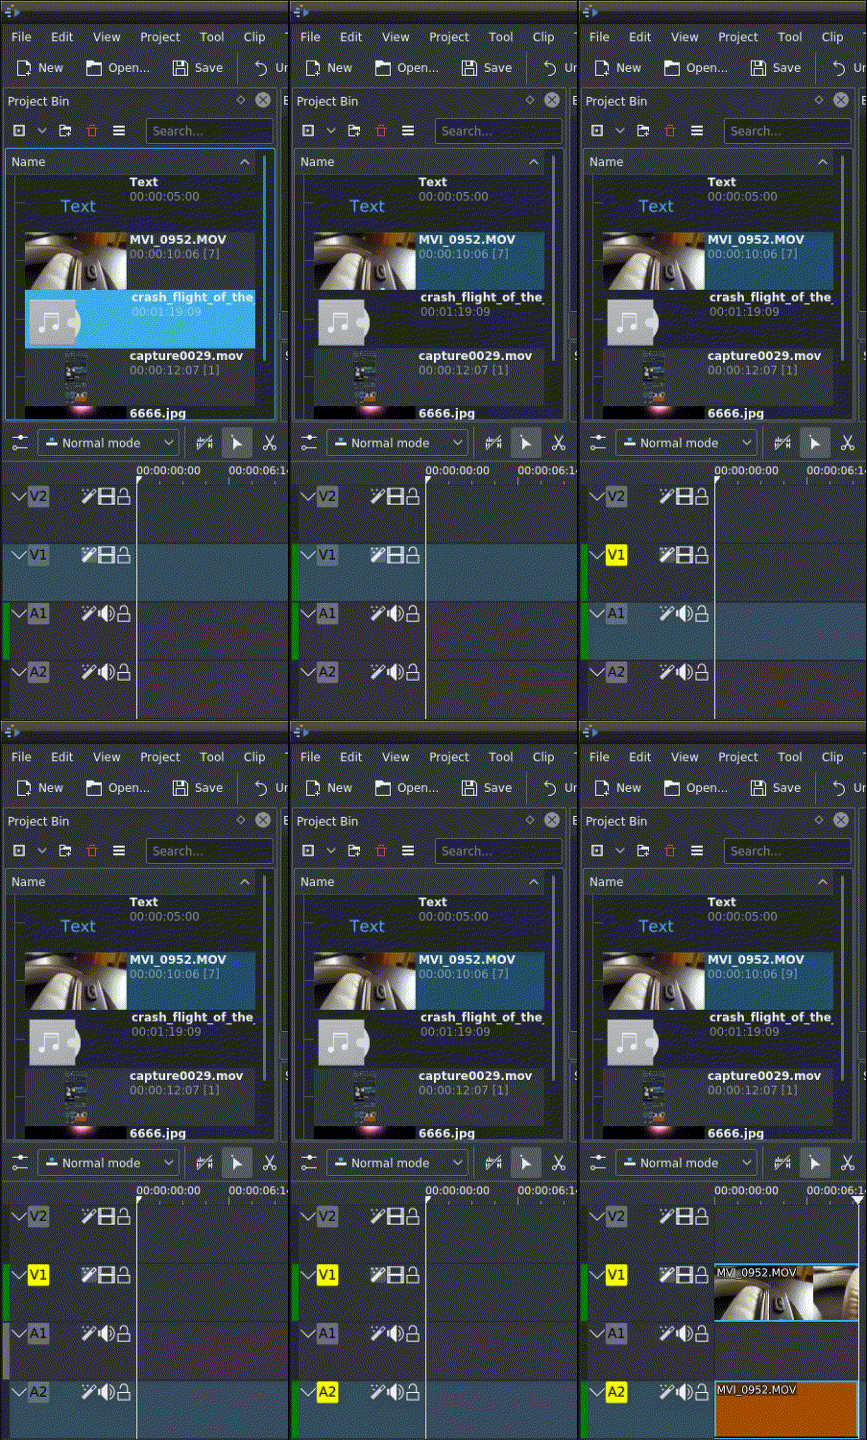
: On the left of the track head the green vertical lines (V1 or A2). The green line is connected to the source clip in the project bin. Only when a clip is selected in the project bin, the green line shows up depending on the type of the clip (A/V clip, picture/title/color clip, audio clip). | |||
[[File:3p-Target-active-1.gif]] | |||
'''Target''' | |||
: In the track head the target V1 or A1 is active when it’s yellow. An active target track reacts to edit operations like insert a clip even if the source is not active. | |||
'''The concept is like thinking of connectors''' | |||
: Connect the source (the clip in the project bin) to a target (a track in the timeline). Only when both connectors on the '''same''' track are switched on the clip “flow” from the project bin to the timeline. | |||
'''Be aware''' | |||
: Active target tracks without connected source react on edit operations. | |||
'''Example of advanced edit''' | |||
Here is a brief introduction to the 3 point editing system. | |||
[[File:3p-Insert-clip-1.gif]] | |||
1. Select a clip in the project bin with an up/down arrow | |||
2. Navigate the clip by the <keycap>JKL</keycap> keys or by the <keycap>left/right</keycap> arrows and set the IN and the OUT point by the <keycap>I</keycap> and <keycap>O</keycap> keys. | |||
3. Hit <keycap>T</keycap> to change to the timeline | |||
4. Select a video or audio track in the timeline (up/down arrow key) and set it as source with <keycap>Shift+T</keycap>. | |||
5. Activate the track as a target with shortcut <keycap>A</keycap> (this connects the track to the source) | |||
6. Hit <keycap>V</keycap> (insert) or <keycap>B</keycap> (overwrite) to add the clip at the play-head position or to fill the selected area in the timeline if it is active. If you need to activate it use the <keycap>G</keycap> key. | |||
[[File:3p-Advanced-edit-1.gif]] | |||
In the following example, we want only to insert the audio part of a clip in A2 and we want to create a gap in all the other video and audio tracks: | |||
1. Activate all the target tracks which contain clips (yellow buttons). | |||
2. Activate just the audio source on A2 | |||
3. Press <keycap>V</keycap> (insert). | |||
<references /> | <references /> | ||
{{Prevnext2 | {{Prevnext2 | ||
| prevpage=Special:MyLanguage/Kdenlive/Manual/Timeline| nextpage=Special:MyLanguage/Kdenlive/Manual/Timeline/Grouping | | prevpage=Special:MyLanguage/Kdenlive/Manual/Timeline| nextpage=Special:MyLanguage/Kdenlive/Manual/Timeline/Grouping | ||
| prevtext= | | prevtext=Монтажный стол | nexttext=Группировка | ||
| index=Special:MyLanguage/Kdenlive/Manual | indextext= | | index=Special:MyLanguage/Kdenlive/Manual | indextext=Вернуться к оглавлению | ||
}} | }} | ||
[[Category:Kdenlive]] | [[Category:Kdenlive]] | ||
Latest revision as of 23:03, 23 September 2022
Редактирование
Редактирование выполняется на монтажном столе. Добавьте клип, переместив его из дерева проекта или из монитора клипа. Как только клип окажется на дорожке, его можно переместить (с помощью мыши) в другое место на той же дорожке, или на другую дорожку.
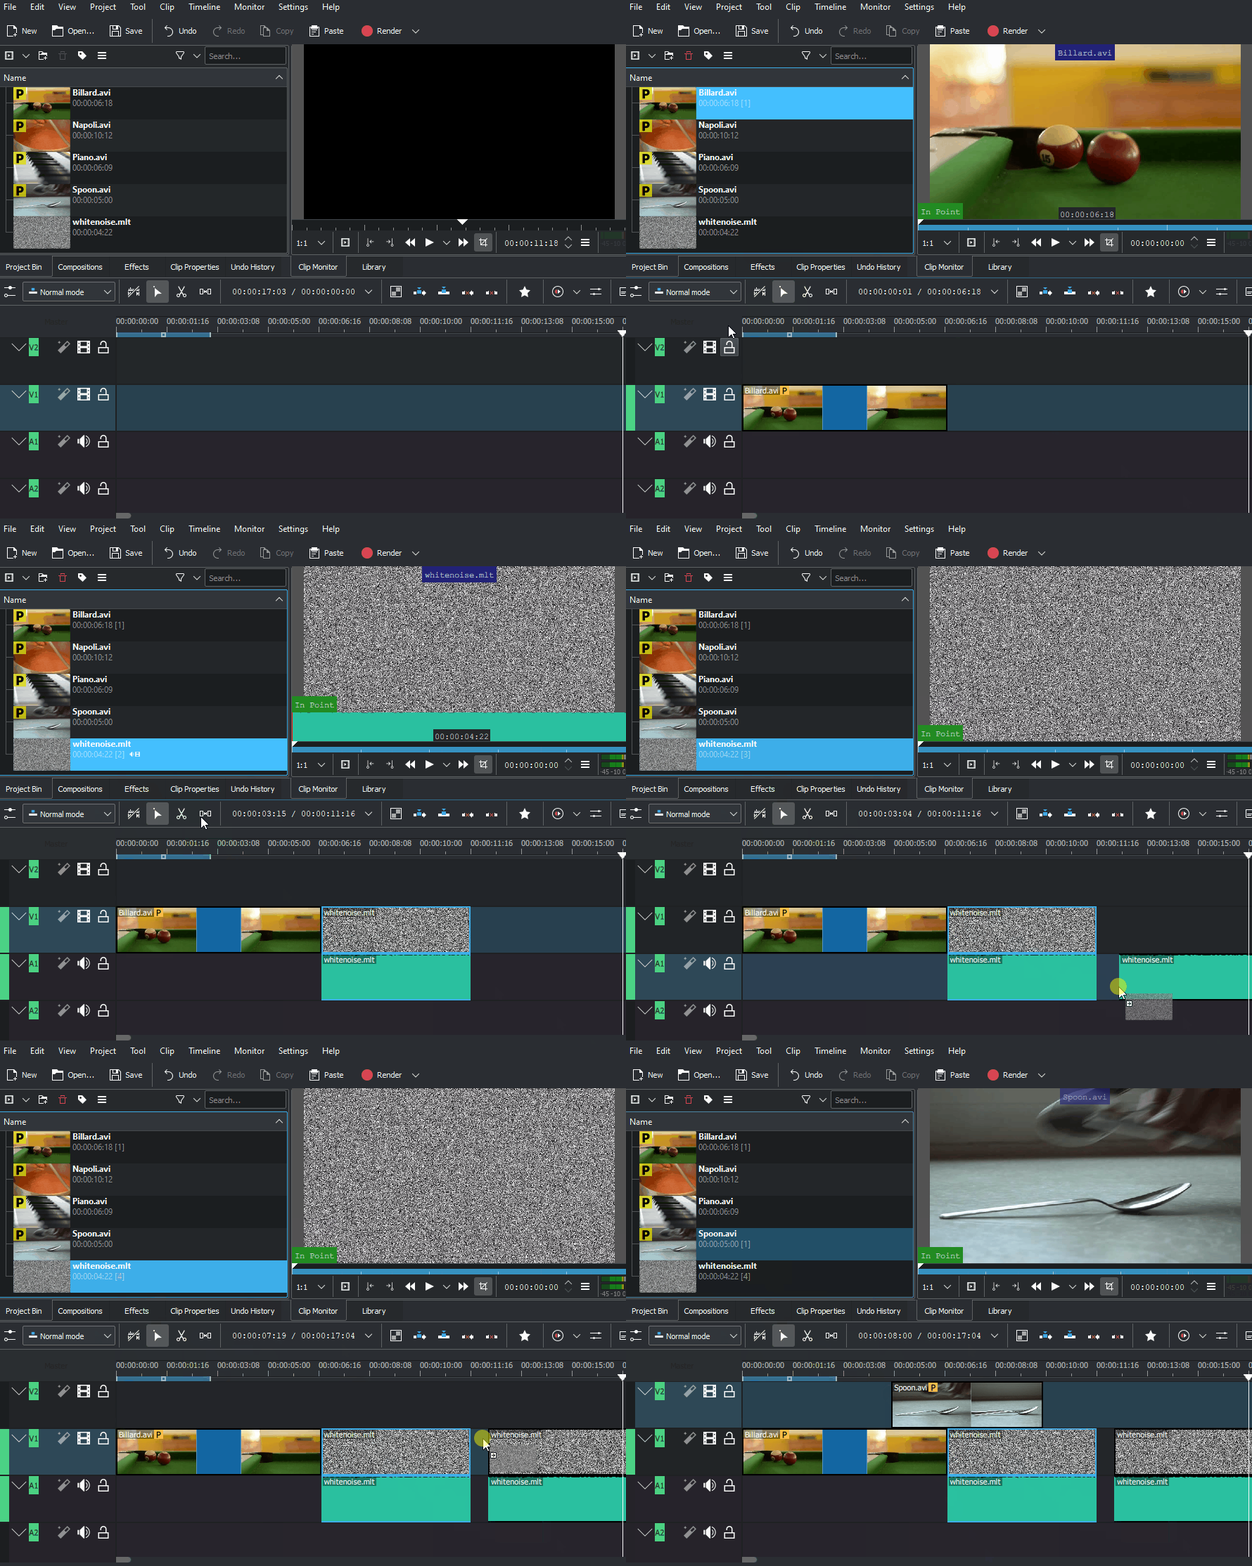
With 19.08.0 editing with keyboard shortcuts was introduced. This will speed up the editing work and you can do editing steps that are not possible or not as quick and easy with the mouse. Working with keyboard shortcuts in 19.08 is different as in the former Kdenlive versions. Mouse operations have not changed and working as before. See 3 point editing.
Навигация в проекте
Курсор монтажного стола показывает ваше текущее местоположение в проекте. Положение на линейке монтажного стола и мониторе проекта всегда синхронизированы. Позиция может быть перемещена следующими способами:
- С помощью сочетания клавиш: Клавиши со стрелкой вправо/влево перемещение на 1 кадр, Shift + вправо/влево на 1 секунду.
- Щелчком/перемещением курсора по линейке монтажного стола или в пустой области монтажного стола.
- Щелчком/перемещением курсора по линейке монитора проекта.
- Прокруткой колёсика мыши, при нахождении указателя над линейкой монтажного стола или монитора проекта.
- Правкой с помощью цифровых клавиш тайм-кода монитора праекта.
- Стрелками вверх/вниз на тайм-коде монитора проекта
Резка клипа
Самый простой способ - разместите Курсор монтажного стола там, там где нужно разрезать клип и выберите клип (щёлкнув левой кнопкой мыши по нему) и используйте меню (горячие клавиши по умолчанию: Shift + R).
Или
Другой способ — используйте Инструмент Резак.
Изменение длительности клипа
Клип может быть изменён от его начала или конца, перемещением его левого или правого края. Более точно изменить размер клипа, можно разместив курсор монтажного стола на кадре, с которого будет начинаться или которым будет заканчиваться обрезанный клип, далее меню: или .
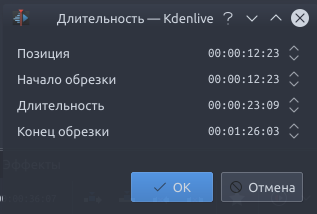
Чтобы контролировать длительность клипа с точностью до кадра, дважды щёлкните по нему на монтажном столе и отрегулируйте его длительность с помощью диалогового окна Длительность клипа.
Вы также можете изменить длительность клипа, разрезав его с помощью Инструмента Резак, затем удалив всё лишнее.
Удаление пробелов между клипами
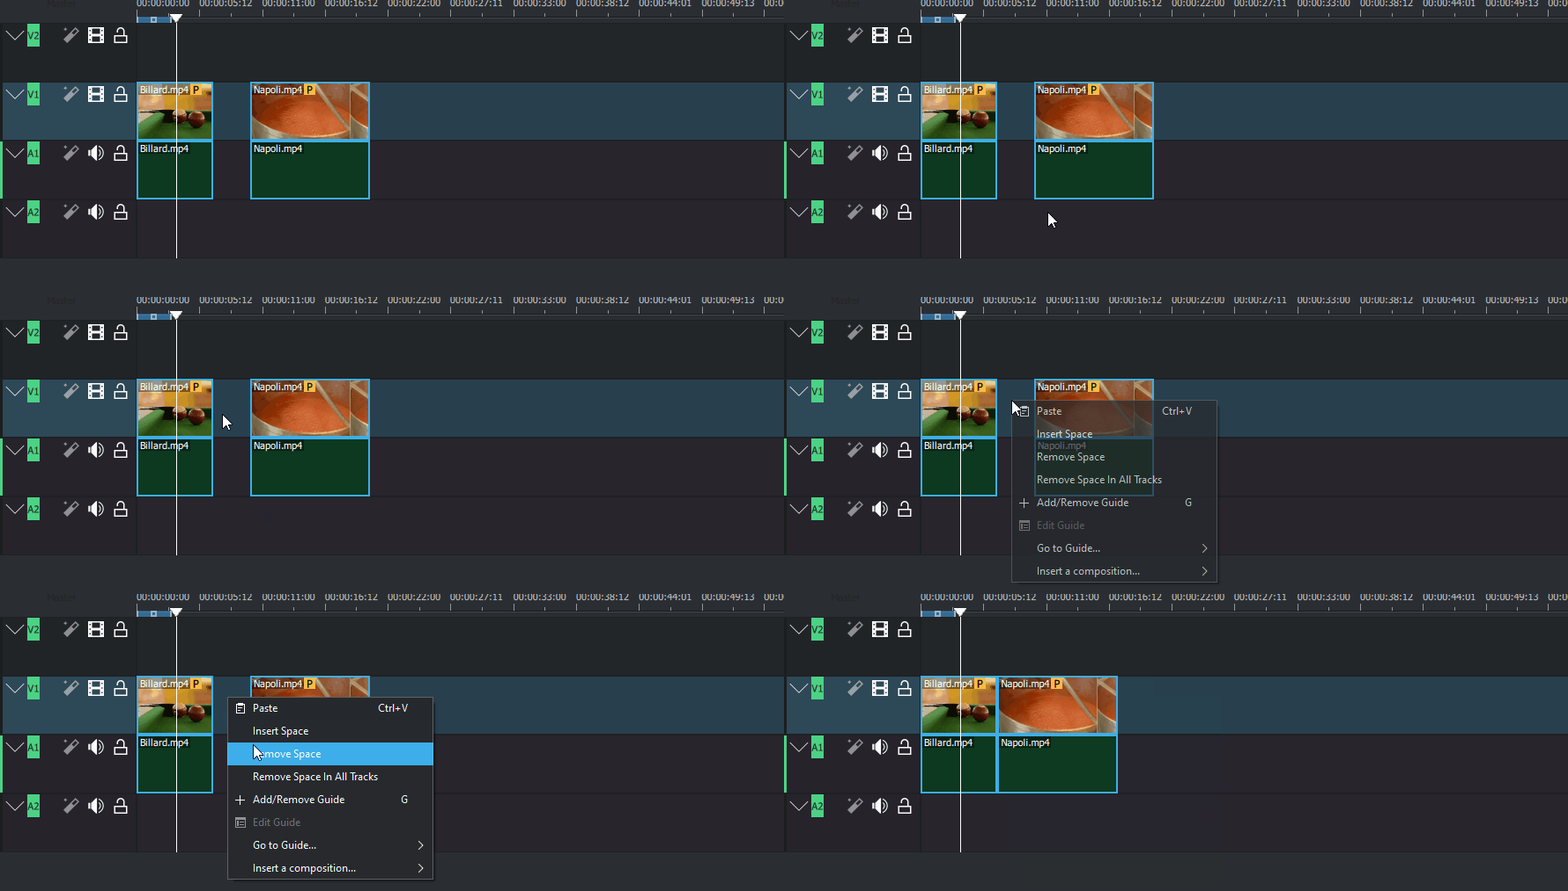
Щёлкните правой кнопкой мыши по пробелу между клипами и выберите , клип который находится справа приклеится к левому. Однако, если у вас клипы размещены на нескольких дорожках и они не сгруппированы, удаление пробела нарушит синхронизацию между этими дорожками. Например, на нижней дорожке, находится клип с музыкальным сопровождением и после удаления пробела он останется на месте. В этой ситуации, возможно, безопаснее использовать инструмент Вставка пробелов.
Панель инструментов монтажного стола
Над монтажным столом расположена «панель инструментов монтажного стола», предназначенная для контроля различных аспектов редактора.

1. Композитинг дорожек выпадающее меню
1а. Отсутствует
1б. Предпросмотр
1в. Высокое качество
1d. Mixed Audio tracks changes the order in which tracks are displayed to mixed audio and video tracks. For example, from the bottom of the timeline to the top of the timeline: A1, V1, A2, V2, A3, V3
1e. Split Audio tracks changes the order in which tracks are displayed to separate audio and video tracks. For example, from the bottom of the timeline to the top of the timeline: A1, A2, A1, V1, V2, V3
1f. Split Audio tracks (reverse) changes the order in which tracks are displayed to separate audio and video tracks with the audio tracks in reverse order. For example, from the bottom of the timeline to the top of the timeline: A1, A2, A3, V1, V2, V3
2. Режим редактирования на монтажном столе выпадающее меню
2a. Обычный режим
2б. Режим перезаписи
2в. Режим вставки
Переключать режим композитинга дорожек и редактирования на монтажном столе, также можно через меню .
23. Участок монтажного стола используется ![]() / Участок монтажного стола не используется
/ Участок монтажного стола не используется ![]() для вставки (переключается). См. Insert & Overwrite Advanced Timeline Editing на оф. сайте Kdenlive (en).
для вставки (переключается). См. Insert & Overwrite Advanced Timeline Editing на оф. сайте Kdenlive (en).
Группа Инструментов (активным может быть только один из трёх)
Активные кнопки выделены серым.
4. Резак
6. Индикатор положения (тайм-код) — отображает временную точку или номер кадра на котором находится курсор монтажного стола (или курсор мыши в данный момент). Нажмите на виджет, чтобы выбрать отображение по времени или по номеру кадра
7a. hh:mm:ss:ff; Sets the position indicator to display time units
7b. Frames Sets the position indicator to display frames
8. Mix Clips - allows same-track transitions to be applied between two clips. See Same Track Transitions for a detailed explination.
8. Вставить участок клипа на монтажный стол. См. Insert & Overwrite Advanced Timeline Editing на оф. сайте Kdenlive (en).
9. Перезаписать участок клипа на монтажном столе. См. Insert & Overwrite Advanced Timeline Editing на оф. сайте Kdenlive (en).
10. Удалить участок заполнив пробел
11. Удалить участок сохранив пробел
12. Избранные эффекты
13. Собрать для предпросмотра
14. Остановить сборку
15. Добавить участок предпросмотра
16. Удалить участок предпросмотра
17. Удалить все участки предпросмотра
18. Собирать автоматически
19. Отключить предпросмотр монтажного стола
20. Управление данными кэша
Пункты с 13 по 20 рассматриваются в статье Timeline preview rendering на оф. сайте Kdenlive (en).
15. Show/Hide the Audio Mixer tool. The audio mixer tool allows audio to be managed in the project.
16. Show/Hide the Subtitle Tool. This will show or hide the subtitle track where subtitles can be created or edited in the project.
Нижняя панель инструментов

24. Автоматически отделять звук от видео
26. Показывать миниатюры видео
27. Показывать миниатюры звука
28. Показывать комментарии к маркерам
29. Привязка
Инструменты масштабирования
30. Выровнять по размеру проекта
31. Уменьшить масштаб
33. Увеличить масштаб
Описание кнопок
Композитинг дорожек - Отсутствует
Если для композиции дорожек установлено значение «Отсутствует», дорожки с информацией об альфа-канале не будут объединены с другими дорожками, если между клипами не добавлен явный композитный или аффинный переход. Это поведение старых версий kdenlive (<= ver 0.9.X).
Композитинг дорожек - Предпросмотр
Если для композиции дорожек установлено значение «Предпросмотр», дорожки с информацией об альфа-канале будут автоматически объединены с другими дорожками с использованием алгоритма, который несколько быстрее, чем алгоритм, используемый с композитингом дорожек — Высокое качество, но слегка ухудшающий цвета.
Композитинг дорожек - Высокое качество
Если для композиции дорожек установлено значение «Высокое качество», дорожками с информацией альфа-канала будут автоматически компоноваться с другими дорожками с использованием алгоритма (qtblend), который несколько медленнее, чем алгоритм, используемый с композитингом дорожек — Предпросмотр, но который сохраняет информацию о цвете с более высокой точностью.
Режим редактирования - Обычный режим
В этом режиме редактирования нельзя размещать одни клипы на других на одной дорожке монтажного стола. Клипы можно переместить на другую дорожку над или под существующим клипом. Сравните этот режим с режимом перезаписи.
Режим редактирования - Режим перезаписи
В этом режиме редактирования можно размещать одни клипы на других на одной дорожке монтажного стола. Входящий клип перезапишет тот участок существующего клипа (или клипов), который покроется входящим клипом.
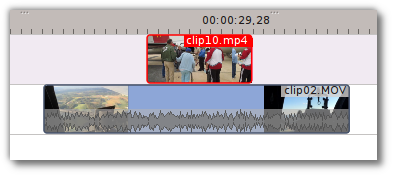
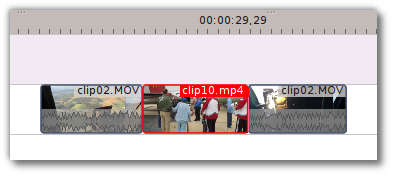
На приведенном выше снимке экрана «После» видно, что клип, перемещаемый с верхней дорожки, заменил часть клипа на нижней дорожке.
Rearrange clips in the timeline
Performing a rearrange edit. This technique lets you quickly change the order of clips in the timeline.
Drag a clip, as you drop it to a new location performs an overwrite edit that overwrites the existing clip.
Режим редактирования - Режим вставки
При выбранном режиме вставки входящий клип будет вставлен, в то место на монтажном столе, куда вы его переместили, разрезая все клипы на всех дорожках (включая звуковые) от своего начала. Правая часть всех существующих клипов переместится вправо, для размещения входящего клипа.


Rearrange edit in the timeline
Performing a rearrange edit. Only clips in the destination track are shifted; clips in other tracks are not affected. This technique lets you quickly change the order of clips in the timeline.
It always closes all space in the track.
Drag a clip, as you drop it to a new location. Releasing the clip performs an insert edit that shifts clips in the destination track only.
Инструмент выбора
Используется для выбора клипов на монтажном столе. Когда инструмент активен, курсор преобразуется в руку.
Резак
Используется, для резки клипов на монтажном столе. Когда инструмент активен, курсор преобразуется в ножницы.
Вставка пробелов
Используется для перемещения всех клипов на монтажном столе сразу на всех или только на одной дорожке, для создания или удаления пробелов между клипами. Для перемещения на всех дорожках выберите клип и переместите мышь в желаемом направлении, все клипы справа от него переместятся в новую позицию.
Для перемещения клипов на одной дорожке нажмите клавишу Control и переместите все элементы справа от выбранного клипа.
Выровнять по размеру проекта
Изменение масштаба содержимого монтажного стола, для просмотра проекта целиком. Эта же функция доступна из меню Монтажный стол, пункт .
Масштабирование проекта
Значки со стрелками служат для увеличения или уменьшения масштаба монтажного стола. Ползунок регулирует масштаб с крупным шагом. Эти же параметры, контролируются из меню - пункты и .
Автоматически отделять звук от видео
Если этот параметр включен и клип перемещён на монтажный стол, звук отделится от клипа и переместится на звуковую дорожку. Это производит то же действие, что и выбор из контекстного меню клипа . Если этот параметр выключен и клип перемещён на монтажный стол, звук останется вместе с видео на видеодорожке.
Автоматические переходы
Если этот параметр включен, то при добавлении любого перехода на монтажный стол длительность перехода будет автоматически подстраиваться под перекрываемую между клипами область. См. Автоматические переходы
Показать миниатюры видео
Если этот параметр включен, то на видеоклипах размещённых на монтажном столе, кроме имени файла будут отображаться миниатюры. Если выключен просто имя файла.
При увеличении монтажного стола до максимума, на клипе в виде миниатюры будет отображён каждый кадр. В остальных режимах масштабирования монтажного стола на клипе будут отображены первый и последний кадры.
Показать миниатюры звука
Если этот параметр включен, то на звуковых клипах размещённых на монтажном столе, кроме имени файла будет отображаться форма звуковой волны. Если выключен просто имя файла.
Показать комментарии к маркерам
С помощью этого параметра можно включить или выключить отображение комментариев к маркерам (текст с золотым фоном в примере ниже) и к направляющим (текст с фиолетовым фоном).
Привязка
При включенном параметре, во время перемещения входящего клипа на монтажный стол и при сближении его среза со срезом существующего клипа, будет выполнятся простая склейка. Как только срезы обоих клипов будут находиться на определённо небольшом расстоянии, они склеятся, без зазора и пересечения друг с другом. Обратите внимание, что склейка происходит, даже если клипы будут находится на разных дорожках монтажного стола.
Клипы будут также привязываться к позиции курсора, к маркерам и направляющим.
Cutting Footage from multiple aligned tracks - Ripple Delete
This is available on the menu under [1].
Seems missing in Kdenlive 17.04 & 18.04
Mark In and Out points in the Project Monitor, then choose (or Ctrl-X). Kdenlive deletes all footage between the In and Out points in unlocked tracks, slides everything else back to fill the gap, and puts the playhead on the In point.
Subtitle
Since Version 20.12.0
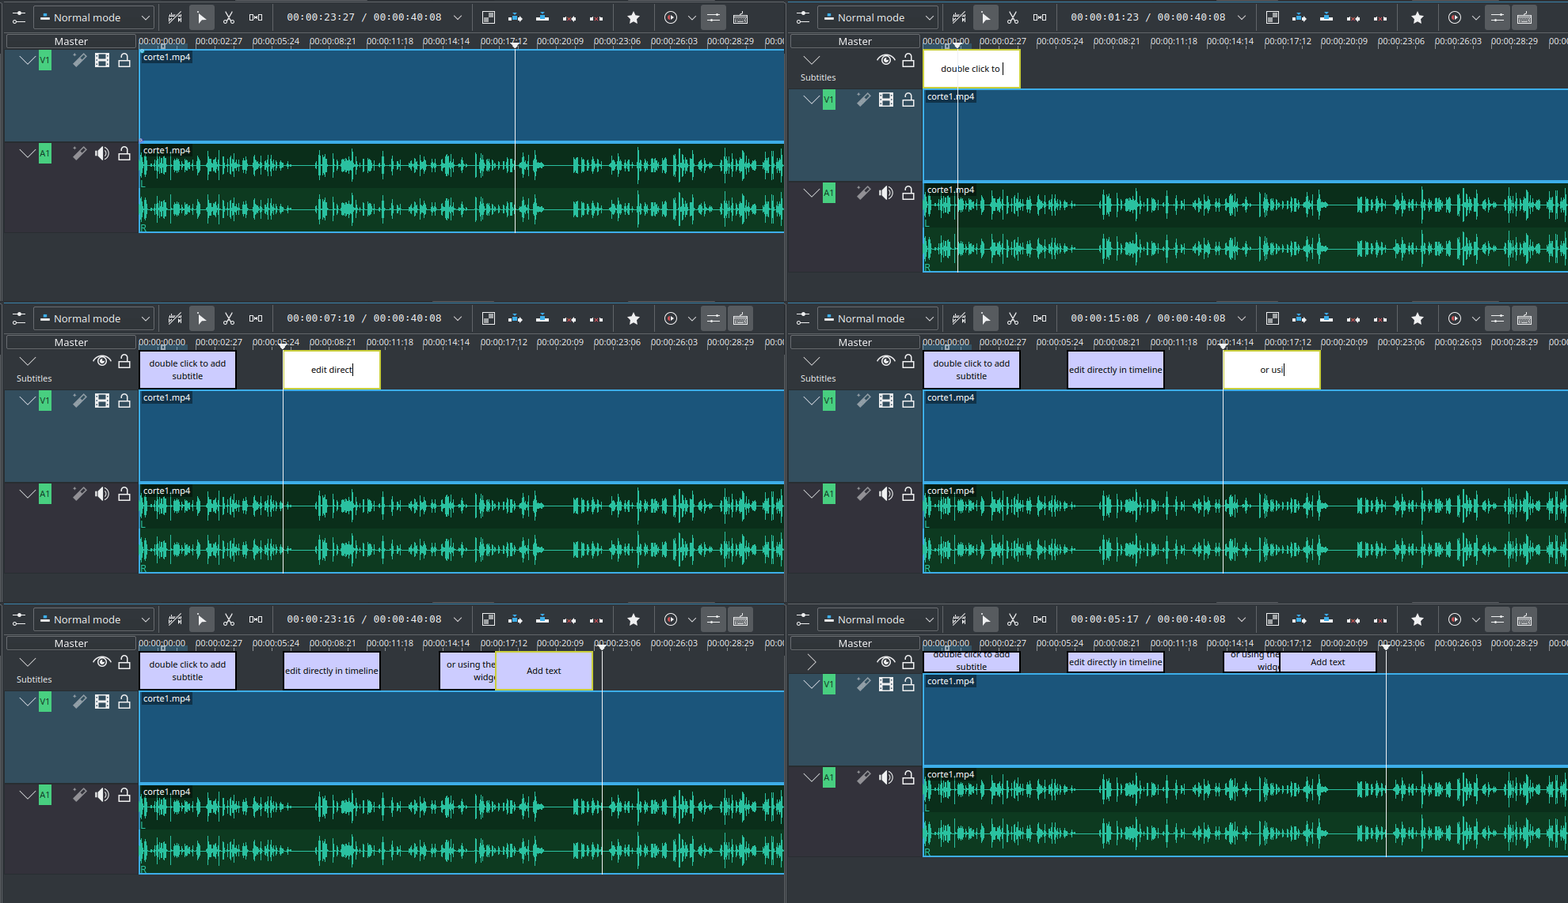
The subtitling tool allows you to add and edit subtitles directly in the timeline on a special subtitle track or by using the new subtitle window. You can also import (SRT/ASS) and export (SRT) subtitles.
There are 3 ways to add subtitle:
- Menu
- Keyboard
- Shift+S adds a subtitle.
- Icon and Mouse
- Click the "subtitle" icon in the timeline toolbar to open the subtitle track in the timeline.
- Double-click in the subtitle track to add a subtitle.
Adding and editing text
Add or editing text either directly into the subtitle clip or in the subtitle window.
Adjust the length of subtitle
Grab the end of a subtitle with the mouse and lengthen or shorten it as needed. Set subtitle in/out can be achieved with the same shortcut as to set clip in/out (left/right parenthesis shortcut).
Subtitle window
- The subtitles window allows easier editing and also makes it possible to easily navigate between subtitles with the left/right button.
- With the plus sign, you can add subtitles.
- The scissors are mostly here for divide subtitles: let's say your subtitle text is too long and you want to make it 2 different subtitles. Put the cursor in the text widget where you want to cut and click the scissors, it will split the text between 2 different subtitle items. The scissors are only working when the playhead is over the subtitle itself.
- The tick adds the text to the subtitle.
Import and export subtitle
Importing SRT and ASS subtitle file:
Exporting SRT subtitles only:
Since version 21.04.0
- Spelling check
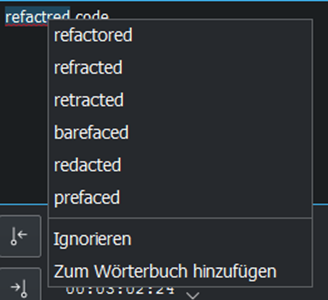
Spelling check for subtitle is integrated and shows incorrect words by a red wiggly line. Right-click on the word and you get a list of possible words you can choose by click on it.
Speech to text
Since version 21.04.0
- Install Python
Python needs to be installed on your computer. Download it from here https://www.python.org/downloads/ for installation on your computer.
Speech recognition requires the vosk and srt python modules
- On Linux open a terminal and put in and run: "pip3 install vosk;pip3 install srt".
- On Windows, you can download this batch file (File:Install vosk srt.zip). After download double click starts the installations.
- Install a language
Goto
Click on the link to get a language model
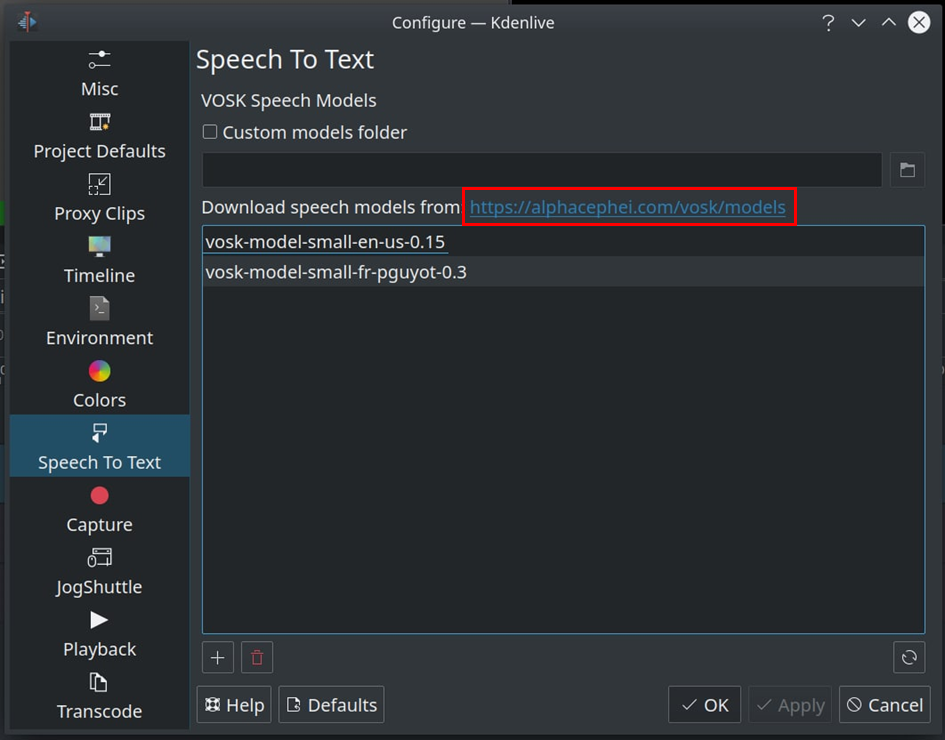
Drag & drop the language you want from the vosk-model download page to the model window, and it will download and extract it for you.
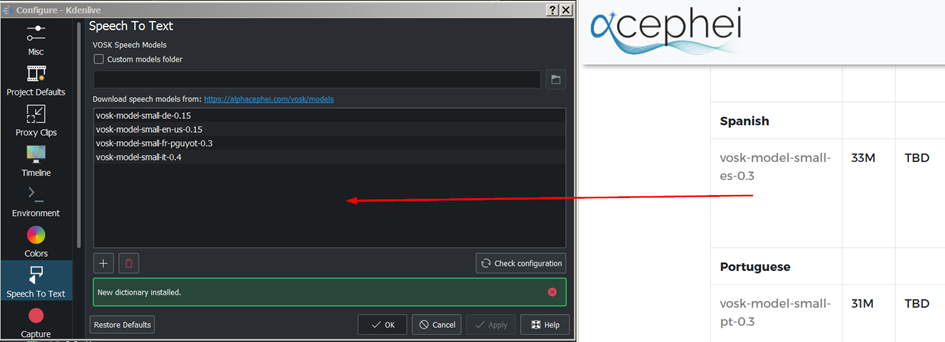
If you have problems click on "Check configuration" button.
Speech recognition
- Creating subtitle by speech recognition
1. Mark the timeline zone you want to recognize (adjust the blue line).
2. Click on the "Speech recognition" icon.
3. Choose the language.
4. Choose how the selected zone should be applied.
5. Click "Process"
The subtitle gets created and inserted automatically.
Remark: Only timeline zone is implemented for now in automatic subtitles.

- Creating clips by speech recognition
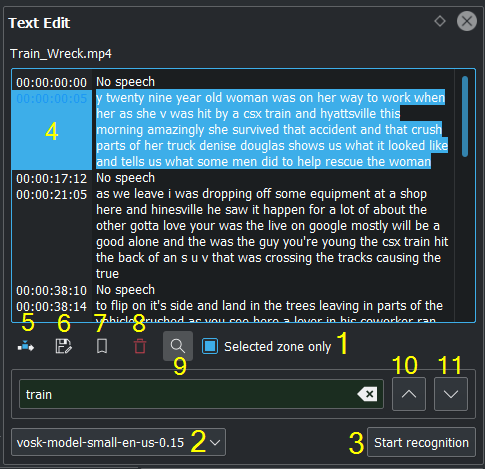
This is useful for interviews and other speech-related footage. Enable
Select a clip in the project bin.
1. If needed set in/out point in the clip monitor and enable "selected zone only". This will only recognize the text inside the zone.
2. Choose the correct language
3. Click "start recognition"
4. Selecting the text you want to either
5. Put into the timeline
6. Save as a new clip
7. Add a Bookmark. You can jump to these bookmarks in the timeline with alt+arrow or edit the bookmark by double click.
8. Delete the selection.
9. Here you can search in the text.
10. And navigate up
11. Or down in the text.
3 point editing
Since version 19.08.0
3 important points to understand the 3 point editing concept (with keyboard shortcuts):
Source
- On the left of the track head the green vertical lines (V1 or A2). The green line is connected to the source clip in the project bin. Only when a clip is selected in the project bin, the green line shows up depending on the type of the clip (A/V clip, picture/title/color clip, audio clip).
Target
- In the track head the target V1 or A1 is active when it’s yellow. An active target track reacts to edit operations like insert a clip even if the source is not active.
The concept is like thinking of connectors
- Connect the source (the clip in the project bin) to a target (a track in the timeline). Only when both connectors on the same track are switched on the clip “flow” from the project bin to the timeline.
Be aware
- Active target tracks without connected source react on edit operations.
Example of advanced edit
Here is a brief introduction to the 3 point editing system.
1. Select a clip in the project bin with an up/down arrow
2. Navigate the clip by the JKL keys or by the left/right arrows and set the IN and the OUT point by the I and O keys.
3. Hit T to change to the timeline
4. Select a video or audio track in the timeline (up/down arrow key) and set it as source with Shift+T.
5. Activate the track as a target with shortcut A (this connects the track to the source)
6. Hit V (insert) or B (overwrite) to add the clip at the play-head position or to fill the selected area in the timeline if it is active. If you need to activate it use the G key.
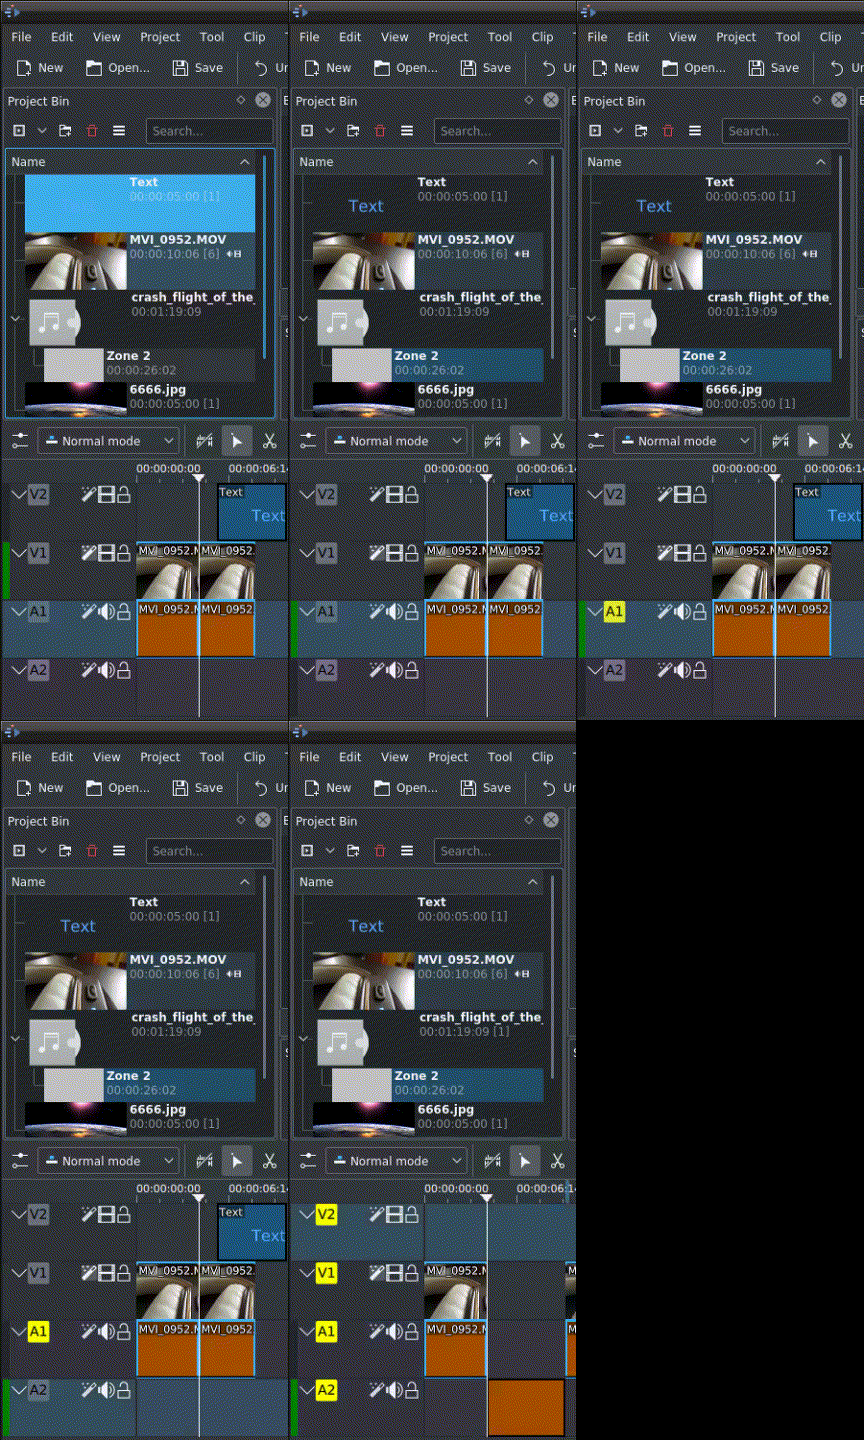
In the following example, we want only to insert the audio part of a clip in A2 and we want to create a gap in all the other video and audio tracks:
1. Activate all the target tracks which contain clips (yellow buttons).
2. Activate just the audio source on A2
3. Press V (insert).
- ↑ available on bleeding edge versions > 0.9.10 (Jan2015)

