KDevelop5/Manual/Customizing KDevelop: Difference between revisions
John Hayes (talk | contribs) m (Minor text changes and added settings photo) |
(Marked this version for translation) |
||
| (2 intermediate revisions by one other user not shown) | |||
| Line 12: | Line 12: | ||
There are a number of useful things one can configure in and around '''KDevelop's''' built-in editor. Of more universal use is to switch on line numbering using the menu entry <menuchoice>Settings -> Configure KDevelop</menuchoice>, which opens a dialog from which the settings for KDevelop can be made. Choosing <menuchoice>Editor -> Appearance</menuchoice>, then clicking the tab <menuchoice>Borders</menuchoice> allows you to select <menuchoice>Show line numbers</menuchoice> making it easier to match compiler error messages or debug messages with locations in the code. In the same submenu you may also want to switch on the ''Icon border'' - a column to the left of your code in which '''KDevelop''' will show icons such as whether there is a breakpoint on the current line. | There are a number of useful things one can configure in and around '''KDevelop's''' built-in editor. Of more universal use is to switch on line numbering using the menu entry <menuchoice>Settings -> Configure KDevelop</menuchoice>, which opens a dialog from which the settings for KDevelop can be made. Choosing <menuchoice>Editor -> Appearance</menuchoice>, then clicking the tab <menuchoice>Borders</menuchoice> allows you to select <menuchoice>Show line numbers</menuchoice> making it easier to match compiler error messages or debug messages with locations in the code. In the same submenu you may also want to switch on the ''Icon border'' - a column to the left of your code in which '''KDevelop''' will show icons such as whether there is a breakpoint on the current line. | ||
<!--T:26--> | |||
[[File:Kdevelop-borders-settings.png|550px|thumb|center]] | [[File:Kdevelop-borders-settings.png|550px|thumb|center]] | ||
| Line 17: | Line 18: | ||
<!--T:6--> | <!--T:6--> | ||
Many of us like code formatted in a particular way. Many projects also enforce a particular indentation style. Neither may match '''KDevelop's''' default indentation style. However, this can be customized: Go to the <menuchoice>Settings -> Customize KDevelop</menuchoice> menu item, then click on <menuchoice>Source Formatter</menuchoice> on the left. You can choose one of the predefined indentation styles that are widely in use, or define your own one by adding a new style and then editing it. There may not be a way to exactly re-create the style in which your project's sources have been indented in the past, but you can come close by using the settings for a new style; an example is shown in the two pictures below. | Many of us like code formatted in a particular way. Many projects also enforce a particular indentation style. Neither may match '''KDevelop's''' default indentation style. However, this can be customized: Go to the <menuchoice>Settings -> Customize KDevelop</menuchoice> menu item, then click on <menuchoice>Source Formatter</menuchoice> on the left. You can choose one of the predefined indentation styles that are widely in use, or define your own one by adding a new style and then editing it. There may not be a way to exactly re-create the style in which your project's sources have been indented in the past, but you can come close by using the settings for a new style; an example of creating a new style is shown in the two pictures below. | ||
<!--T:7--> | <!--T:7--> | ||
| Line 27: | Line 28: | ||
<!--T:8--> | <!--T:8--> | ||
{{Note|1= With '''KDevelop 4.2.2''', you can create a new style for a particular mimetype (e.g. for C++ header files) but this style does not show up among the list of possible styles for other mimetypes (e.g. for C++ source files) although it would of course be useful to use the same style for both kinds of files. You will therefore have to define the style twice, once for header and once for source files. This has been reported as [https://bugs.kde.org/show_bug.cgi?id=272335 KDevelop bug 272335].}} | {{Note|1= With '''KDevelop 4.2.2''', you can create a new style for a particular mimetype (e.g. for C++ header files) but this style does not show up among the list of possible styles for other mimetypes (e.g. for C++ source files) although it would of course be useful to use the same style for both kinds of files. You will therefore have to define the style twice, once for header and once for source files. This has been reported as [https://bugs.kde.org/show_bug.cgi?id=272335 KDevelop bug 272335].}} | ||
=== Customizing keyboard shortcuts === <!--T:9--> | === Customizing keyboard shortcuts === <!--T:9--> | ||
| Line 46: | Line 46: | ||
<!--T:17--> | <!--T:17--> | ||
The editor's code completion can be customized via <menuchoice>Settings -> Configure Editor -> Editing -> Auto Completion</menuchoice>. In particular, you can select how many characters you need to type in a word before auto-completion kicks in. | The editor's code completion can be customized via <menuchoice>Settings -> Configure KDevelop -> Editor -> Editing -> Auto Completion</menuchoice>. In particular, you can select how many characters you need to type in a word before auto-completion kicks in. | ||
<!--T:18--> | <!--T:18--> | ||
| Line 64: | Line 64: | ||
<!--T:21--> | <!--T:21--> | ||
'''KDevelop''' has two ways to show a completion: <menuchoice> | '''KDevelop''' has two ways to show a completion: <menuchoice>When Invoked Manually</menuchoice> shows just the basic information in completion tooltips (i.e. the namespace, class, function, or variable name). This will look similar to '''Kate''' completion (except for the icons). | ||
On the other hand, <menuchoice>Always</menuchoice> will additionally show the type for each entry, | |||
On the other hand, <menuchoice> | |||
and in the case of functions, also the arguments they take. Also, | and in the case of functions, also the arguments they take. Also, | ||
if you are currently filling in the arguments to a function, full | if you are currently filling in the arguments to a function, full | ||
| Line 79: | Line 78: | ||
<!--T:23--> | <!--T:23--> | ||
* <menuchoice> | * <menuchoice>Never</menuchoice>: Never show "Full Completion" | ||
<!--T:24--> | <!--T:24--> | ||
* <menuchoice> | * <menuchoice>When Invoked Manually</menuchoice>: Only show "Full Completion" when auto-completion has been triggered manually (i.e., whenever you hit <keycap>Ctrl+Space</keycap>) | ||
<!--T:25--> | <!--T:25--> | ||
* <menuchoice>Always | * <menuchoice>Always</menuchoice>: Always show "Full Completion" | ||
<!--T:12--> | <!--T:12--> | ||
Latest revision as of 09:22, 18 April 2020
Customizing KDevelop
There are times when you want to change the default appearance or behavior of KDevelop, for example, because you are used to different keyboard shortcuts or because your project requires a different indenting style for source code. In the following sections, we briefly discuss the various ways how KDevelop can be customized for these needs.
Customizing the editor
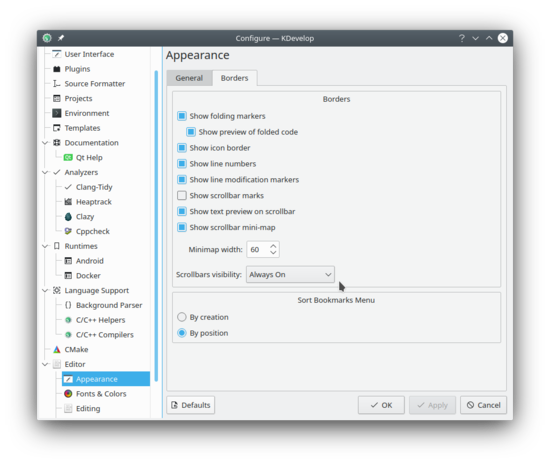
There are a number of useful things one can configure in and around KDevelop's built-in editor. Of more universal use is to switch on line numbering using the menu entry , which opens a dialog from which the settings for KDevelop can be made. Choosing , then clicking the tab allows you to select making it easier to match compiler error messages or debug messages with locations in the code. In the same submenu you may also want to switch on the Icon border - a column to the left of your code in which KDevelop will show icons such as whether there is a breakpoint on the current line.
Customizing code indentation
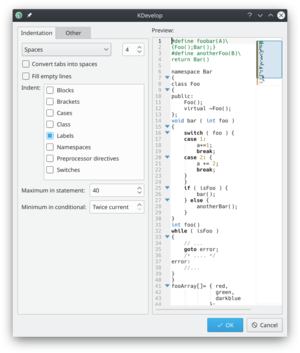
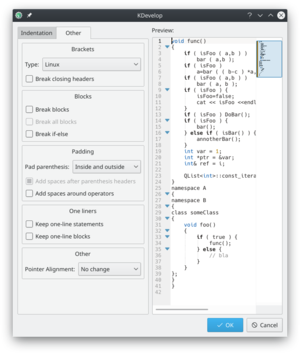
Many of us like code formatted in a particular way. Many projects also enforce a particular indentation style. Neither may match KDevelop's default indentation style. However, this can be customized: Go to the menu item, then click on on the left. You can choose one of the predefined indentation styles that are widely in use, or define your own one by adding a new style and then editing it. There may not be a way to exactly re-create the style in which your project's sources have been indented in the past, but you can come close by using the settings for a new style; an example of creating a new style is shown in the two pictures below.
 |
 |
Customizing keyboard shortcuts
KDevelop has an almost boundless list of keyboard shortcuts (some of them are listed in the "Useful keyboard shortcuts sections" of several chapters in this manual) that can be changed to your taste through the menu . At the top of the dialog you can enter a searchword and it only shows those commands that match; you can then edit which key combination is bound to this command.
Two that have been found to be very useful to change are to set to the Tab key (many people don't usually enter tabs by hand and rather prefer if the editor chooses the layout of code; with the changed shortcut, hitting Tab makes KDevelop indent/outdent/align the code). The second one is putting on Ctrl + B since this is quite a frequent operation.
Customizing code auto-completion
Code completion is discussed in this manual's section on writing source code. In KDevelop, it comes from two sources: the editor, and the parse engine. The editor (Kate) is a component of the larger KDE environment and offers auto-completion based on words it has already seen in other parts of the same document. Such auto-completions can be identified in the tooltip by the icon that precedes it:
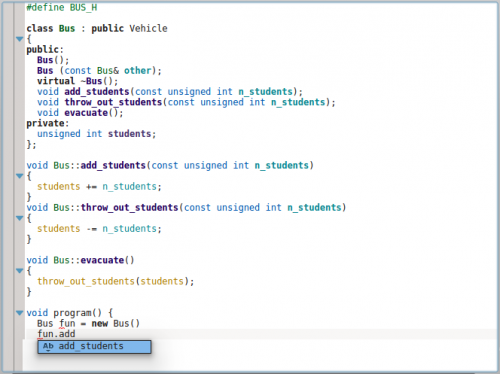
The editor's code completion can be customized via . In particular, you can select how many characters you need to type in a word before auto-completion kicks in.
On the other hand, KDevelop's own auto-completion is much more powerful as it takes into account semantic information about the context. For example, it knows which member functions to offer when you type object., etc., as shown here:
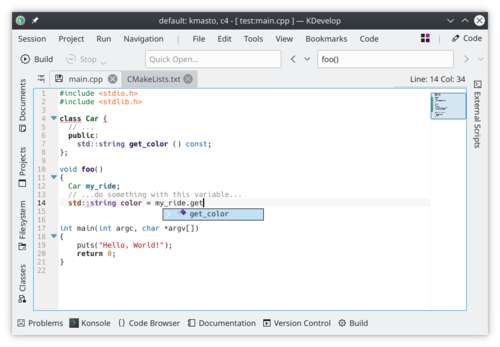
This context information comes from various language support plugins, which can be used after a given file has been saved (so it can check the filetype and use the correct language support). KDevelop's completion is set to appear as you type, right away, pretty much everywhere that it could possibly complete something. This is configurable in . If it isn't already set (as it should, by default), make sure is set.
KDevelop has two ways to show a completion: shows just the basic information in completion tooltips (i.e. the namespace, class, function, or variable name). This will look similar to Kate completion (except for the icons). On the other hand, will additionally show the type for each entry, and in the case of functions, also the arguments they take. Also, if you are currently filling in the arguments to a function, full completion will have an additional info-box above the cursor that will show you the current argument you are working on. KDevelop's code completion should also bring-to-top and highlight in green any completion items that match the currently expected type in both minimal and full completion, known as "best-matches".
The three possible choices for the completion level in the configuration dialog are:
- : Never show "Full Completion"
- : Only show "Full Completion" when auto-completion has been triggered manually (i.e., whenever you hit Ctrl+Space)
- : Always show "Full Completion"
