Klipper: Difference between revisions
No edit summary |
Marked this version for translation |
||
| (13 intermediate revisions by 6 users not shown) | |||
| Line 1: | Line 1: | ||
<languages /> | |||
{|class="tablecenter vertical-centered" | |||
|[[Image:Klipper2.png|250px]]|| ||<translate><!--T:1--> | |||
'''Klipper is your clipboard on steroids'''</translate> | |||
|} | |||
<translate> | |||
<!--T:2--> | |||
The traditional expectation of a clipboard is that you can copy a section of text in order to paste it elsewhere. If you copy a section, the previous one is lost. '''Klipper''' solves this problem at a stroke. The item you copied last will still be the default one to be pasted, but others will have been stored in a buffer, so you can choose to paste your selections in a different order. Even the number of items stored in the buffer can be configured! Click on the icon on your tray or panel, and you will see the possible selections, as well as some options. Let's take a look at some configuration options. | |||
<!--T:10--> | |||
| | {{Note|Within Plasma there are two different buffers. One is the ''clipboard'' and the other is the ''selection''. The ''clipboard'' buffer is filled when you press <keycap>Ctrl + X</keycap> or <keycap>Ctrl + C</keycap> and pasted by using <keycap>Ctrl + V</keycap>. The ''selection'' buffer is filled by simply marking some text and pasted by pressing the middle mouse button. Having said that it is important to know that Klipper can be configured to hold both buffers.}} | ||
{| | <!--T:3--> | ||
|[[Image:Klipper-conf.png|thumb|250px]]|| ||Possibly the two items most important to you on the General tab is whether you want the clipboard to start up empty or to retain its contents across sessions, and whether to synchronise the clipboard contents and selection | {|class="vertical-centered" | ||
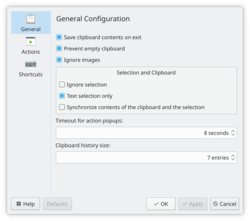
|[[Image:Klipper-conf.png|thumb|250px]]|| ||Possibly the two items most important to you on the <menuchoice>General</menuchoice> tab is whether you want the clipboard to start up empty or to retain its contents across sessions, and whether to synchronise the clipboard contents and selection. | |||
|} | |} | ||
{| | <!--T:4--> | ||
|[[Image:Klipper-actions.png|thumb|250px]]|| ||If you write scripts or work in programming this section is for you. Actions based on regular expressions can be set here. | {|class="vertical-centered" | ||
|[[Image:Klipper-actions.png|thumb|250px]]|| ||If you write scripts or work in programming this section is for you. Actions based on [https://en.wikipedia.org/wiki/Regular_expression regular expressions] can be set here. | |||
|} | |} | ||
{| | <!--T:5--> | ||
{|class="vertical-centered" | |||
|[[Image:Klipper-shortcuts.png|thumb|250px]]|| ||Here you can customise existing shortcuts. It is not possible at the moment to make additional ones | |[[Image:Klipper-shortcuts.png|thumb|250px]]|| ||Here you can customise existing shortcuts. It is not possible at the moment to make additional ones | ||
|} | |} | ||
The | <!--T:6--> | ||
The ''Handbook'' is available from the <menuchoice>Help</menuchoice> button at the bottom of the settings dialog. | |||
== Tutorial == | == Tutorial == <!--T:7--> | ||
* [[ | * [[Special:myLanguage/Klipper/How_to_search_in_phone_books_using_Klipper|How to search in phone books using Klipper]] | ||
* [[Special:myLanguage/Klipper/Pastebins|Klipper can send your clips straight to a paste-bin]] | |||
== | == More Information == <!--T:8--> | ||
* [https://docs.kde.org/stable5/en/plasma-workspace/klipper/index.html Klipper handbook] | |||
* http://linux-blog.org/make-klipper-work-for-you/ | * http://linux-blog.org/make-klipper-work-for-you/ | ||
<!--T:11--> | |||
Klipper can be accessed from the command line using ''xclip'' . To copy to the ctl+C/V buffer use ''xclip -selection clipboard'' | |||
<!--T:9--> | |||
[[Category:Utilities]] | [[Category:Utilities]] | ||
[[Category:System]] | [[Category:System]] | ||
</translate> | |||
Latest revision as of 06:42, 11 November 2022
 |
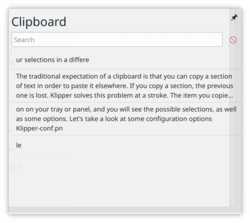
Klipper is your clipboard on steroids |
The traditional expectation of a clipboard is that you can copy a section of text in order to paste it elsewhere. If you copy a section, the previous one is lost. Klipper solves this problem at a stroke. The item you copied last will still be the default one to be pasted, but others will have been stored in a buffer, so you can choose to paste your selections in a different order. Even the number of items stored in the buffer can be configured! Click on the icon on your tray or panel, and you will see the possible selections, as well as some options. Let's take a look at some configuration options.
 |
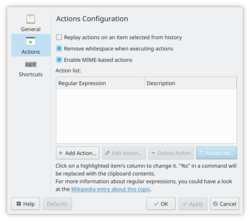
If you write scripts or work in programming this section is for you. Actions based on regular expressions can be set here. |
 |
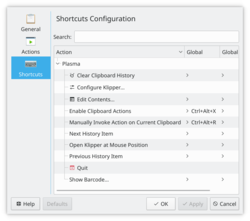
Here you can customise existing shortcuts. It is not possible at the moment to make additional ones |
The Handbook is available from the button at the bottom of the settings dialog.
Tutorial
More Information
Klipper can be accessed from the command line using xclip . To copy to the ctl+C/V buffer use xclip -selection clipboard


