Digikam/Exposure Blending/da: Difference between revisions
Importing a new version from external source |
Importing a new version from external source |
||
| Line 6: | Line 6: | ||
Uanset hvor godt dit kamera er, så er det virkeligt vanskeligt at tage et veleksponeret billede af en scene med stor kontrast som en solsort i sneen. Selv hvis du skifter til manuel tilstand og tilpasser eksponeringsindstillingerne, så er der stadig en risiko for, at du ender med en foto med under- eller overeksponerede områder. Den eneste måde at løse dette problem på er at bruge eksponeringsblanding. Denne teknik bruger flere fotos af den samme scene med forskellige eksponeringer og forener dem til et perfekt eksponeret billede. | Uanset hvor godt dit kamera er, så er det virkeligt vanskeligt at tage et veleksponeret billede af en scene med stor kontrast som en solsort i sneen. Selv hvis du skifter til manuel tilstand og tilpasser eksponeringsindstillingerne, så er der stadig en risiko for, at du ender med en foto med under- eller overeksponerede områder. Den eneste måde at løse dette problem på er at bruge eksponeringsblanding. Denne teknik bruger flere fotos af den samme scene med forskellige eksponeringer og forener dem til et perfekt eksponeret billede. | ||
Selvom eksponeringsblanding lyder enkelt i teorien, så kan der være ret slidsomt og tidskrævende at opnå brugbare resultater. Heldigvis kan '''digiKam''' udføre slavearbejdet for dig takket være et eksponeringsblandings-værktøj, som kommer sammen med '''Kipi'''-plugin'ene. Eksponeringsblandings-værktøjet har brug for programmet '''hugin''' til at forarbejde og forene fotoerne, så du må først installere det på din maskine. På '''Ubuntu''' gøres det ve brug af kommandoen {{Input|1=sudo apt-get install hugin}} | |||
To keep things tidy, move the photos you want to blend into a separate album, select them using the <keycap>Ctrl+A</keycap> keyboard shortcut, and choose <menuchoice>Tools</menuchoice> -> <menuchoice>Blend bracketed images</menuchoice>. This opens the '''Exposure Blending Import wizard''' that guides you through the entire process. In the <menuchoice>Set Bracketed Images</menuchoice> window, add other photos if needed, and remove and rearrange the photos that are already in the list. Hit then the <menuchoice>Next</menuchoice> button to move to the next step. '''digiKam''' can align the selected photos before blending them. This feature can come in handy if you took the photos without a tripod. If this is the case, tick the <menuchoice>Align bracketed images</menuchoice> check box, and press <menuchoice>Next</menuchoice> to start the pre-processing. Once '''digiKam''' is done, press <menuchoice>Finish</menuchoice>, and you will be automatically dropped into the '''Exposure Blending''' editor. | To keep things tidy, move the photos you want to blend into a separate album, select them using the <keycap>Ctrl+A</keycap> keyboard shortcut, and choose <menuchoice>Tools</menuchoice> -> <menuchoice>Blend bracketed images</menuchoice>. This opens the '''Exposure Blending Import wizard''' that guides you through the entire process. In the <menuchoice>Set Bracketed Images</menuchoice> window, add other photos if needed, and remove and rearrange the photos that are already in the list. Hit then the <menuchoice>Next</menuchoice> button to move to the next step. '''digiKam''' can align the selected photos before blending them. This feature can come in handy if you took the photos without a tripod. If this is the case, tick the <menuchoice>Align bracketed images</menuchoice> check box, and press <menuchoice>Next</menuchoice> to start the pre-processing. Once '''digiKam''' is done, press <menuchoice>Finish</menuchoice>, and you will be automatically dropped into the '''Exposure Blending''' editor. | ||
Revision as of 06:25, 29 October 2010
Eksponeringsblanding med digiKam
Denne artikel blev oprindeligt bragt i Scribbles and Snaps og bringes ger med Dimitri Popovs tilladelse.
Uanset hvor godt dit kamera er, så er det virkeligt vanskeligt at tage et veleksponeret billede af en scene med stor kontrast som en solsort i sneen. Selv hvis du skifter til manuel tilstand og tilpasser eksponeringsindstillingerne, så er der stadig en risiko for, at du ender med en foto med under- eller overeksponerede områder. Den eneste måde at løse dette problem på er at bruge eksponeringsblanding. Denne teknik bruger flere fotos af den samme scene med forskellige eksponeringer og forener dem til et perfekt eksponeret billede.
Selvom eksponeringsblanding lyder enkelt i teorien, så kan der være ret slidsomt og tidskrævende at opnå brugbare resultater. Heldigvis kan digiKam udføre slavearbejdet for dig takket være et eksponeringsblandings-værktøj, som kommer sammen med Kipi-plugin'ene. Eksponeringsblandings-værktøjet har brug for programmet hugin til at forarbejde og forene fotoerne, så du må først installere det på din maskine. På Ubuntu gøres det ve brug af kommandoen
sudo apt-get install hugin
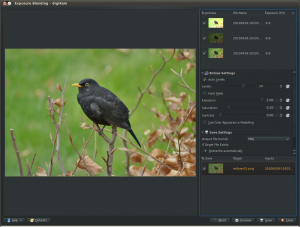
To keep things tidy, move the photos you want to blend into a separate album, select them using the Ctrl+A keyboard shortcut, and choose -> . This opens the Exposure Blending Import wizard that guides you through the entire process. In the window, add other photos if needed, and remove and rearrange the photos that are already in the list. Hit then the button to move to the next step. digiKam can align the selected photos before blending them. This feature can come in handy if you took the photos without a tripod. If this is the case, tick the check box, and press to start the pre-processing. Once digiKam is done, press , and you will be automatically dropped into the Exposure Blending editor.

Hit the button to see the blended photo in the preview pane. If you are not satisfied with the result, you can tweak the available options, including exposure, saturation, and contrast. You can also exclude individual photos from the stack to improve the blending result. The clever part is that every time you tweak the settings and press the button, digiKam generates a preview image which you can compare with the previous versions. You can then save all the generated versions, or save only the one you like most.
Although digiKam’s exposure blending tool is not the most powerful or flexible solution out there, it is capable of producing rather impressive results, especially if you are not afraid of getting your hands dirty with manually tweaking the final results.
