Amarok/Manual/Organization/Collection/ExternalDatabase: Difference between revisions
(→Configure Database: user output wiki markup) |
(Minor corrections to the MySQL commands) |
||
| Line 8: | Line 8: | ||
First you need to install an '''MySQL'''-Server. On Debian-based distributions like Ubuntu you can use | First you need to install an '''MySQL'''-Server. On Debian-based distributions like Ubuntu you can use | ||
{{Input|1=sudo apt-get install mysql-server}} | {{Input|1=sudo apt-get install mysql-server mysql-client}} | ||
to install it. You will be asked to specify a password for the root-account for the database. | to install it. You will be asked to specify a password for the root-account for the database. The ''mysql-client'' package is needed in order to execute some of the commands in this document, but it's not fundamental to the use of Amarok. | ||
=== Configure Database === | === Configure Database === | ||
Connect to the local database using | Connect to the local database using | ||
{{Input|1=mysql -u root -p | {{Input|1=mysql -u root -p''}} | ||
You will be prompted for the password for MySQL's '''root''' user. You will get the {{Output|1=mysql>}} prompt. <br /> | |||
Create a new user '''''amarokuser''''' with the password '''''amarokpass''''' using the | Create a new user '''''amarokuser''''' with the password '''''amarokpass''''' using the | ||
{{Input|1=CREATE USER '''<nowiki>'</nowiki>amarokuser<nowiki>'</nowiki>'''@'''<nowiki>'</nowiki>localhost<nowiki>'</nowiki>''' IDENTIFIED BY '''<nowiki>'</nowiki>amarokpass<nowiki>'</nowiki>''';}} | {{Input|1=CREATE USER '''<nowiki>'</nowiki>amarokuser<nowiki>'</nowiki>'''@'''<nowiki>'</nowiki>localhost<nowiki>'</nowiki>''' IDENTIFIED BY '''<nowiki>'</nowiki>amarokpass<nowiki>'</nowiki>''';}} | ||
Revision as of 00:19, 28 December 2010
Introduction
Amarok 2.2 and above support an external MySQL database as a backend.
Configure Server
Install MySQL-Server
First you need to install an MySQL-Server. On Debian-based distributions like Ubuntu you can use
sudo apt-get install mysql-server mysql-client
to install it. You will be asked to specify a password for the root-account for the database. The mysql-client package is needed in order to execute some of the commands in this document, but it's not fundamental to the use of Amarok.
Configure Database
Connect to the local database using
mysql -u root -p
You will be prompted for the password for MySQL's root user. You will get the
mysql>
prompt.
Create a new user amarokuser with the password amarokpass using the
CREATE USER 'amarokuser'@'localhost' IDENTIFIED BY 'amarokpass';
command. Amarok needs its own database, which is created with
CREATE DATABASE amarokdb;
Give the new user access to the database by entering the
GRANT ALL ON amarokdb.* TO 'amarokuser'@'%' IDENTIFIED BY 'amarokpass';
command, where % is a wildcard to allow all hosts to connect to the database. Now use the
FLUSH PRIVILEGES;
statement to reload various internal caches used by MySQL. Finally
exit
closes the MySQL-prompt.
By default the server can only be accessed by the local host. To change this you need to edit the file /etc/mysql/my.cnf and adjust the address near bind-address to the one your server listens on the network. 0.0.0.0 listens on all interfaces. After that you need to restart the server using
sudo service mysql restart
Configure Client
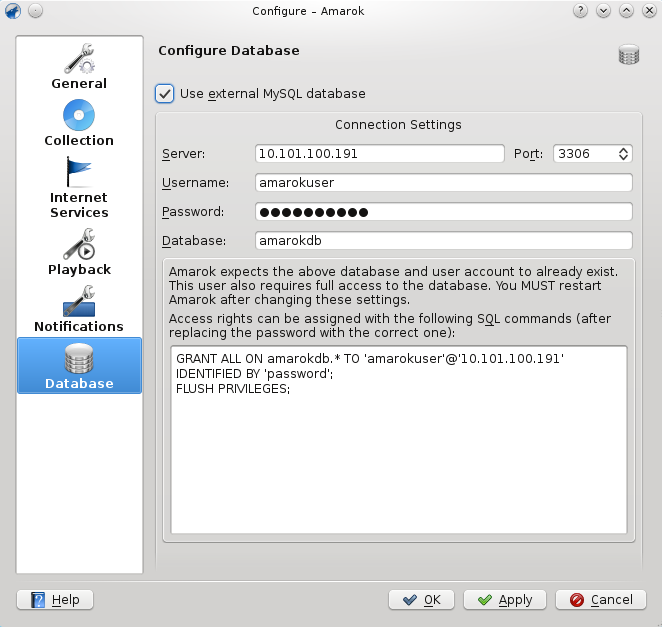
Open the configuration dialog by clicking . Enable the checkbox and enter the user data.

You need to restart Amarok so that the changes take effect.
Migrating from MySQL Embedded to MySQL Server
If you want to maintain the statistics, etc. that you have in the embedded MySQL database from before Amarok 2.2, you can do the following: First, start Amarok 2.2 at least once to give the database a chance to update to the latest schema version.
Next, kill the running MySQL service
sudo /etc/init.d/mysql stop
and start a MySQL daemon from your ~/.kde4/share/apps/amarok directory (--defaults-file MUST be the first option!):
/usr/sbin/mysqld --defaults-file=`pwd`/my.cnf --default-storage-engine=MyISAM --datadir=`pwd`/mysqle --socket=`pwd`/sock --skip-grant-tables
The skip-grant-tables means you can use any password or username to connect to it. 'localhost' will not work, the MySQL client will try to use a Unix socket. Using 127.0.0.1 as the host makes it work. Some systems may restrict this access through apparmor or SELinux. They can be temporarily disabled with
sudo /etc/init.d/apparmor stop
Now, run mysqldump, passing in the -S option to specify the local socket. This will dump your old embedded DB out to a SQL file.
mysqldump -S sock amarok > amarok.mysql
You can then restart your MySQL service and load this SQL file into your MySQL server. You'll have needed to already run the GRANT statement above and create an Amarok database ("CREATE DATABASE amarok;"):
sudo /etc/init.d/mysql stop
 mysql -u amarokuser -p amarok < amarok.mysql
