Digikam/Local Contrast/tr: Difference between revisions
Created page with "Bu yazı aslen [http://scribblesandsnaps.wordpress.com/category/software/open-source/ Scribbles and Snaps]'te bir blog yazısı olarak ortaya çıkmış ve Dmitri Popov'un izniyl..." |
Created page with "'''digiKam''' fotoğraflardaki kötü pozlanmış alanları iyileştirmek için bazı araçlar sunar. Örneğin Exposure Blending a..." |
||
| Line 4: | Line 4: | ||
Bu yazı aslen [http://scribblesandsnaps.wordpress.com/category/software/open-source/ Scribbles and Snaps]'te bir blog yazısı olarak ortaya çıkmış ve Dmitri Popov'un izniyle kullanılmıştır. | Bu yazı aslen [http://scribblesandsnaps.wordpress.com/category/software/open-source/ Scribbles and Snaps]'te bir blog yazısı olarak ortaya çıkmış ve Dmitri Popov'un izniyle kullanılmıştır. | ||
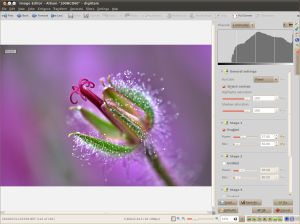
'''digiKam''' | '''digiKam''' fotoğraflardaki kötü pozlanmış alanları iyileştirmek için bazı araçlar sunar. Örneğin [[Special:turkish/Digikam/Exposure_Blending| Exposure Blending]] aracı farklı pozlamalardaki birkaç fotoğrafı kaynaştırarak mükemmel bir biçimde pozlanmış bir fotoğraf elde etmenizi sağlar. Ama ya eğer sadece bir görüntünüz varsa? Bu durumda <menuchoice>Yerel Karşıtlık</menuchoice> aracını denemek isteyebilirsiniz. Bu özellik fotoğrafın global karşıtlığını artırıp yerel karşıtlığını azaltarak fotoğrafın dinamik erimini geliştirmek için tasarlanmış olan [http://zynaddsubfx.sourceforge.net/other/tonemapping/ LDR Ton Haritalama Aracı]'na dayalıdır. Bunu fotoğrafın doygunluğu azaltılmış ve bulanık bir halini üreterek yapar; ardından <menuchoice>Doğrusal</menuchoice> veya <menuchoice>Güç</menuchoice> fonksiyonunu kullanarak asıl fotoğrafın RGB (Kırmızı-Yeşil-Mavi) kanallarını doygunluğu azaltılmış bulanık fotoğrafla birleştirir. Kulağa karmaşık mı geliyor? Kaygılanmayın, <menuchoice>Yerel Karşıtlık</menuchoice> aracını kullanmak görece basittir, yani memnun edici sonuçlara ulaşmak için işin karmaşıklığını anlamak zorunda değilsiniz. | ||
[[Image:Digikam_localcontrast.png|thumb|300px|center]] | [[Image:Digikam_localcontrast.png|thumb|300px|center]] | ||
Revision as of 13:24, 31 December 2010
Fotoğraflarrınız digiKam'ın Yerel Karşıtlık Aracı ile İyileştirin
Bu yazı aslen Scribbles and Snaps'te bir blog yazısı olarak ortaya çıkmış ve Dmitri Popov'un izniyle kullanılmıştır.
digiKam fotoğraflardaki kötü pozlanmış alanları iyileştirmek için bazı araçlar sunar. Örneğin Exposure Blending aracı farklı pozlamalardaki birkaç fotoğrafı kaynaştırarak mükemmel bir biçimde pozlanmış bir fotoğraf elde etmenizi sağlar. Ama ya eğer sadece bir görüntünüz varsa? Bu durumda aracını denemek isteyebilirsiniz. Bu özellik fotoğrafın global karşıtlığını artırıp yerel karşıtlığını azaltarak fotoğrafın dinamik erimini geliştirmek için tasarlanmış olan LDR Ton Haritalama Aracı'na dayalıdır. Bunu fotoğrafın doygunluğu azaltılmış ve bulanık bir halini üreterek yapar; ardından veya fonksiyonunu kullanarak asıl fotoğrafın RGB (Kırmızı-Yeşil-Mavi) kanallarını doygunluğu azaltılmış bulanık fotoğrafla birleştirir. Kulağa karmaşık mı geliyor? Kaygılanmayın, aracını kullanmak görece basittir, yani memnun edici sonuçlara ulaşmak için işin karmaşıklığını anlamak zorunda değilsiniz.

Open the photo you want in the editor and choose -> . The tool lets you apply up to four tonemapping operations called stages. Each stage offers two parameters for you to tweak: and . The former allows you to specify the desaturation level, while the latter lets you adjust the affected areas on the photo. To preview the result, hit the button. Once you are satisfied with the result, press OK to apply the process to the photo.
While the tool may sound like an easy way to fix photos, you should use it with care: sometimes it can do more damage than good, producing unnaturally looking photos.
