Parley/Manual/da: Difference between revisions
No edit summary |
Importing a new version from external source |
||
| Line 249: | Line 249: | ||
Du kan klikke på den lille ikon ved siden af indikatoren for at ændre, hvordan dit svar regnes. Det store symbol viser altid, hvordan svaret regnes. | Du kan klikke på den lille ikon ved siden af indikatoren for at ændre, hvordan dit svar regnes. Det store symbol viser altid, hvordan svaret regnes. | ||
==== | ==== Sæt øvelse tilbage til oprindelig tilstand ==== | ||
You can reset all your practice scores (remove the grades) to the initial state. When being in edit mode select '''Edit''' from the menu bar and then '''Remove Grades'''. | You can reset all your practice scores (remove the grades) to the initial state. When being in edit mode select '''Edit''' from the menu bar and then '''Remove Grades'''. | ||
Revision as of 06:08, 25 January 2011
Home >> Applications >> Education >> Parley >> Parley Manual
Denne manual er skrevet af Sabine Eller, Daniel Laidig og Frederik Gladhorn.
Copyright 2010 Sabine Eller, Daniel Laidig og Frederik Gladhorn
Introduktion
Parley bruges til at træne ordforråd. Den hjælper dig til at memorere et ordforråd, når du for eksempel er ved at lære et fremmedsprog. Du kan lave dine egne samlinger af ordlister med de ord, som du behøver eller vælge blandt en stor mangfoldighed af ordforrådssamlinger. Der kan du finde samlinger til almindelig sprogbrug, men også anatomi, musik, geografi, kemi og eksamenstræning.
Parley er meget fleksibel og bruger en flashkort tilgang til læring. Den holder automatisk styr på din fremgang. Med Parley kan du arrangere din ordliste som du vil og du kan lave dine egne lektioner efter behov; men i modsætning til rigtige flashkort kan du bruge andre læringsmetoder med Parley.
Flashkort indeholder udtryk på forsiden og deres oversættelse på bagsiden. Du starter med en stak kort. Hvis du kender oversættelsen af et kort, så lægger du det i en anden stak. Hvis du ikke husker oversættelsen, så holder du kortet i den første stak for at prøve igen senere.
Parleys primære fO.k.us er ikke at lære dig grammatik. Der er dog nogle former for øvelser, som kan hjælpe dig med dette.
Parley består af to store dele: træning af ordforråd og en editor til ordforrådssamlinger.
I denne manual henviser ordforrådssamling til en fil, som indeholder lektioner og ordlisterne til lektionerne.
Du kan både komme til editoren og øvelserne fra startsiden.
Træningen består af tre dele: først opsætning af øvelsen, hvor du vælger, hvad du vil træne. Herefter starter du den egentlige træning, og når du er færdig med det, får du et sammendrag.
Tip: Som i alle andre programmer kan du højreklikke for at udforske Parleys funktioner og muligheder. Ved et højreklik vises en "kontekstmenu", som viser, hvad du kan gøre i den aktuelle situation. Prøv at højreklikke på lektioner og ord for at se nogle muligheder.
Startsiden
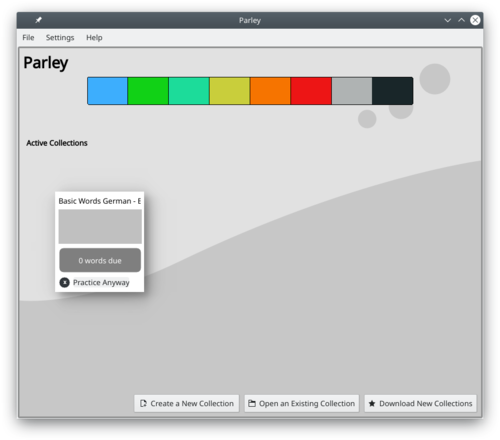
Når du starter Parley op, så mødes du af Startsiden. Til at begynde med er startsiden tom, men når du har åbnet nogle ordforrådssamlinger, så vises de samlinger, som du senest har arbejdet med.
En ordforrådssamling er en fil, som indeholder ord og deres oversættelse til andre sprog eller andre par af ord eller sætninger, som du gerne vil lære. Ordene er organiseret i lektioner.
For at begynde træningen klikker du på en af ordforrådssamlingerne i listen. Du får nu mulighed for at opsætte øvelsen.
Bemærk et lille Editorikon, som viser sig til højre for dO.k.umentets navn, når du flytter musen hen over det. Editorikonet lader dig åbne samlingen i editoren i stedet for at begynde at træne den. For at redigere en samling klikker du på Editorikonet til højre for den.
Hvis du ønsker at starte din egen ordforrådssamling, så klikker du på "Opret en ny samling".
Du kan også åbne en eksisterende samling, hvis du har den på din computer allerede men den ikke findes på listen.
Den sidste knap på startsiden lader dig hente ordforrådssamlinger lavet af andre. Når du selv har lavet en samling, som du gerne vil dele med andre, så kan du let uploade den fra editoren.
Parley leveres med forskellige temaer, så du kan skifte til en anden grafisk stil. Se Indstil Parley for yderligere information.
Åbn en eksisterende samling
Lad os antage, at din samling allerede befinder sig på din harddisk.
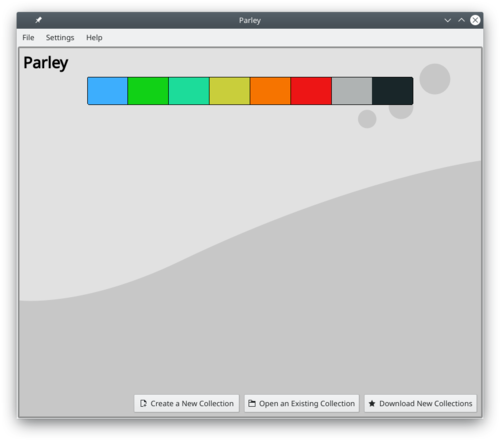
Sådan ser skærmen ud, første gang du starter Parley.
Klik på Åbn en eksisterende samling.
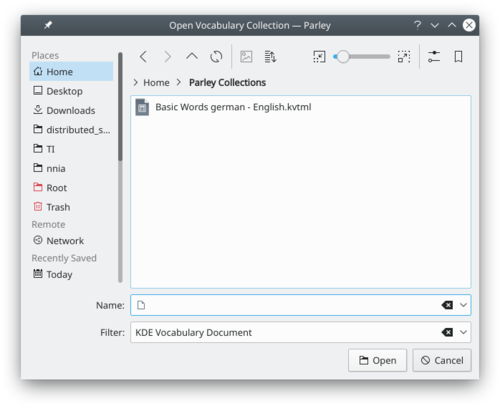
I filvælgerdialogen navigerer du til den mappe, som indeholder datafilerne og vælger den ved at klikke på den. Afhængigt af dit system skal du muligvis også klikke på O.k. før files åbnes.
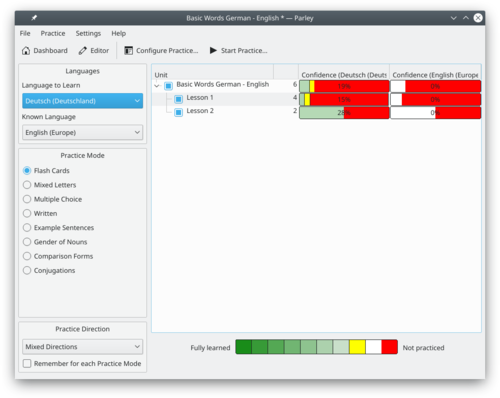
Nu er filen læst ind og du er kommet til opsætningsskærmen for øvelser: se de næste afsnit for yderligere detaljer.
Træning af ordforråd
For at starte træningen vælger du et dO.k.ument efter at have startet Parley op. Hvis du allerede havde dokumentet åbent i editoren, så skal du blot klikke på Practice i værktøjslinjen.
Opsætning af øvelsen
Før den egentlige træning starter kommer du altid til en dialog, hvor du indstiller øvelsen. Der er tre felter, som lader dig vælge, hvad du vil træne:
- Valg af sprog
- Valg af øvelsestilstand
- Valg af lektion, som også viser, hvor langt du er nået
I venstre side kan du vælge, hvilken kombination af sprog du vil træne. Hvis du for eksempel vælger engelsk til fransk, så vil du blive vist engelske ord og Parley vil bede dig om at skrive den franske oversættelse.
Nede under afsnittet Sprog kan du vælge, hvilken slags øvelse du vil lave. Øvelse bestemmer, hvordan øvelsens spørgsmål bliver stillet.
I det store felt til højre ser du øvelserne i ordforrådssamlingen. Du kan vælge hvilken øvelse du vil træne ved hjælp af tilvalgsfeltet foran øvelsens navn. Antallet af ord i her enkelt øvelse vises ved siden af navnet. På højre side af navnet ser du, hvor langt du er nået med øvelsen.
Avanceret konfiguration af øvelser
Dialogen til Avancerede øvelsesindstillinger lader dig angive mere avancerede indstillinger, som vil påvirke øvelsen.
Fra dialogen til opsætning af øvelsen kommer du til den avancerede indstillingsdialog ved hjælp af knappen Indstil øvelse i værktøjslinjen - det er knappen med den grønne ikon.
Blokering
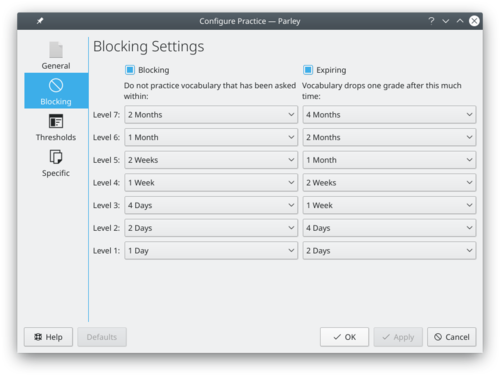
Hvis du har planer om at øve dit ordforråd regelmæssigt, så bør du sikre dig, at funktionen Blokering er aktiveret. Tilvalgene til blokering findes i dialogen Avanceret konfiguration af øvelser. Der går du til siden Blokering og sætter flueben i tilvalgsfeltet Blokering. Nu kan du oven i købet indstille, hvor lang tid et ord, som du har svaret korrekt på bliver blokeret.
Blokering betyder, at du ikke vil blive spurgt om et ord i nogen tid efter sidste øvelse. Denne periode afhænger af, hvor godt du kender ordet, sådan at du oftere vil blive spurgt om ord, som du endnu ikke kender.
Grænser
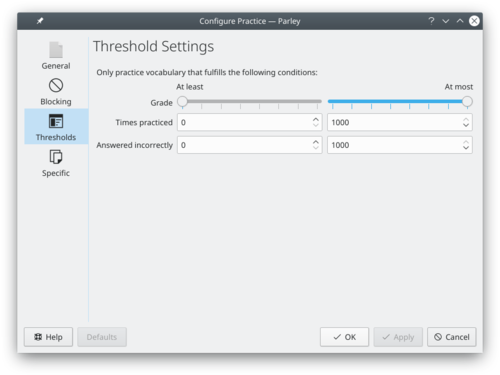
Grænser er en anden måde at begrænse, hvad du vil træne.
Du kan beslutte kun at træne ord, som du kender bedre eller dårligere end en vis "karakter"; eller du kan udvælge ord, som du har trænet et vist antal gange. Med ordtypevalget kan du vælge kun at træne ord af en bestemt klasse, fx navneord eller udsagnsord.
Avancerede indstillinger for øvelser
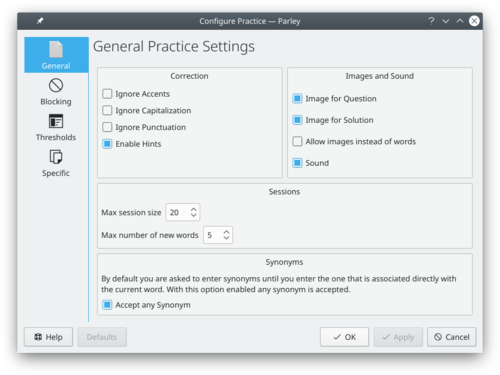
Du kan finde flere andre indstillingsmuligheder for øvelserne i dialogen Avancerede øvelsesindstillinger.
De vigtigste valgmuligheder er følgende:
- Ignorér accentfejl: hvis du vælger dette og indtaster et ord med e i stedet for é det vil stadig regnes som korrekt.
- Ignorér fejl i store/små bogstaver: Hvis du vælger dette, så behøver du ikke skelne mellem store og små bogstaver, når du indtaster ord.
- Aktivér billeder: hvis dette er aktiveret, vil billeder blive vist i løbet af øvelsen, hvis de er tilgængelige.
- Aktive indgange under øvelse: hvor mange ord du vil blive spurgt om flere gange, før der tilføjes et nyt ord. Det vil sige, at hvis du indstiller den til et lavt antal, så vil ord dukker op igen hurtigere, men med en høj indstilling vil der gå længere tid, før du ser det samme ord igen.
Træning
Flashkort
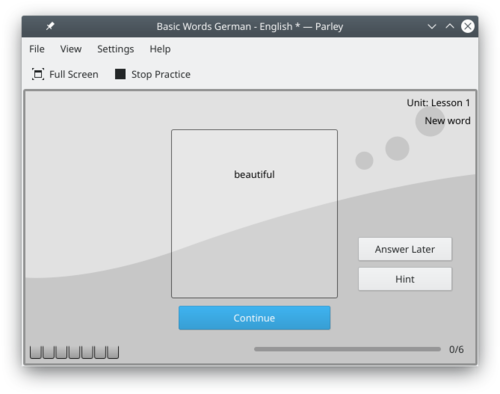
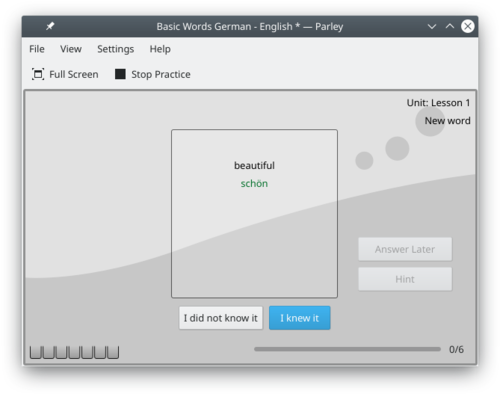
Efter at have aktiveret øvelsestypen Flaskkort og klikket på Start øvelse, så dukker den følgende skærm op. Øvelsestypen Flaskkort virker på samme måde som med "rigtige" flashkort. Du forestiller dig svaret, og skulle du få brug for hjælp, så kan du klikke på Tip, som vil begynde at give dig svaret et bogstav ad gangen.
Du kan også vælge at springe et ord over for nu. Når du klikker på Svar senere vil ordet dukke op igen på et senere tidspunkt.
Et klik på Fortsæt afslører løsningen. Nu skal du angive, om du kendte svaret. Hvis du ikke kendte det, så klik Jeg ved det ikke. Hvis du kendte svaret, så klik Jeg ved det. Dette vil føre dig til det næste spørgsmål.
Nederst til venstre i vinduet har du 7 bokse, som viser, hvor godt du kender ordforrådet. Disse 7 bokse svarer til blokeringsniveauerne, som indstilles under Blokering i dialogen Avancerede indstillinger for øvelser.
Tip: I stedet for at klikke på Fortsæt du kan også taste mellemrum på tastaturet.
Du kan stoppe øvelsen når som helst ved at klikke på Stop øvelse.
Blandede bogstaver
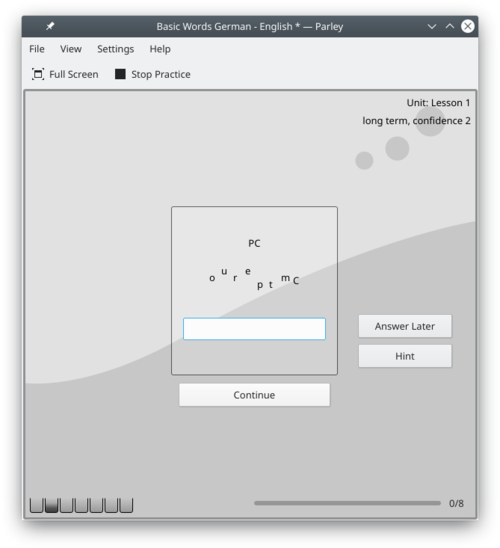
Blandede bogstaver er en træningsmetode, hvor du får hjælp med det samme: alle svarets bogstaver vises i blandet orden:
Ønsker du hjælp, kan du klikke på Hint, som vil give dig løsningen et bogstav ad gangen. Selvfølgelig kan du også vælge at svare senere ved at klikke på Answer Later.
For at give svaret skal du skrive det i det tomme felt under de blandede bogstaver og taste Enter eller klikke på knappen Fortsæt.
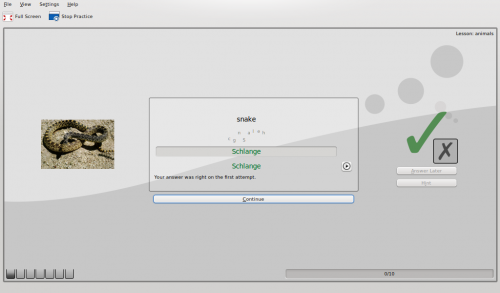
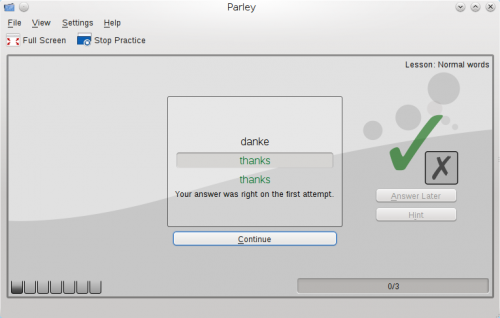
Hvis dit svar var korrekt, så vil Parley fortælle dig det, og du kan taste Enter igen, eller klikke på Fortsæt for at gå videre med det næste spørgsmål.
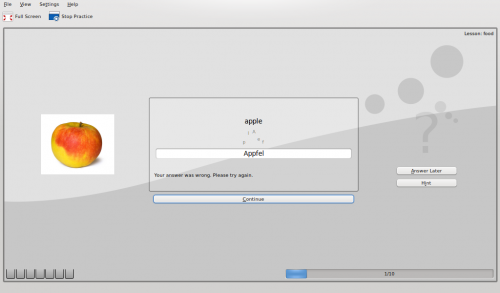
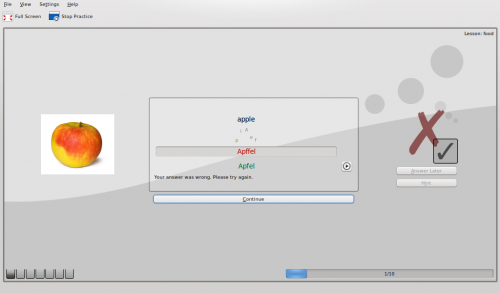
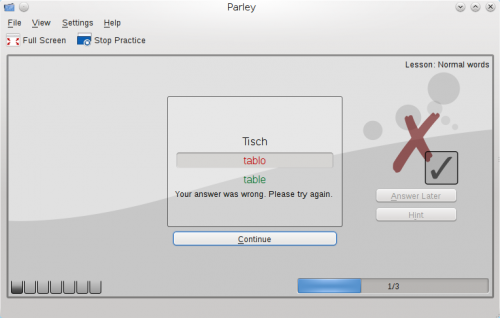
Svarer du forkert, så vil du blive bedt om at prøve igen:
Hvis du ikke kender svaret, skal du blot klikke på Fortsæt endnu en gang. Derefter dukker det følgende op, hvor du kan se løsningen. Gå videre med Fortsæt.
Efter at løsningen er afsløret, kan du se et stort ikon til højre, som angiver om dit svar regnes som rigtigt eller forkert. Du kan underkende, hvordan dit svar regnes. Se Regn et svar som rigtigt.
Multiple-choice
Automatisk udvælgelse af de mulige svar
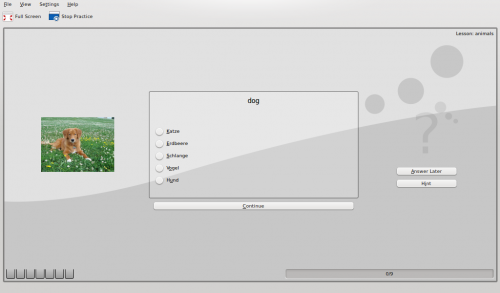
I øvelsestypen Multiple-choice bliver du præsenteret for et antal mulige svar, hvoraf kun et er korrekt. Klikke på Tip for at få Parley til at fjerne et af de forkerte svar; på den måde bliver dine valgmuligheder mere begrænsede med hvert klik på Tip. Du kan selvfølgelig også klikke på Answer Later.
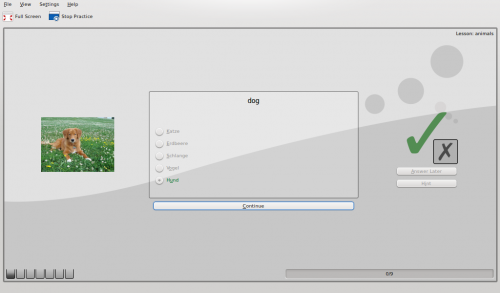
Når du har foretaget dit valg ved at klikke på det, som du mener er korrekt, så viser Parley skærmen nedenfor, hvis svaret var rigtigt. Gå videre med næste spørgsmål ved at klikke på Fortsæt.
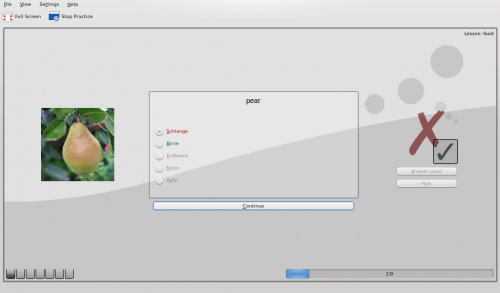
Hvis dit svar derimod var forkert, vil det korrekte svar blive vist i grønt og det forkerte i rødt. Også her kan du gå videre ved at klikke på Fortsæt.
Efter at svaret er blevet afsløret kan du se et stort ikon til højre, der angiver, om dit svar regnes som rigtigt eller forkert. Du kan underkende, hvordan dit svar regnes. Se Regn et svar som rigtigt.
Hvis du ønsker at stoppe øvelsen, skal du blot klikke på knappen Stop øvelse.
Med ja/nej-svar
Normalt foreslår Parley automatisk et korrekt og flere forkerte svar i multiple-choice-tilstanden. For nogle øvelser har du istedet forud givne svarmuligheder som ja/nej eller lignende. Sådanne øvelser skal konfigureres ved at klikke på Indstil øvelse.
Vælg fanebladet Avanceret; du får så noget lignende det følgende skærmbillede:
Hvis du kun har to valgmuligheder so ja/nej, så sæt Antal valgmuligheder til 2 i afsnittet Multiple-choice.
Skriftlig
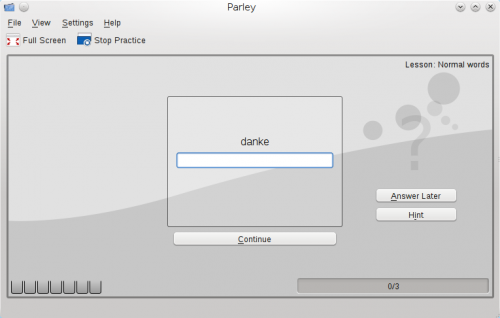
Hvis du vælger øvelsestypen Skriftlig, så skal du skrive svarene for at lave øvelsen. Du kan bruge knappen Tip, som vil give dig bogstaver i svaret et ad gangen. Selvfølgelig kan du også vælge udskyde svaret ved at klikke på knappen Answer Later.
Når du har indtastet svaret, klikker du på Fortsæt; så viser Parley dig om dit svar var korrekt. Gå videre ved at klikke på Fortsæt igen.
Skulle du give et forkert svar, kan du prøve igen flere gange for at finde det rigtige svar. Hvis du ikke prøve igen, og du blot klikker på Fortsæt, bliver svaret vist.
Gå videre med øvelsen ved at klikke på Fortsæt eller stop ved at klikke på knappen Stop øvelse.
Når svaret er vist kan du se et stort ikon til højre, der angiver om dit svar regnes som rigtigt eller forkert. Du kan underkende, hvordan dit svar regnes. Se Regn et svar som rigtigt.
Regn et svar som rigtigt
Efter at løsningen er blevet vist, så ser du et stort ikon i højre side, som viser om dit svar tæller som rigtigt eller forkert. Hvis du ser et stort flueben, så mener Parley, at du svarede korrekt.
Hvis du havde brug for mere end ét forsøg til at svare korrekt, vil dit svar tælles som forkert.
Du kan klikke på den lille ikon ved siden af indikatoren for at ændre, hvordan dit svar regnes. Det store symbol viser altid, hvordan svaret regnes.
Sæt øvelse tilbage til oprindelig tilstand
You can reset all your practice scores (remove the grades) to the initial state. When being in edit mode select Edit from the menu bar and then Remove Grades.
Furthermore you can reset your grades for individual lessons from within the Practice Setup by right clicking on the lesson to reset and choose Remove Grades.
Opsummering efter træning
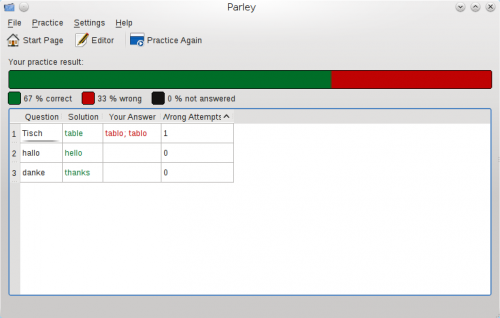
The summary shows up when you finish a learning session. In the big bar on the top it shows you how well you did.
Below is a table with all the words you practiced, together with the mistakes you made. The words with the most mistakes are on top so you can easily see what you do not know yet.
Grammar Practice Modes
With Parley you can also learn specific grammar structures, such as the gender of nouns, the comparison forms of adjectives and the conjugation of verbs. Let's look at some examples.
Articles and Gender of Nouns
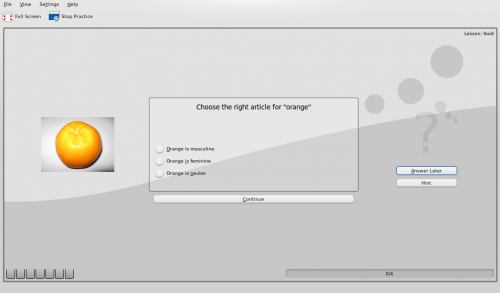
Once the practice mode Gender of Nouns is activated, click on Start Practice.
In the case below we use German as language to learn and so you have three genders to choose from: masculine, feminine and neuter. By clicking on Hint one of the wrong answers gets excluded. Of course you can also decide to Answer Later by clicking on that button.
You should enter the articles for the language in the Editor to see the articles instead of the grammatical gender terms. Also note that this only works, if the gender of the words has been set up properly. See Word Types for more information how to change the word type to the right gender.
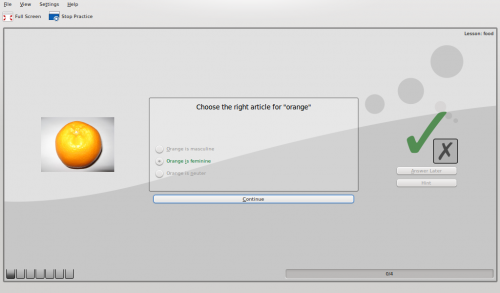
When you give the correct answer the following is shown and you go ahead practicing by clicking on Continue.
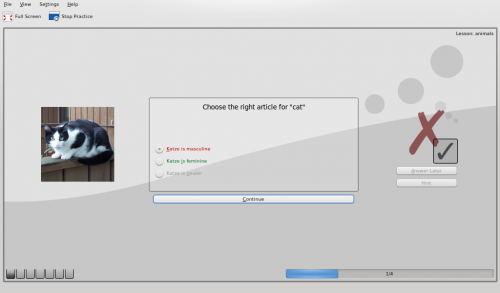
Should you give the wrong answer the following is shown and you go ahead practicing by clicking on Continue.
You can stop practicing anytime by clicking on Stop Practice.
Comparison Forms of Adjectives and Adverbs
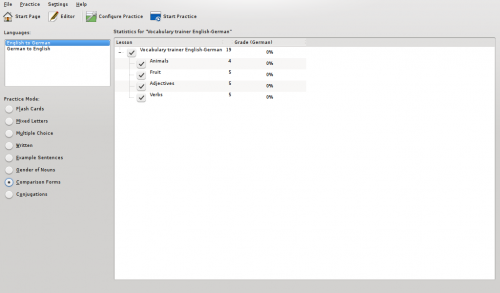
On the Practice screen select Comparison Forms and then click on Start Practice to go ahead.
This only works when the conjugation forms of the word have been entered in the vocabulary collection. See Entering Comparison Forms.
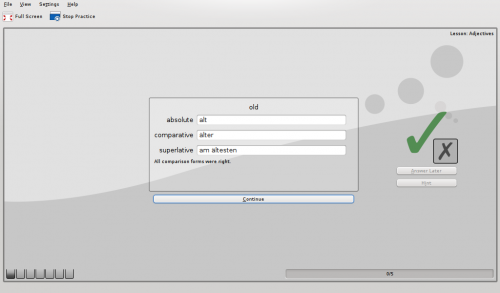
The exercise requires you to enter the comparison forms for the term shown. In this case the translation of the English word old to German. The German language has three forms: absolute, comparative and superlative. To go on with the exercise just click on Continue.
Conjugations
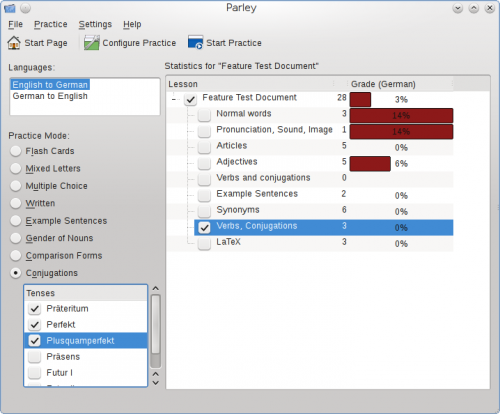
To practice conjugations choose the Conjugations mode and the tenses you wish to exercise.
In the document the conjugation forms of the words have to be entered in order to allow this practice mode to work. See Entering Conjugation Forms.
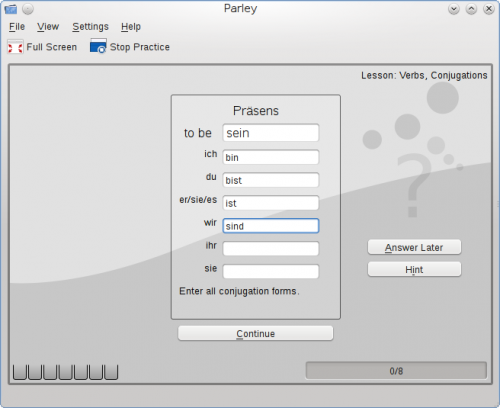
Then click on Start Practice. You are required to enter the correct conjugation forms according to the tense shown. To go ahead click on Continue
Redigering af ordforråd
Setup
Before you start using a vocabulary collection or create your own it is helpful to understand the different elements in Parley and configure them accordingly. The next sections will guide you step by step through this process. There are several locations in Parley for settings:
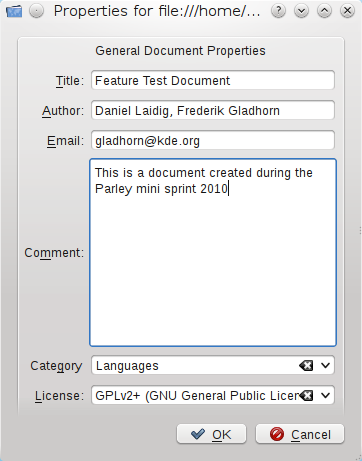
- File→Properties This is the place for the "General Document Properties", meaning some information about your vocabulary collection and yourself.
- Edit→Languages Find here settings around the languages you use
- Practice→Configure Practice Here are settings how you practice your vocabulary. Depending on what you want to do during the specific learning session you change them on the fly.
- Settings→Configure Parley For more general and display settings
About the Collection
Entering meta data like a title and your contact info is relevant if you plan to make your collection available for other people. Use File->Properties to edit the data.
Vocabulary Columns
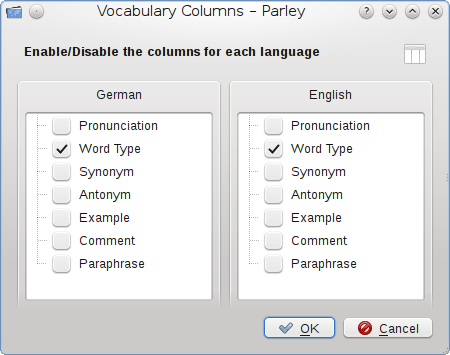
Depending on what your learning sessions are going to be about it can be relevant to have further Vocabulary Columns show up in your edit section. To choose these columns select View from the Menu bar and then Vocabulary Columns. There you can determine if the columns for Pronunciation, Word Type, Synonym, Antonym, Example, Comment and/or Paraphrase are to be shown.
Languages and Grammar
Set up some grammar details to let Parley help you. Use Edit->Languages to pull up the grammar dialog.
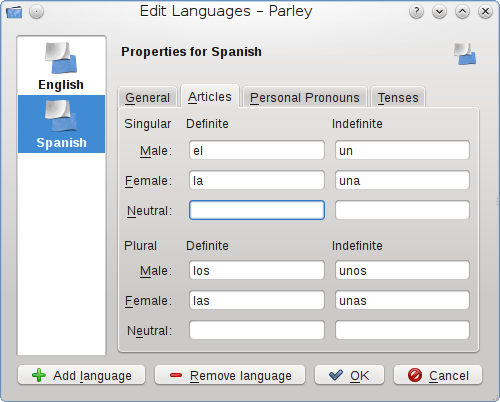
Articles in English are simply the which is the definite article and a as indefinite article. Most other languages have more articles which can be filled in at the articles tab.
For conjugations the personal pronouns should be filled out. Most languages do not have different conjugation forms for he/she/it, in that case, you should not check Male/Female have different conjugations! Simply enter the pronouns for all three forms. Personal Pronouns in English:
| Singular | Plural | |
| 1st Person | I | we |
| 2nd Person | you | you |
| 3rd Person | he/she/it | they |
Tenses: Depending on the language, you can enter the right tenses which you later want to learn how to conjugate. Examples are: Simple Present, Simple Past, Future I etc.
Btw. by clicking on the Add New Language button you can add an additional language to your collection.
Let's Have a Closer Look at Spanish
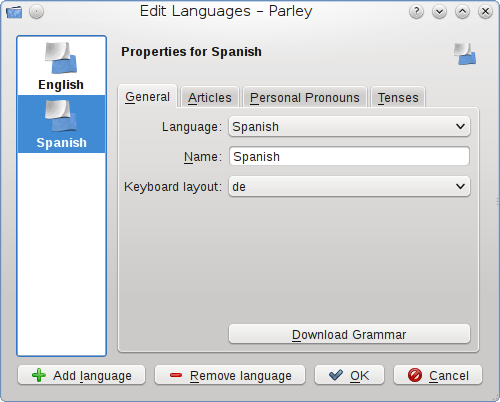
On the General tab the basic language settings, like here
- Language = Spanish
- Name = Spanish
- Keyboard layout = de (for German)
You can leave Keyboard layout empty if you are not sure about what you are using. Parley will then simply take the standard layout of your computer.
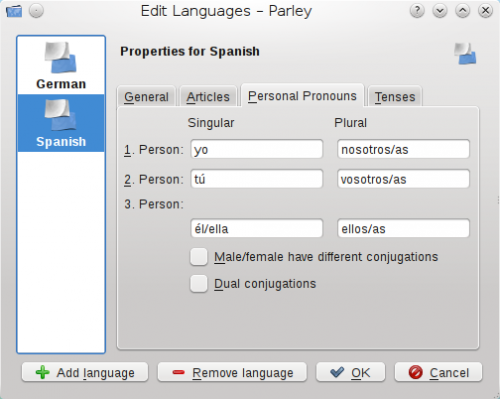
Let's have a look at the Articles tab: Spanish knows only male and female nouns, therefore the field Neutral remains empty.
Spanish Personal Pronouns have multiple forms for 3rd person singular and 1st, 2nd and 3rd person plural. To remain consistent, the possibilities should be entered with a / between the two forms.
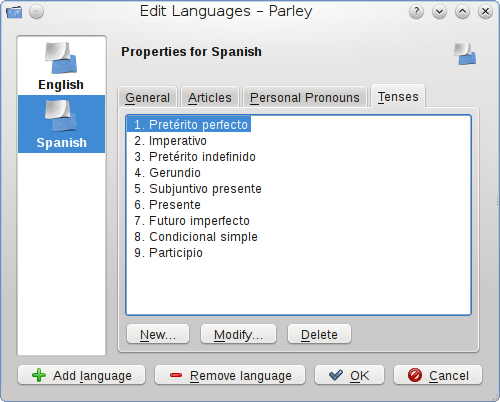
Under Tenses you will find the various tenses that are available for a verb form. You can add to the tenses that are already there by clicking on New, modify with Modify or in case something does not actually exist simply Delete the tense after having it selected.
Lessons
On the left you have a list of lessons. If you started a new collection, this list might be empty except for one lesson that was created by default for you.
If you cannot see the list of lessons, you might have to enable it in the View menu - View->Lessons.
The check boxes in front of the lesson name show which lessons are currently included in your practice. The number next to it is the number of words in the lesson.
New Lesson
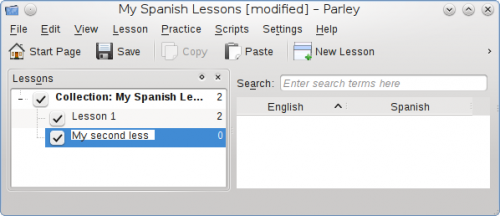
Add a new lesson: Select where this lesson belongs to, for example the collection My Spanish Lessons.
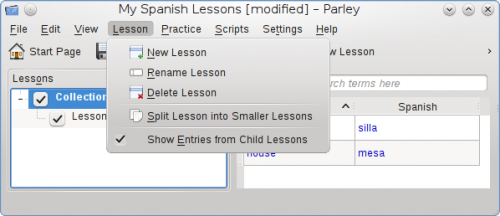
In the Lesson menu, select New Lesson.
Please make sure to select the right point in the tree structure of lessons before selecting New Lesson. In our case, wanting a Sub-Lesson of Collection: My Spanish Lessons it is exactly that one that needs to be selected before going ahead with New Lesson.
Moving, Renaming and Deleting Lessons
To change the name of a lesson, double click it, or right click on the lesson and choose Rename. You can also delete it this way (but you'll lose its contents also then).
If you don't like the arrangement of lessons, you can move a lesson with the mouse. You can drag it onto another lesson, then it will become a child of that lesson.
Splitting a Lesson
If your lessons grow too big, you can choose to split them up to make learning easier in small units. 20 words for a lesson is probably a good size. Right click a lesson, or use Lesson->Split Lesson into Smaller Lessons and the lesson will be separated into child lessons. You can choose to randomize the words that are put into the new lessons before assigning them, or to keep them in order.
What is Shown in the Table
Parley shows always the words of the lesson that you have currently selected. You can enable to see the words in sub-lessons contained in this lesson also. Use Lesson→Show Entries from Child Lessons to enable this. That way, you can browse all words by selecting the document lesson at the very top.
Word Types
Parley lets you associate word types with the words. Word types are for example: Nouns, Verbs, Adjectives and Adverbs.
In order to work with word types, enable the word type tool: View→Word Types
You can categorize the word types just like lessons.
If you want to see all words of a certain type - e.g. all nouns, simply select the noun category, and you will see only nouns in the table.
The easiest way to set the word type, is to drag and drop a word onto its type. You can even do this with multiple words at the same time.
Words or Sentences
Adding New Vocabulary
Use Add New Entry in the toolbar to add new words. You can start typing the word in the first language right away. By default Parley lets you enter another word when you press Enter in the last row, so you don't have to keep using the Add button. After entering the first word, press Enter or Tab to go to the next language.
Editing Words
If you want to replace a word, select its entry and start typing. To change the word instead, double click the entry and you can change the contents of the cell without losing the old word.
Press Tab to go to the next word. Enter leaves the editing mode. You can use the arrow keys to move around.
Synonyms
Synonyms are hard to set up and do not always work really well. Here is how you set them up in any case:
- Use View→Synonyms to see the synonyms tool.
- Select first word (A) you want to make synonyms, then click on the second word (B)
- The button in the synonym tool changes it's text to "A and B are synonyms"
The words will now be shown as connected in the synonym tool and can be recognized as synonyms in the practice.
Adding Images
First show the image tool by selecting View in the menu bar and then clicking on Image. The checkbox in front of Image will then be activated. This will show up the picture section on the right hand side of the Parley screen
To add an image to a word make sure the word is highlighted. In the image section on the right hand side click on the Folder icon and choose the picture you wish to associate.
Adding Sound
First show the sound tool by selecting View in the menu bar and then clicking on Sound. This will show up the sound section on the right hand side of the Parley screen.
To add a sound to a word make sure the word is highlighted. In the sound section on the right hand side click on the Folder icon and choose the sound you wish to associate.
Entering Comparison Forms
In order to enter comparison forms, make sure the comparison forms tool is enabled. You open it with the menu: View→Comparison Forms
First select a word that is an adjective or adverb.
Click the Adjective or Adverb button in the comparison forms tool.
Enter the comparison forms.
Now you can use the Comparison Forms Practice mode.
Entering Conjugation Forms
In order to enter conjugation forms, make sure the conjugation forms tool is enabled. You open it with the menu: View→Conjugation
First select a word that is a verb.
Click the ... is a Verb button in the conjugations tool.
After selecting the right tense in the tense selection box, enter the conjugation forms.
The tenses can be configured for each language: Languages and Grammar.
Now you can use the Conjugations Practice mode.
Creating New Files
In this section we will describe how to create new files and this not only with the usual vocabulary learning part, but also for grammar exercises, mathematics etc.
New Collection: Vocabulary English-German
In this section we describe how you can create a vocabulary training file including pictures and sound. In a second stage we will also add adjectives and verbs. This is a very complete example and therefore quite long. Eventually you will not need all points for your project.
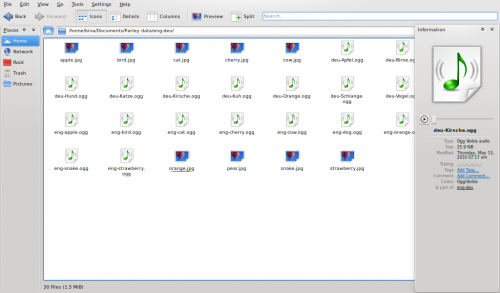
Since we wish to add sound-files and pictures, we should make sure that these will all be in one folder which for convenience is being called eng-deu. Our data file we create with Parley will be saved in the same folder. This will help a lot when you decide to share your work with others.
So this is what we have in terms of sound files and pictures:
Let's start from the Start Page which is shown once you launch Parley:
Click on the button Create a New Collection.
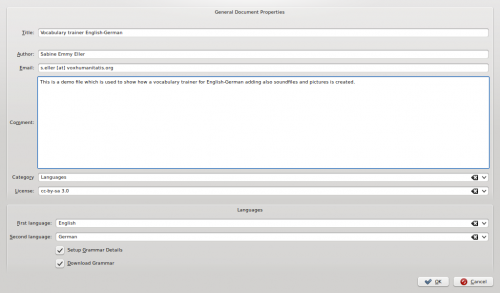
The General Document Properties page shows up which is being filled as follows (just adapt to what your file is about):
Next click on OK. The following screen asks you to set up the language details. Here we don't want to change anything and therefore we just click on OK.
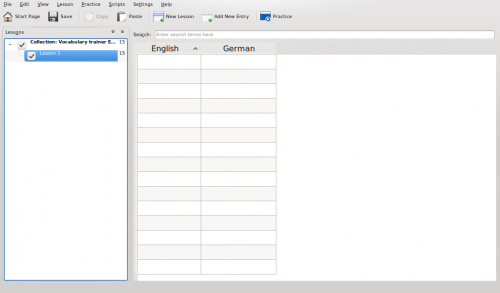
As a first step, let's create the vocabulary part. We will think about the addition of the sound files and pictures in a second stage. This is what the lesson looks like:
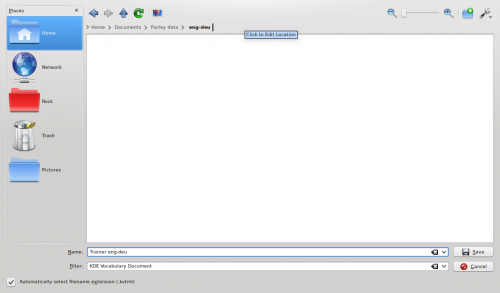
Before we do anything else, let's save the file to the folder with the pictures and sound-files. Click on the Save icon and select the folder using the navigation. In this example we will call the file Trainer eng-deu - once you entered the name just click on save.
If you now check your folder where the sound-files and pictures are, you will also find the file Trainer eng-deu.kvtml
Let's have a short look at the words we want to add: apple, bird, cat, cherry, cow, orange, pear, snake, strawberry. We have animals and fruit and therefore we decide to create two lessons that are called: Animals and Fruit.
We now rename Lesson 1 to Animals and then we add a lesson called Fruit. Right-click on Lesson 1 and choose Rename Lesson from the options shown. Now Lesson 1 is highlighted and you can simply overwrite it by typing in Animals. When done, hit the Enter key. Now right-click on Collection: Vocabulary trainer E... which is the root of the lesson tree and choose New Lesson from the options shown. In the new field write Fruit and hit the Enter key again.
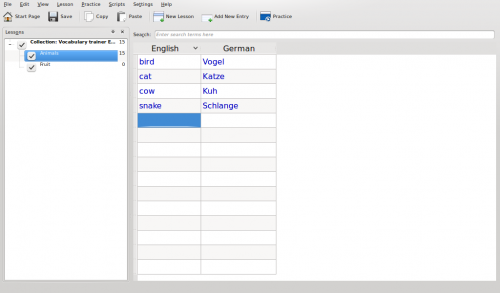
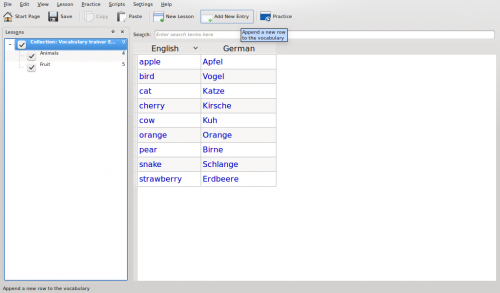
First, let's insert the animals. Please click on the lesson Animals and you will get an empty table you can fill in. Click with your mouse in the first field, and insert the source terms. Then, insert the target terms in the second column. Once you've inserted all 4 English animal names with their German translation the screen looks like this:
In our case we want only 4 entries in the animals lesson. There are many empty lines that should be deleted. To do this click on the first empty field, and keep the shift key pressed while clicking on the last empty field. All lines to be deleted will be highlighted. Then, press the Del key and confirm the question Do you really want to delete the selected entries? by clicking on the Delete button.
Let's add the fruit terminology. Just click on the lesson named Fruit. This second lesson is completely empty. Since we have five fruit terms we need to add five lines. Therefore, press the Ins key five times, and then, just like before, we add our terminology.
Don't forget to save every now and then ...
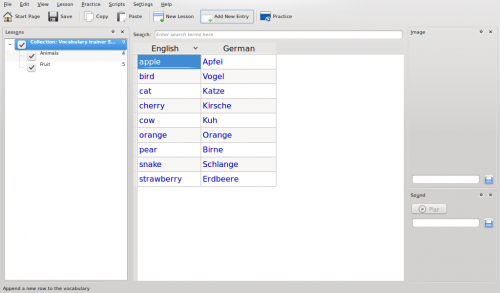
A click on the root of our lesson tree Collection: Vocabulary trainer E... and Parley will show us all entries that are present in the two lessons:
Time to add sound and images. First of all we need to activate the Image and Sound views. From the menu bar select View and there click on Image and then Sound. Once these options are activated, two new sections are shown on the right hand side of the Parley editing screen: Image and Sound.
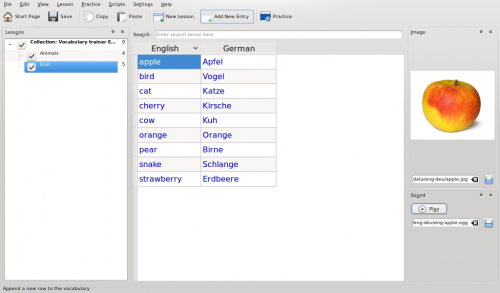
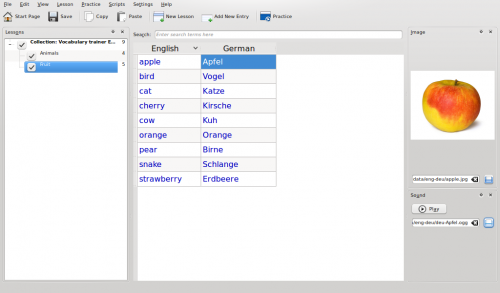
Select the English word apple by clicking on it. It is highlighted, so let's add the picture. In the image section on the right hand side click on the Folder icon and choose the picture you wish to associate.
To add the pronunciation for the English apple, do the same in the Sound section, selecting the relevant sound file.
By clicking on the Play button in the sound tool you can listen to the pronunciation.
The screen will then look like this:
Then click on the German translation Apfel. The field is now highlighted to indicate the selection. You will note the picture with the apple is associated also to the German term. In the sound section select the pronunciation, just like before.
Just go ahead like this for all terms.
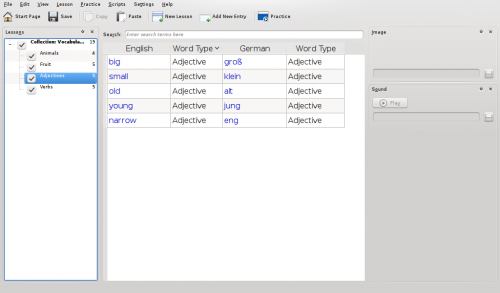
Time to add adjectives and verbs as lessons to our project. So just do as before with the lesson Fruit and create two new lessons: Adjectives and Verbs. Let's assume we will add big, small, old, young, narrow' in the adjective lesson and to go, to come, to buy, to drink, to eat in the verb lesson.
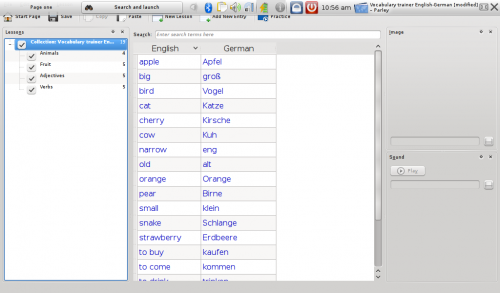
The following shows a screenshot with all inserted terminology. Now, words are mixed and it would be nice to see what is a noun, adjective or verb.
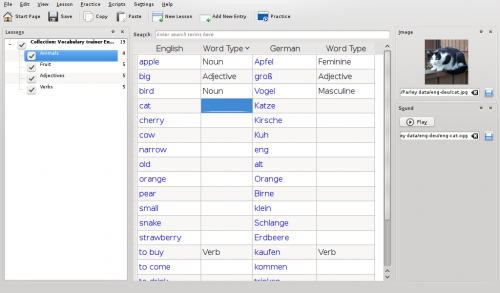
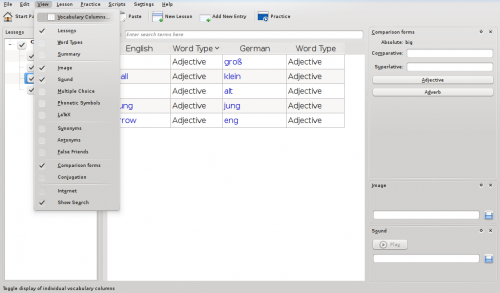
As the next step we are going to show the Word Type. Select View in the menu bar and then select Vocabulary Columns. We activate Word Type for English and German by clicking on the checkbox in front of Word Type. Then click on OK to accept the changes.
By clicking on the fields in the column Word Type you can select the word type and for those languages where nouns have a gender you can also select the Noun/Gender combination. Below the Word Type column with part of the selections already done.
Once we have specified all the word types, we will first consider Adjectives, adding Comparison Forms to them. So let's move to the Adjectives lesson only.
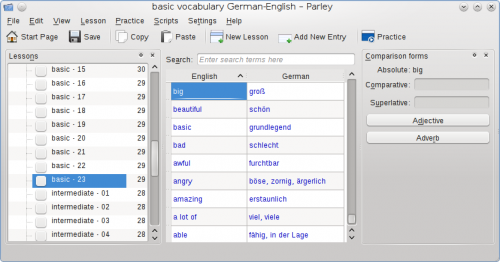
To show the Comparison Forms on the right hand side of the screen, select the View in the menu bar and activate the Comparison Forms checkbox.
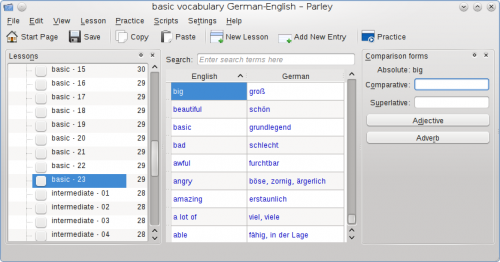
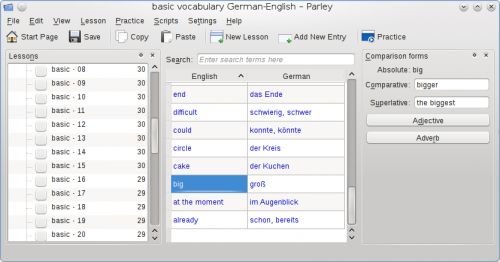
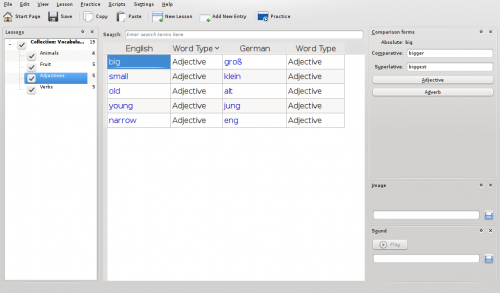
Edit the Comparison forms by adding Comparative and Superlative to the single adjectives. First, click on the adjective for which you wish to add the comparison forms, in our case big, and add bigger and biggest. Then, continue with the next adjective to complete, until all comparison forms have been entered.
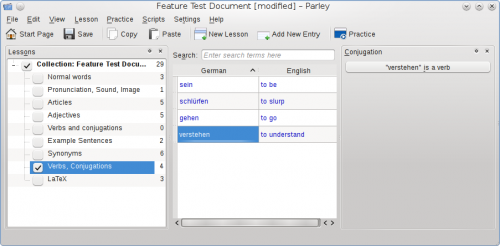
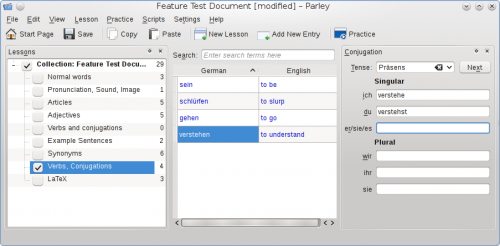
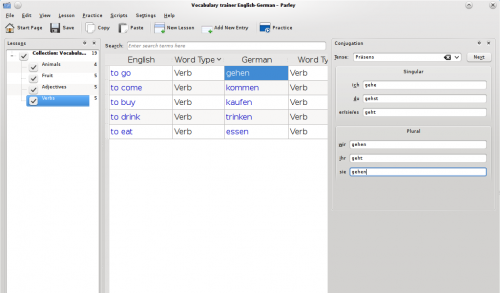
Finally, let's consider the Conjugation form of the Verbs. Select the Verbs lesson and then activate the conjugation section on the right hand side by selecting View from the menu bar and activating Conjugation. As an example we edit the present tense (Präsens) form of gehen. Please first select Präsens from the drop down menu and then add the verb forms.
This needs to be done for all verbs, and in all possible tenses.
Once you are done you can start to practice by clicking on the Practice button.
New Collection: Single Names and Collective Names
This exercise was created for the 3rd class of an Italian primary school. Pupils are supposed to connect single names with collective names, such as tree → woods
When you start Parley you get the start page, eventually also listing some previously used files (that you cannot see here).
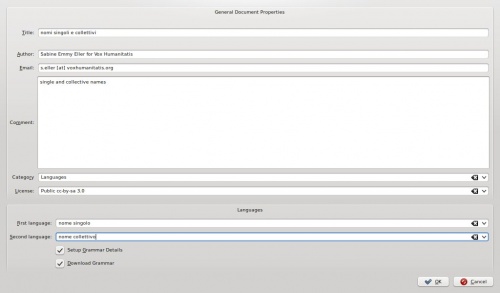
Click on Create a New Collection and the following screen with empty or partly filled fields will show up:
Fill in the title, here nomi singoli e collettivi, your name, e-mail address, in the Comment section you can write down a more detailed description, select your category and license. Then there we have something special: instead of indicating the first and second language, like it normally would happen, we added nome singolo (single name) and nome collettivo (collective name). Setup Grammar Details and Download Grammar are not needed here. In the screenshot they are still activated - please deactivate them by just clicking on the checkboxes. When you are done, please click on OK.
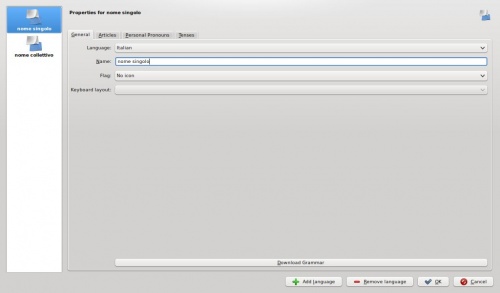
The Properties page for nome singolo comes up and here you see it already with the necessary changes made:
On the left hand side you can see where the data you are adding belongs to. nome singolo. Choose the language, here Italian and insert nome singolo in the following editable field. Then click on OK.
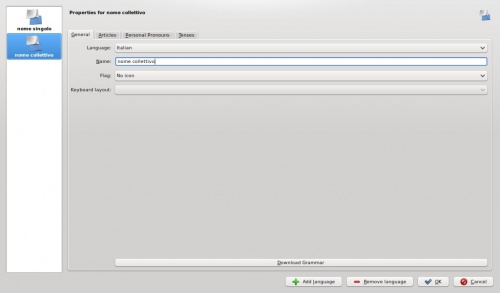
Now the Properties page for nome collettivo is shown:
Like before: choose Italian as language and insert nome collettivo and click on OK.
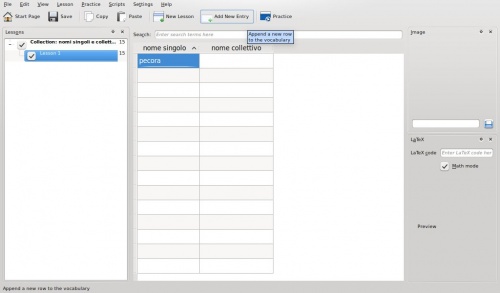
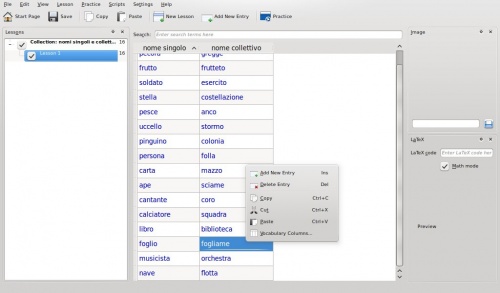
And now you can start to edit:
Just insert the nome singolo (single name) in the first column and the corresponding nome collettivo (collective name) in the second column.
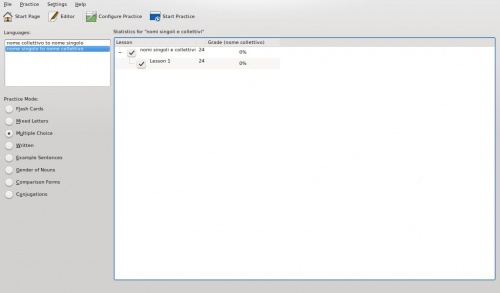
If the number of available fields is not enough, just right-click anywhere on the edit section and choose Add New Entry. Don't forget to save your file every now and then. When you have finished adding all entries you will want to see if Practice mode works fine. Well just click on the Practice button right above the edit section and the page with the practice settings comes up:
In this case Multiple Choice is a good option, but also Written will do fine. After choosing the Practice Mode just click on Start Practice and have fun.
Getting Additional Collections
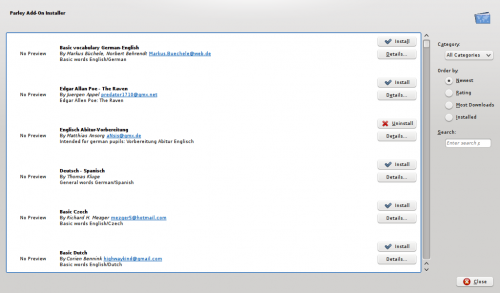
When you are on the Start Page you have the possibility to install Collections directly from the server, provided you are online. Just click on Download New Collections.
A window with many interesting collections opens. Just select what you find most interesting and click on Install. Then open the file to practice or edit.
Indstil Parley
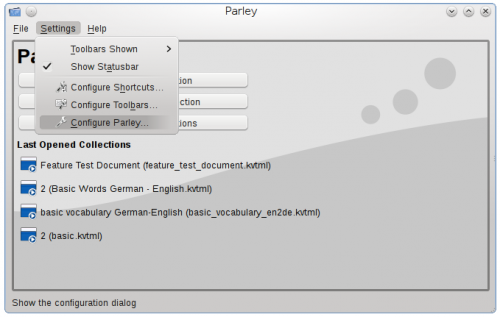
You can configure the appearance of Parley from the Start Page or from within the Edit section. Select Settings from the menu bar and then Configure Parley.
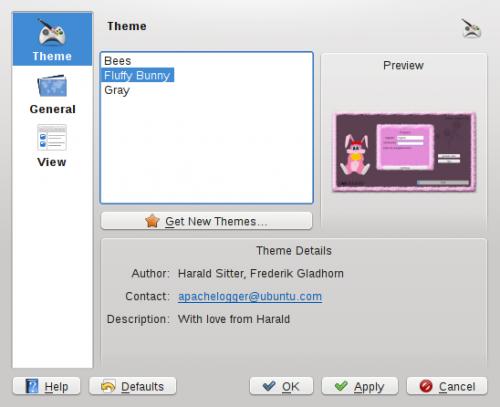
Theme Tab
The configuration opens with the Theme section. This is the place where you can choose how Parley should greet you when launching it: an elegant Grey version, the all time busy Bees or the Fluffy Bunny for all those who love pink. Note that it could well be that Fluffy Bunny is not in your version: if you want it, read the following section.
Once you selected your preferred theme, click on OK.
Screenshots of the Bees and Fluffy Bunny themes:
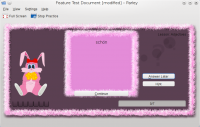
And if these are not enough: you can click on Get New Themes to find more themes. Over time we hope that more and more themes come along. If you know how to create SVG graphics (for example with Inkscape), you can create your own theme and share it with the world.
Additional themes can be found on kde-look.org
General Tab
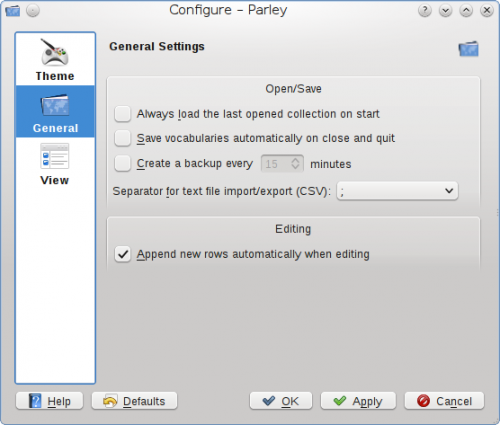
The General tab gives you some options regarding the behavior of Parley.
Open/Save options
Always load the last opened collection on start will immediately take you back to the vocabulary you were learning. Often you will use this together with the second option Save vocabularies automatically on close and quit because it's just handy not to have always answer the same question if changes (including learning results) should be changed or not. The option Create a backup every ... minutes can be very handy to help you save your work frequently. One less thing to think about.
Sometimes the import and/or export of text (CSV) files can be very handy and there you need the proper separator to elaborate data afterwards or to be able to read the data you got from somewhere else. Parley allows you to choose among various separators to make sure you can re-use your data.
Editing option
Here you can determine whether Parley automatically appends new rows while you are editing your vocabulary collection. This can be useful if you want to add many entries, before then splitting them up into various lessons. On the other hand, it can be good to have this option off if you want to work by creating lessons with a set maximum number of entries.
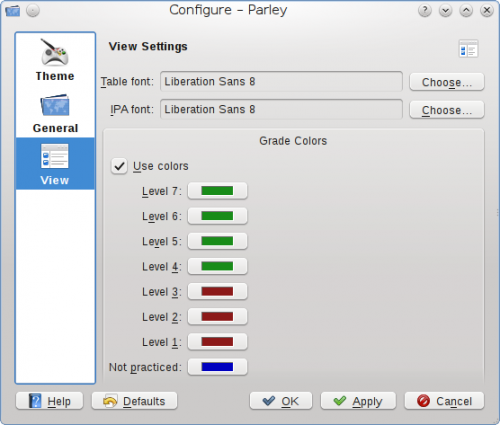
View Tab
The View Settings allows you to change font and its size, very handy when you work on a netbook for example, and you can choose the Grade Colors you like best.
Parley on Windows
It is possible to install Parley together with other Educational software on Windows systems. For further info please visit this page.
The steps to be followed in short:
Download the installer here.
Then follow the installation procedure like for any other Windows software - screenshots are here.
When you come to the Package selection screen, select the language(s) you wish the software to be available in and the package - in this case kdeedu. If you don't select any language you will automatically get English.
Then finish the installation process by clicking on Next, following the coming screens just like you normally do with other Windows software.
Please note that the Parley team does not deal with the Windows-Installer and therefore we cannot easily answer your questions. Should you have difficulties, please contact the KDE-Windows team directly. You can do so by subscribing to the mailing list here or join them on IRC at irc://freenode.net Channel: #kde-windows.
Notes For Advanced Users
Using Parley for Exam Preparation
- what to bear in mind with long questions / answers?
- how to start with a new Exam
- example 1 with capitals
- example 2 with sentence
You can upload your files and share them with others. Use the upload button from the file menu in the Editor within Parley.
If that does not work, you can also visit kde-files.org. In either case the files will show up in the Download New Collections dialog on the Start Page.
File format
If you are interested in the file formats that Parley can read and stores the vocabulary collections in, visit: Parley File Formats on userbase.kde.org


