Digikam/LightTable/it: Difference between revisions
Importing a new version from external source |
Importing a new version from external source |
||
| Line 7: | Line 7: | ||
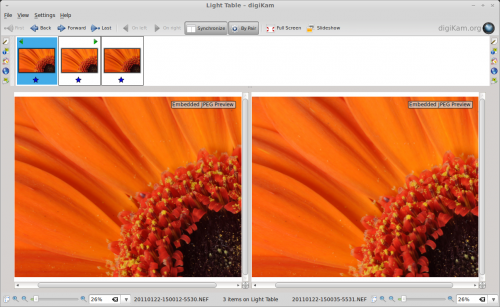
[[File:Digikam_lighttable.png|center|thumb|500px|Copyright Dmitri Popov]] | [[File:Digikam_lighttable.png|center|thumb|500px|Copyright Dmitri Popov]] | ||
Così facendo si apre una finestra vuota del Tavolo luminoso. Puoi aggiungere due o più foto trascinandole nel riquadro miniature (chiamato barra delle miniature in digiKam) della finestra. In alternativa puoi selezionare le foto in un album ed utilizzare la scorciatoia da tastiera <keycap>Ctrl + L</keycap> o il comando <menuchoice>Immagine -> Metti nel tavolo luminoso</menuchoice> per aggiungere le foto selezionate alla nuova finestra del Tavolo luminoso. Puoi quindi aggiungere ulteriori foto alla finestra attuale del Tavolo luminoso selezionandole in un album e scegliendo il comando <menuchoice>Immagine -> Aggiungi al tavolo luminoso</menuchoice> o utilizzando la scorciatoia da tastiera <keycap>Ctrl + Shift + L</keycap>. | |||
Using Light Table is rather straightforward. If you have added only a pair of photos to the Light Table window, they will be displayed side by side, making it easier for you to examine and compare photos. Press the <menuchoice>Synchronize</menuchoice> button, and Light Table will keep both photos in sync. So when you zoom in and out or drag one photo, these actions are automatically applied to the other photo, too. You can reorder the photos in the Light Table window using the <menuchoice>On left</menuchoice> and <menuchoice>On right</menuchoice> buttons. And if you have more than two photos in the Light Table window, you can view them by pairs by clicking the <menuchoice>By Pair</menuchoice> button. | Using Light Table is rather straightforward. If you have added only a pair of photos to the Light Table window, they will be displayed side by side, making it easier for you to examine and compare photos. Press the <menuchoice>Synchronize</menuchoice> button, and Light Table will keep both photos in sync. So when you zoom in and out or drag one photo, these actions are automatically applied to the other photo, too. You can reorder the photos in the Light Table window using the <menuchoice>On left</menuchoice> and <menuchoice>On right</menuchoice> buttons. And if you have more than two photos in the Light Table window, you can view them by pairs by clicking the <menuchoice>By Pair</menuchoice> button. | ||
Revision as of 12:11, 19 February 2011
Passare in rassegna le foto con lo strumento Tavolo luminoso di digiKam
Pubblicato: 2/2/2011 | Autore: Dmitri Popov
Se hai varie schede di memoria nella tua borsa fotografica, non hai alcun bisogno di preoccuparti di quante foto puoi scattare prima di esaurire la memoria della tua fotocamera digitale. Questo significa che puoi tranquillamente fare decine di scatti dello stesso soggetto cercando differenti angolazioni, composizioni e luci. Ma questo rende anche un po' una sfida il compito di selezionare la foto migliore dal mucchio. Per fortuna digiKam fornisce uno strumento semplice ma efficace che può aiutarti a confrontare ed analizzare più foto fianco a fianco e a scegliere quella che ti piace di più. Il nome di questo meraviglioso strumento è Tavolo luminoso e puoi richiamarlo scegliendo dalla barra degli strumenti principale.

Così facendo si apre una finestra vuota del Tavolo luminoso. Puoi aggiungere due o più foto trascinandole nel riquadro miniature (chiamato barra delle miniature in digiKam) della finestra. In alternativa puoi selezionare le foto in un album ed utilizzare la scorciatoia da tastiera Ctrl + L o il comando per aggiungere le foto selezionate alla nuova finestra del Tavolo luminoso. Puoi quindi aggiungere ulteriori foto alla finestra attuale del Tavolo luminoso selezionandole in un album e scegliendo il comando o utilizzando la scorciatoia da tastiera Ctrl + Shift + L.
Using Light Table is rather straightforward. If you have added only a pair of photos to the Light Table window, they will be displayed side by side, making it easier for you to examine and compare photos. Press the button, and Light Table will keep both photos in sync. So when you zoom in and out or drag one photo, these actions are automatically applied to the other photo, too. You can reorder the photos in the Light Table window using the and buttons. And if you have more than two photos in the Light Table window, you can view them by pairs by clicking the button.
Find more tutorials like this by clicking on the Photography link below.
