System Settings/Input Devices/it: Difference between revisions
No edit summary |
Updating to match new version of source page |
||
| Line 1: | Line 1: | ||
<languages /> | <languages /> | ||
{|class="tablecenter vertical-centered" | |||
|[[Image:Settings-input-devices.png|300px|thumb|center]] | |||
|Configuring your input devices | |||
|} | |||
{{PreferenceHelp}} | |||
__TOC__ | |||
{{PrefIcon|Preferences-desktop-keyboard.png|Keyboard}} | |||
In this section you can manage the settings for your keyboard. See more on this in [http://docs.kde.org/development/en/kdebase-workspace/kcontrol/keyboard/index.html the Handbook]. | |||
<span class="mw-translate-fuzzy"> | |||
{{Info/it|1=Questo articolo fa riferimento a KDE SC 4.5.1 e successive.}} | {{Info/it|1=Questo articolo fa riferimento a KDE SC 4.5.1 e successive.}} | ||
</span> | |||
===Abilitare <keycap>Control + Alt + Backspace</keycap> per terminare [[Special:myLanguage/Glossary#X-Server|X-Server]]=== | ===Abilitare <keycap>Control + Alt + Backspace</keycap> per terminare [[Special:myLanguage/Glossary#X-Server|X-Server]]=== | ||
| Line 17: | Line 30: | ||
Per attivare questa funzione, per prima cosa assicurati che <menuchoice>Configura le opzioni della tastiera</menuchoice> sia attivo nella scheda <menuchoice>Avanzate</menuchoice>. Poi seleziona un tasto dalla vista ad albero <menuchoice>Posizione tasto Compose</menuchoice>. Infine fai clic su <menuchoice>Applica</menuchoice>. D'ora in poi sarai in grado di utilizzare quel tasto come tasto Compose. | Per attivare questa funzione, per prima cosa assicurati che <menuchoice>Configura le opzioni della tastiera</menuchoice> sia attivo nella scheda <menuchoice>Avanzate</menuchoice>. Poi seleziona un tasto dalla vista ad albero <menuchoice>Posizione tasto Compose</menuchoice>. Infine fai clic su <menuchoice>Applica</menuchoice>. D'ora in poi sarai in grado di utilizzare quel tasto come tasto Compose. | ||
{{PrefIcon|Preferences-desktop-mouse.png|Mouse}} | |||
In this section you can manage the settings for your mouse. See more on this in [http://docs.kde.org/development/en/kdebase-workspace/kcontrol/mouse/index.html the Handbook]. | |||
{{PrefIcon|Trans.png|Touchpad}} | |||
{{PrefIcon|Input-gaming.png|Joystick}} | |||
In this section you can manage the settings for your joustick. See more on this in [http://docs.kde.org/development/en/kdebase-workspace/kcontrol/joystick/index.html the Handbook]. | |||
<span class="mw-translate-fuzzy"> | |||
[[Category:Desktop/it]] | [[Category:Desktop/it]] | ||
[[Category:Sistema/it]] | [[Category:Sistema/it]] | ||
[[Category:Configurazione/it]] | [[Category:Configurazione/it]] | ||
</span> | |||
Revision as of 08:50, 1 September 2011
 |
Configuring your input devices |

Keyboard
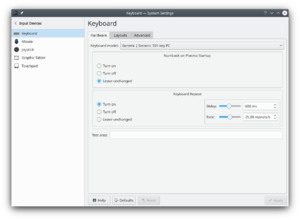
In this section you can manage the settings for your keyboard. See more on this in the Handbook.
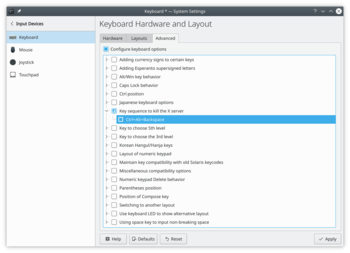
Abilitare Control + Alt + Backspace per terminare X-Server
Nella scheda assicurati che sia attivato. Poi cerca nella lista sottostante "Combinazione da tastiera per terminare il server X". Sotto dovresti poter controllare . Una volta fatto, fai clic su .

Attivare il tasto Compose
Compose è una funzione che ti permette di scrivere qualsiasi carattere, a prescindere dalla mappatura di tastiera che stai utilizzando, premendo un certo tasto (tasto Compose) e una serie di altri tasti. Potresti cioè associare i caratteri ‘~’ e ‘n’ in modo che vengano sostituiti da un carattere ‘ñ’ quando vengono premuti dopo il tasto Compose. Ci sono molte combinazioni di tasti predefinite e inoltre puoi personalizzare il file di configurazione di Compose in modo da adattarlo al meglio alle tue specifiche necessità. Troverai ulteriori informazioni qui.
Per attivare questa funzione, per prima cosa assicurati che sia attivo nella scheda . Poi seleziona un tasto dalla vista ad albero . Infine fai clic su . D'ora in poi sarai in grado di utilizzare quel tasto come tasto Compose.

Mouse
In this section you can manage the settings for your mouse. See more on this in the Handbook.

Touchpad

Joystick
In this section you can manage the settings for your joustick. See more on this in the Handbook.

