Tutorials/Shared Database/uk: Difference between revisions
(Created page with "==== Налаштовування =====") |
(Created page with "==== Створення баз даних ====") |
||
| Line 20: | Line 20: | ||
{{Warning| This file disables ''network access'' and ''user authentication''. The latter means that any application from your computer can connect to it without a password. This makes configuration of programs easier, and is well-suited for the general desktop use case.}} | {{Warning| This file disables ''network access'' and ''user authentication''. The latter means that any application from your computer can connect to it without a password. This makes configuration of programs easier, and is well-suited for the general desktop use case.}} | ||
==== | ==== Створення баз даних ==== | ||
The first thing we have to do once MySQL is installed and running is add a separate database for each program. I generally name them after the programs that use them. This can be done with either GUI administration tools, but since we only have to do it once it's probably faster to write a few commands: | The first thing we have to do once MySQL is installed and running is add a separate database for each program. I generally name them after the programs that use them. This can be done with either GUI administration tools, but since we only have to do it once it's probably faster to write a few commands: | ||
Revision as of 13:29, 16 September 2011
Загальна база даних
There are several desktop applications for KDE that deal with some kind of a database. The most popular are probably Amarok the music player, digiKam the photo manager, and Akonadi the personal information framework. To simplify their installation and limit their requirements, each of these programs ship a database of their own, in most cases using SQLite. Having many separate databases creates unnecessary overhead, and makes it more difficult to back up your data.
Сервер бази даних
The only database universally supported in these programs is MySQL, so this is what we well use. It is also very easy to configure, either by command-line or with graphics tools.
Встановлення
First, we have to install the mysql server. Linux users will probably want to install a package from their distribution, other can get it from their homepage. Instructions to start MySQL at boot are distribution-specific, but since MySQL is a popular package, they shouldn't be hard to find. During the installation, the installer will probably ask you for a root password. Choose a secure password for this and remember it, this account will not be used by the desktop applications but only for database administration.
Налаштовування =
For the server configuration, this we will assume that your database server is not used over the network, contains no sensitive data, and that you trust your applications. If you plan to use this database for Akonadi data, it's best if you copy the configuration file from the Akonadi code repository, which can be downloaded at here. Make a copy of your existing /etc/mysql/my.cnf, then replace it with the downloaded file.

Створення баз даних
The first thing we have to do once MySQL is installed and running is add a separate database for each program. I generally name them after the programs that use them. This can be done with either GUI administration tools, but since we only have to do it once it's probably faster to write a few commands:
$ mysql -u root -p
At the password prompt, type in the root password set when installing MySQL. Now we can start creating databases. For example, to create a database named 'amarok', type in this command:
mysql> create database amarok;
Amarok
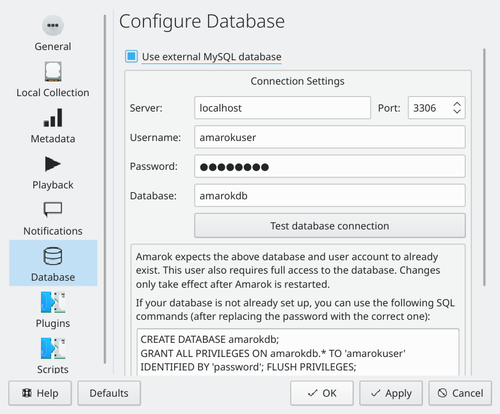
Amarok requires very little configuration, but it doesn't provide a way to migrate your old database. Go to and go to the tab.
Fill in localhost as the server address, 3306 as the port, and amarok as the database name.

digiKam
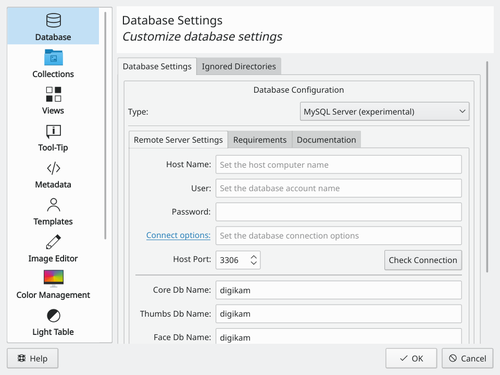
digiKam is somewhat special because it requires two databases: one for the images metadata, and one for thumbnails. Their names are not important, I chose to call them digikam and digikam_thumb:
mysql> create database digikam;
mysql> create database digikam_thumb;
In digiKam, the process is very similar to that of Amarok. The settings are located in .

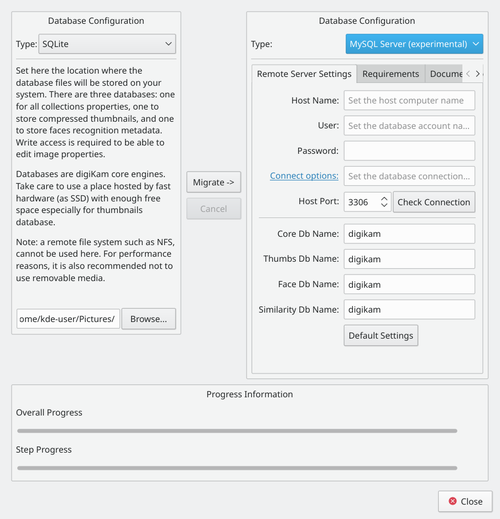
digiKam also comes with a handy database migration tool, available in . Fill in your previous database settings (you don't have to do anything if you haven't changed these options) on the left side and your new settings on the right side, then click .

Akonadi
First create a database for akonadi:
mysql -u root -p
create database akonadi;
Akonadi is not supposed to be a user-facing tool, so there is no configuration GUI for it. However, you can edit
~/.config/akonadi/akonadiserverrc to have these contents:
[%General]
Driver=QMYSQL

[QMYSQL]
Name=akonadi
Host=localhost
StartServer=false
Options=
ServerPath=/usr/bin/mysqld
Save the file, then log out and log in back again.
