Digikam/Vintage Effect/uk: Difference between revisions
Created page with "digiKam/Ефект старої фотографії" |
Created page with "== Створення ефекту старої фотографії за допомогою digiKam ==
Створено на основі допису у блозі Дмітр..." |
||
| Line 1: | Line 1: | ||
<languages /> | <languages /> | ||
== | == Створення ефекту старої фотографії за допомогою digiKam == | ||
Створено на основі допису у блозі Дмітрія Попова (Dmitri Popov), 16 січня 2012 року | |||
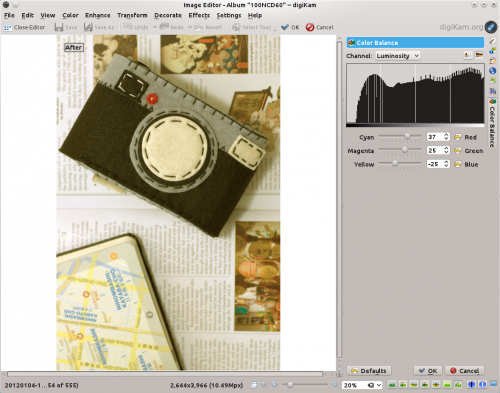
Want to add a vintage effect to your photos? '''digiKam''' has all the tools you need to turn your digital snapshots into vintage masterpieces. Open the photo you want for editing, adjust exposure, white balance, and tweak other settings as you would usually do. The first step in the “aging” process is to add film grain to the photo. To do this, choose <menuchoice>Effects -> Add Film Grain</menuchoice>. There are a lot of parameters you can configure, but you don’t have to enable and tweak them all. You can start with adjusting the <menuchoice>Grain Size</menuchoice> parameter as well as trying different values for parameters in the <menuchoice>Luminance Noise</menuchoice> section. You can preview the result at any time using the <menuchoice>Try</menuchoice> button. Next step is to tweak the color balance to make the photo look aged. One way to do this is to tweak the color balance settings, so the photo looks washed out with a slightly yellow cast imitating aged photo paper. Choose <menuchoice>Color -> Color Balance</menuchoice> and adjust the Cyan, Magenta, and Yellow parameters to achieve the desired result. | Want to add a vintage effect to your photos? '''digiKam''' has all the tools you need to turn your digital snapshots into vintage masterpieces. Open the photo you want for editing, adjust exposure, white balance, and tweak other settings as you would usually do. The first step in the “aging” process is to add film grain to the photo. To do this, choose <menuchoice>Effects -> Add Film Grain</menuchoice>. There are a lot of parameters you can configure, but you don’t have to enable and tweak them all. You can start with adjusting the <menuchoice>Grain Size</menuchoice> parameter as well as trying different values for parameters in the <menuchoice>Luminance Noise</menuchoice> section. You can preview the result at any time using the <menuchoice>Try</menuchoice> button. Next step is to tweak the color balance to make the photo look aged. One way to do this is to tweak the color balance settings, so the photo looks washed out with a slightly yellow cast imitating aged photo paper. Choose <menuchoice>Color -> Color Balance</menuchoice> and adjust the Cyan, Magenta, and Yellow parameters to achieve the desired result. | ||
Revision as of 09:35, 18 January 2012
Створення ефекту старої фотографії за допомогою digiKam
Створено на основі допису у блозі Дмітрія Попова (Dmitri Popov), 16 січня 2012 року
Want to add a vintage effect to your photos? digiKam has all the tools you need to turn your digital snapshots into vintage masterpieces. Open the photo you want for editing, adjust exposure, white balance, and tweak other settings as you would usually do. The first step in the “aging” process is to add film grain to the photo. To do this, choose . There are a lot of parameters you can configure, but you don’t have to enable and tweak them all. You can start with adjusting the parameter as well as trying different values for parameters in the section. You can preview the result at any time using the button. Next step is to tweak the color balance to make the photo look aged. One way to do this is to tweak the color balance settings, so the photo looks washed out with a slightly yellow cast imitating aged photo paper. Choose and adjust the Cyan, Magenta, and Yellow parameters to achieve the desired result.

The exact values for each parameter depend on the given photo and your personal taste, but you can start with the following values:
- Cyan: 37
- Magenta: 25
- Yellow: -25
To make the vintage effect even more realistic, add vignetting to the photo. Choose , tick the check box and adjust the available parameters to your liking. Finally, sharpen the photo using to make the film grain more pronounced, and you are done.
