Kdenlive/Manual/Transitions/Composite: Difference between revisions
embed a compositing expriment made using detontation films free sample effects |
|||
| Line 32: | Line 32: | ||
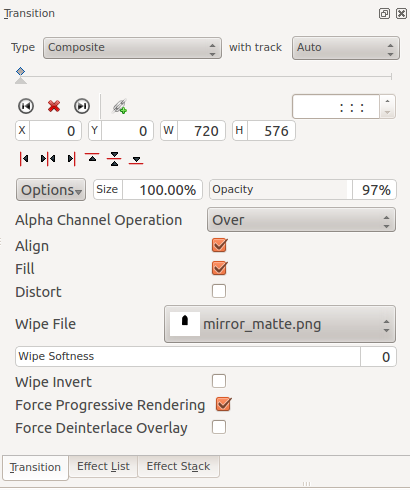
Screen shot of composite transition using a custom wipe file to mask out a section of video - as described in Tutorial 3 | Screen shot of composite transition using a custom wipe file to mask out a section of video - as described in Tutorial 3 | ||
[[File:Composite transition with wipe file.png]] | [[File:Composite transition with wipe file.png]] | ||
Aspriational goal - a compositing experiment made using detontation films free sample effects | |||
{{#ev:youtube|vo-xntF1bns}} | |||
Revision as of 14:40, 8 July 2012
Composite Transition
The composite transition combines the video data from 2 video tracks into one.
Tutorial 1
See this tutorial that describes how to use
- Alpha Manipution>Blue Screen
- rotoscoping
- Composite Transition.
- Crop and Transform>Pan and Zoom effect
- Enhancment>Sharpen Effect
- Alpha Manipution>Alpha Operations
Tutorial 2 - composite transition and Blue Screen
Tutorial showing how to use the "Blue screen" function ,composite transition and Keyframes to animate one image moving over another in the KDEnlive video editor
{{#ev:youtube|M8hC5FbIzdE}}
Tutorial 3 - Video Masks
This tutorial uses the composite transition and a custom video mask (matte) to create an effect where you can make it appear that one video is playing on the screen of a still of a computer monitor.
The mask / matte is created with GIMP.
Save your mattes to /usr/share/kde4/apps/kdenlive/lumas
{{#ev:youtube|FIpnGlRY27U}}
Screen shot of composite transition using a custom wipe file to mask out a section of video - as described in Tutorial 3

Aspriational goal - a compositing experiment made using detontation films free sample effects
{{#ev:youtube|vo-xntF1bns}}
