Taking Screenshots/it: Difference between revisions
Appearance
No edit summary |
Updating to match new version of source page |
||
| Line 18: | Line 18: | ||
== Flusso di lavoro == | == Flusso di lavoro == | ||
In | In this example [[Special:myLanguage/Spectacle|Spectacle]] is used, but other screen capture applications work as well. | ||
[[Image:Taking_Screenshots.png|thumb|500px|center| | [[Image:Taking_Screenshots.png|thumb|500px|center|Capturing a shot of [https://www.kde.org/applications/graphics/spectacle/ Spectacle] using ''Window under cursor'']] | ||
# | # Start [[Special:myLanguage/Spectacle|Spectacle]] | ||
# | # Choose a Capture mode (1) from the following: | ||
#; | #;Current Screen (only visible on a multi-screen environment) | ||
#: | #: Everything on the single screen is captured, usually used for ''desktop screenshots''. | ||
#; | #;Full Screen | ||
#: | #:This works differently, depending on whether you have a single screen or a multi-screen environment. For single screen users it captures everything currently on the screen. Multi-screen users will see it capture all screens into a single window. | ||
#; | #;Window Under Cursor | ||
#: | #: The content of an applications or dialog window is captured. usually used for ''application screenshots''. Preferably, check the '''Include window decorations''' option (2). | ||
#; | #;Region | ||
#:# | #: Only a region to be defined later is captured. | ||
#:# | # Click on <menuchoice>New Snapshot</menuchoice> (3). | ||
# | #;Full Screen | ||
# | #;Current Screen | ||
#;Window Under Cursor | |||
#: Click anywhere on the screen to take the snapshot. | |||
#;Region: | |||
#:# Use the mouse to draw a rectangle around the region to be captured (for example around a window). | |||
#:# Strike the <keycap>Enter</keycap> key or double click in the region to take the snapshot. | |||
# Click on <menuchoice>Save As...</menuchoice> (4). | |||
# Browse to the location you want to save the image, give it a name ('''''name.png''''') and click on <menuchoice>Save</menuchoice> | |||
== Suggerimenti == | == Suggerimenti == | ||
* | * The <menuchoice>Snapshot delay</menuchoice> option (5) makes [[Special:myLanguage/Spectacle|Spectacle]] wait a given amount of time (given in seconds) before taking the snapshot. This can be useful in many situations, for example when taking screenshots of drop-down menus | ||
* | * It's often useful to create a separate user for taking screenshots to ensure a standard look with the default settings. | ||
* | * Use <menuchoice>Type: Color</menuchoice> in the wallpaper settings to get a white background. | ||
== Vedi anche == | == Vedi anche == | ||
* [[Special:myLanguage/ | * [[Special:myLanguage/Spectacle|Spectacle]] | ||
[[Category: | [[Category:Contributing]] | ||
[[Category:Needs work]] | |||
Revision as of 12:10, 7 February 2018
Introduzione
Lo scopo di pubblicare schermate di applicazioni è quello di introdurre i potenziali utenti all'aspetto dell'applicazione e dare loro un'idea di cosa aspettarsi dal prodotto, una volta installato ed eseguito. Pertanto le schermate dovrebbero documentare l'uso comune delle applicazioni, disponibile agli utenti con configurazioni hardware comuni.
Linee guida
- Imposta la lingua ad "Inglese Americano" a meno che non si tratti di una schermata localizzata.
- Salva come immagine PNG.
- Preferibilmente usa le impostazioni predefinite (icone, schema colori, stile, decorazioni finestra, impostazioni dell'applicazione ecc.).
- Preferibilmente usa la (modulo Effetti Desktop in Impostazioni di sistema), ma non ti preoccupare se la tua scheda grafica non supporta la composizione.
- Preferibilmente usa il font "Liberation Sans" a 9pt.
- Se la schermata mostra parti del desktop, preferibilmente usa lo sfondo predefinito di plasma, includi un margine (intorno ai 20 pixel) e se possibile assicurati che le ombre della finestra non risultino tagliate.
- Se stai realizzando una schermata localizzata (es. in italiano), usa lo stesso nome dell'originale inglese, con il codice-lingua (lo stesso che trovi nell'indirizzo delle pagine) aggiunto come suffisso.
- Se devi aggiornare una schermata esistente, utilizza esattamente lo stesso nome in modo che l'aggiornamento avvenga in automatico (vedi Aggiornare un'immagine).
Flusso di lavoro
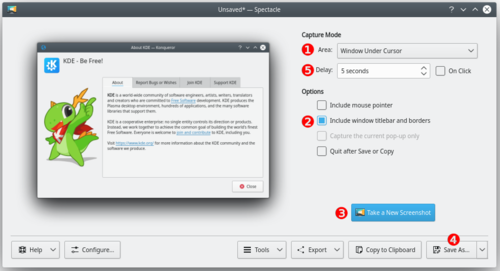
In this example Spectacle is used, but other screen capture applications work as well.

- Start Spectacle
- Choose a Capture mode (1) from the following:
- Current Screen (only visible on a multi-screen environment)
- Everything on the single screen is captured, usually used for desktop screenshots.
- Full Screen
- This works differently, depending on whether you have a single screen or a multi-screen environment. For single screen users it captures everything currently on the screen. Multi-screen users will see it capture all screens into a single window.
- Window Under Cursor
- The content of an applications or dialog window is captured. usually used for application screenshots. Preferably, check the Include window decorations option (2).
- Region
- Only a region to be defined later is captured.
- Click on (3).
- Full Screen
- Current Screen
- Window Under Cursor
- Click anywhere on the screen to take the snapshot.
- Region
-
- Use the mouse to draw a rectangle around the region to be captured (for example around a window).
- Strike the Enter key or double click in the region to take the snapshot.
- Click on (4).
- Browse to the location you want to save the image, give it a name (name.png) and click on
Suggerimenti
- The option (5) makes Spectacle wait a given amount of time (given in seconds) before taking the snapshot. This can be useful in many situations, for example when taking screenshots of drop-down menus
- It's often useful to create a separate user for taking screenshots to ensure a standard look with the default settings.
- Use in the wallpaper settings to get a white background.
