Digikam/Wikimedia Commons/da: Difference between revisions
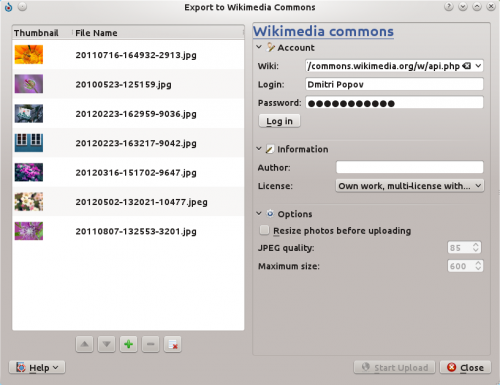
Created page with "center|500px|thumb|Brug af Kipi pluginet til Wikimedia Commons" |
Created page with "Pluginet kan kaldes frem ved at vælge menuen <menuchoice>Værktøjer -> Eksportér til Wikimedia Commons</menuchoice>. Hvis du ikke ser kommandoen i menuen, så har du enten ..." |
||
| Line 8: | Line 8: | ||
Pluginet kan kaldes frem ved at vælge menuen <menuchoice>Værktøjer -> Eksportér til Wikimedia Commons</menuchoice>. Hvis du ikke ser kommandoen i menuen, så har du enten en ældre version '''digiKam''' (pluginet blev introduceret i version 2.6) eller pluginet er ikke blevet aktiveret. I det sidste tilfælde kan du aktivere pluginet ved at vælge <menuchoice>Indstillinger -> Indstil digiKam...</menuchoice>. Gå til afsnittet <menuchoice>Kipi-plugin</menuchoice> og aktivér pluginet til <menuchoice>Wikimedia eksport</menucgoice>. Før du begynder at bruge pluginet skal du også oprette en konto på Wikimedia Commons. | |||
Using the plugin to upload photos to Wikimedia Commons couldn’t be easier. Select one or several photos in a '''digiKam''' album and choose <menuchoice>Tools -> Export to Wikimedia Commons</menuchoice>. This opens the export dialog window. In the Wiki field, type the URL of Wikimedia Commons API ''(http://commons.wikimedia.org/w/api.php)''. Enter then your user name and password in the appropriate fields and press <menuchoice>Log In</menuchoice>. In the <menuchoice>Information section</menuchoice>, specify the author’s name and choose a license. If you want to resize photos before uploading them to Wikimedia Commons, check the <menuchoice>Resize photos before uploading</menuchoice> check box, and adjust the quality and size settings. Hit the <menuchoice>Start Upload</menuchoice> button, and the plugin takes care of the rest. | Using the plugin to upload photos to Wikimedia Commons couldn’t be easier. Select one or several photos in a '''digiKam''' album and choose <menuchoice>Tools -> Export to Wikimedia Commons</menuchoice>. This opens the export dialog window. In the Wiki field, type the URL of Wikimedia Commons API ''(http://commons.wikimedia.org/w/api.php)''. Enter then your user name and password in the appropriate fields and press <menuchoice>Log In</menuchoice>. In the <menuchoice>Information section</menuchoice>, specify the author’s name and choose a license. If you want to resize photos before uploading them to Wikimedia Commons, check the <menuchoice>Resize photos before uploading</menuchoice> check box, and adjust the quality and size settings. Hit the <menuchoice>Start Upload</menuchoice> button, and the plugin takes care of the rest. | ||
Revision as of 07:01, 7 August 2012
Eksportér fotos til Wikimedia Commons med digiKam
Fra Dmitri Popovs blog, 25. juni, 2012
Der er næppe nogen bedre måde at dele dine fotografiske mesterværker med verden end at føje dem til Wikimedia Commons pulje. Selv om projektets webside har sit eget værktøj til at oploade fotos, så kan digiKams Kipi-plugin til Wikimedia-eksport være ret nyttig, når du skal eksportere mange fotos på én gang uden at du behøver at skulle undvære dit yndlings fotohåndteringsprograms bekvemmeligheder.

Pluginet kan kaldes frem ved at vælge menuen . Hvis du ikke ser kommandoen i menuen, så har du enten en ældre version digiKam (pluginet blev introduceret i version 2.6) eller pluginet er ikke blevet aktiveret. I det sidste tilfælde kan du aktivere pluginet ved at vælge . Gå til afsnittet og aktivér pluginet til
Using the plugin to upload photos to Wikimedia Commons couldn’t be easier. Select one or several photos in a '''digiKam''' album and choose <menuchoice>Tools -> Export to Wikimedia Commons. This opens the export dialog window. In the Wiki field, type the URL of Wikimedia Commons API (http://commons.wikimedia.org/w/api.php). Enter then your user name and password in the appropriate fields and press . In the , specify the author’s name and choose a license. If you want to resize photos before uploading them to Wikimedia Commons, check the check box, and adjust the quality and size settings. Hit the button, and the plugin takes care of the rest.
