Digikam/Negatives/ca: Difference between revisions
No edit summary |
Created page with "Category:Gràfics/ca
Category:Fotografia/ca
Category:Guies d'aprenentatge/ca" |
||
| Line 18: | Line 18: | ||
Although choosing the matching film profile may yield a better result, the converted image may still require some work. In most cases, you may need to adjust the white point to remove the remaining blue tint. You can do this either manually or automatically using the appropriate buttons. Usually, the automatic white point adjustment does the job, but the resulting image needs to be brightened up by adjusting the <menuchoice>Gamma input value</menuchoice> slider. | Although choosing the matching film profile may yield a better result, the converted image may still require some work. In most cases, you may need to adjust the white point to remove the remaining blue tint. You can do this either manually or automatically using the appropriate buttons. Usually, the automatic white point adjustment does the job, but the resulting image needs to be brightened up by adjusting the <menuchoice>Gamma input value</menuchoice> slider. | ||
[[Category: | [[Category:Gràfics/ca]] | ||
[[Category: | [[Category:Fotografia/ca]] | ||
[[Category: | [[Category:Guies d'aprenentatge/ca]] | ||
Revision as of 14:27, 9 February 2013
Processar negatius de pel·lícula amb digiKam
Transcrit des de l'article d'en Dmitri Popov, el 29 de gener de 2013
While digiKam is first and foremost an application for processing and organizing digital photos, it also features tools for working with film negatives.
Before you can process negatives in digiKam, you need to digitize them. If you don’t have access to a film scanner or a lab that offers film scanning services, you can digitize film using a DSLR camera (there are plenty of tutorials on how to do that on the Web). The rest of the process assumes that you are using the latter way to digitize film negatives.
Open a RAW file containing a film negative in the editor (choose or press F4). Crop the original file and apply lens correction if necessary. Choose then to transform the negative into a positive image. In case you work with the color negative, the converted image most likely requires some additional tweaking. First of all, the converted image is likely to have a strong blue tint. The easiest way to remove it is to use digiKam’s Auto-Correction tool. Choose and select one of the presets. In many cases, the or presets do a decent job of correcting the colors. If the colors still look slightly off, you can adjust them further using the tool.

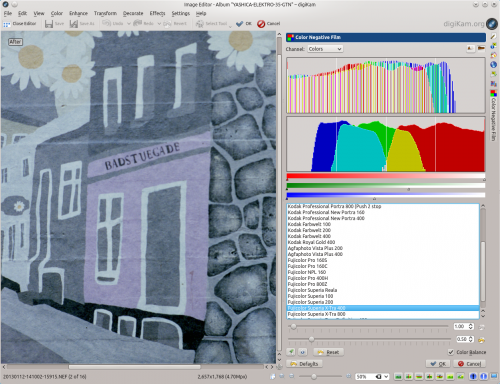
The Invert feature in combination with an Auto-Correct preset provides a quick-and-dirty way of converting negatives, but digiKam has another tool designed specifically for processing color negatives. To access it, choose the command. The Color Negative Film interface contains several handy features that can help you to convert the negative and tweak the resulting image. While the Invert tool uses a generic profile for converting negatives, the Color Negative Film interface offers film profiles for many popular film types. So the first step is to select the appropriate profile. For better results, try to enable the option, too. If the used film is not in the list, you can use the profile as a fall back.
Although choosing the matching film profile may yield a better result, the converted image may still require some work. In most cases, you may need to adjust the white point to remove the remaining blue tint. You can do this either manually or automatically using the appropriate buttons. Usually, the automatic white point adjustment does the job, but the resulting image needs to be brightened up by adjusting the slider.
