Archive:Kdenlive/Manual/Projects and Files/Project Settings: Difference between revisions
Formatting change |
m Prevnext in separate unit |
||
| Line 83: | Line 83: | ||
<!--T:29--> | <!--T:29--> | ||
Metadata set up here will written to the files rendered from the project if [[Special:MyLanguage/Kdenlive/Manual/Project_Menu/Render#Export_Metadata|Export Metadata]] is checked in File Rendering. | Metadata set up here will written to the files rendered from the project if [[Special:MyLanguage/Kdenlive/Manual/Project_Menu/Render#Export_Metadata|Export Metadata]] is checked in File Rendering. | ||
{{Prevnext2 | {{Prevnext2 | ||
| prevpage=Special:MyLanguage/Kdenlive/Manual/Projects_and_Files/Project | nextpage=Special:MyLanguage/Kdenlive/Manual/Projects_and_Files/Notes | | prevpage=Special:MyLanguage/Kdenlive/Manual/Projects_and_Files/Project | nextpage=Special:MyLanguage/Kdenlive/Manual/Projects_and_Files/Notes | ||
Revision as of 11:44, 9 March 2013
Project Settings Dialog
This is reached via in the Project Menu. This dialog has 3 Tabs.
Project Settings Tab

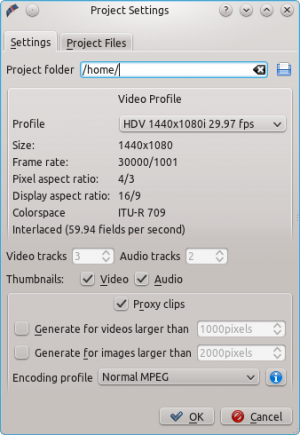
The Project Settings dialog is shown when you start a new project (). This allows you to set all basic properties for your project. You can also edit the properties of your current project in .
Project Folder
As recommended in the Quick Start section, you should create a new folder for your project. This folder will hold all temporary files that are used during the editing of your project (thumbnails, proxy clips, etc).
Video Profile
The video profile will define the format of your project. A list of predefined formats is available in Kdenlive, for example DV / DVD PAL, HD 1080i 25 fps, etc.
The profile defines the video resolution, as well as display ratio, color space and a few other parameters.
You should carefully choose your project format and select the one that fits better with what you want to output. All video operations on the project (like compositing, scaling, etc) will then use this profile. Advanced users can create custom project profiles in Settings -> Manage Project Profiles.
For example, if your goal is to create a DVD, you should use a DVD profile with the correct frame rate (PAL / NTSC) and display ratio (widescreen or not).
Tracks
You can select the default number of audio and video tracks that your project will have. You can always add or remove tracks in an existing project.
Thumbnails
The Audio and Video thumbnails are shown in the Timeline. They can also be enabled / disabled through buttons in the status bar.
Proxy Clips
"Proxy clips" is a feature that can be used if your computer is not powerful enough to display and edit your source video clips (similar to "offline" or "reduced quality" editing in other software). This is especially useful when working with full HD AVCHD sources that require a lot of resources.
When the feature is enabled, Kdenlive will automatically create reduced versions of your source clips, and use these versions for your editing. Then, when you want to render your project, Kdenlive will replace the proxy clips with the originals for a full resolution rendering.
The option will automatically create a proxy clips for all videos added to the project that have a frame width larger than x. This also applies to images.
You also have the choice to manually enable / disable proxy clips for each clip in your project tree by right-clicking on the clip and choosing .
You can choose an Encoding profile for the proxy clips, which will define the size, codecs and bitrate used when creating a proxy. The proxy profiles can be managed from the Kdenlive Settings dialog ().
Project Files Tab
From here you can manage the files that are part of the project. You can clear the proxy files and thumbnails and delete unused clips.
Note: the Unused Clips - button deletes file from your hard drive not just from the project tree. If you just want to remove unused clips from your project but not delete them from your hard drive - use Project > Clean Project.
Metadata Tab
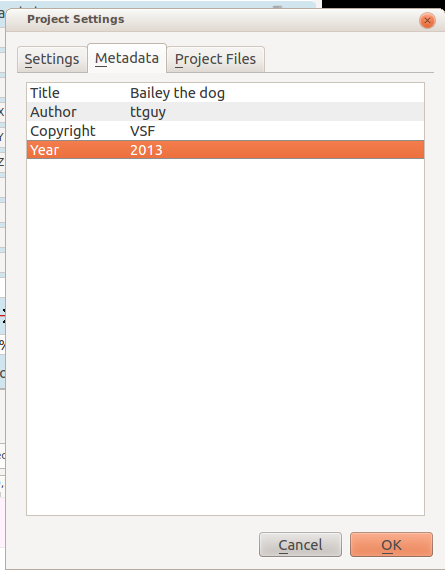
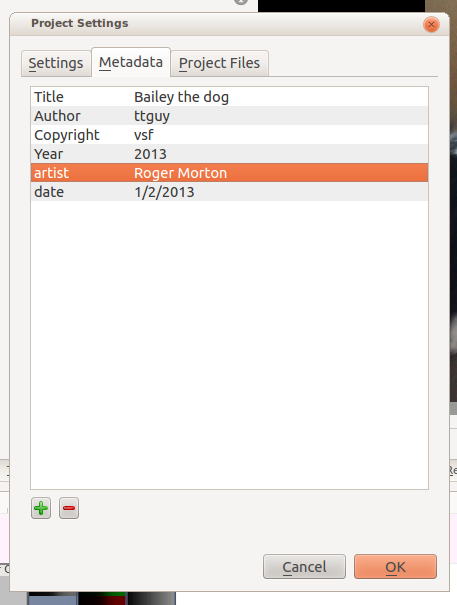
Screenshots below show the Metadata tab for two different versions of Kdenlive. Version 0.9.6 introduces buttons to add and subtract metadata fields.
 |

|
| ver >=0.9.5 | ver <= 0.9.6 |
Metadata set up here will written to the files rendered from the project if Export Metadata is checked in File Rendering.

