Karbon/Tutorials/Artistic Text Shape/da: Difference between revisions
(Created page with "I denne vejledning skal du * lave en tekstform * associere tekstformen med en sti") |
(Created page with "{{Tip/da|Hvis en dokker ikke er synlig, så kan du enten vælge den i menuen <menuchoice>Indstillinger -> Dokkere</menuchoice> eller højreklikke på dokkerens titel og derve...") |
||
| Line 6: | Line 6: | ||
* associere tekstformen med en sti | * associere tekstformen med en sti | ||
{{Tip| | {{Tip/da|Hvis en dokker ikke er synlig, så kan du enten vælge den i menuen <menuchoice>Indstillinger -> Dokkere</menuchoice> eller højreklikke på dokkerens titel og derved gøre dokkeren synlig.}} | ||
== First step with a text shape == | == First step with a text shape == | ||
Revision as of 09:15, 16 May 2014
Denne vejledning vil vise dig, hvad du kan gøre med . Denne vejledning foregår i Karbon, men formen er tilgængelig i andre af Calligras programmer og fungerer på tilsvarende måde i dem alle.
I denne vejledning skal du
- lave en tekstform
* associere tekstformen med en sti

First step with a text shape
 |
To add an artistic text shape, go to the docker, click on the icon, and drag it to the canvas. |
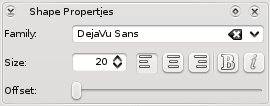
After adding the shape, you might want to edit the text and display something more interesting. To do this, you need to activate the , either by double clicking on the newly created shape, or selecting  in the toolbox. Then you can change the text to something like this.

After changing the to "Steve", the to 30pt, and setting , you can have the following shape in your canvas:

Path follower
This is still a very straight, flat text. Now we want a curvy text. To do this, we will need to create a path, for instance, using the ![]() .
.
You should have something like this:

To associate the text with the curve, you need to activate the by double clicking on the text, or selecting  .
.
Then, if you move the mouse on top of the curve you will see the cursor changing to a hand, you will need to click on the curve. In the
docker, the icon ![]() is now enabled, and you need to click on it to attach the path. Using the offset in the docker, you can adjust the text to get the following result:
is now enabled, and you need to click on it to attach the path. Using the offset in the docker, you can adjust the text to get the following result:

You can detach the path by clicking on ![]() . You can , and the text. If you change the curve, then the text will be updated.
. You can , and the text. If you change the curve, then the text will be updated.

