Taking Screenshots/ru: Difference between revisions
Appearance
Updating to match new version of source page |
Updating to match new version of source page |
||
| Line 18: | Line 18: | ||
== Приемы работы == | == Приемы работы == | ||
In this example [ | In this example [[Special:myLanguage/Spectacle|Spectacle]] is used, but other screen capture applications work as well. | ||
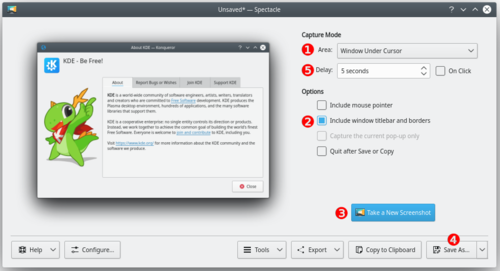
[[Image: | [[Image:Taking_Screenshots.png|thumb|500px|center|Capturing a shot of [https://www.kde.org/applications/graphics/spectacle/ Spectacle] using ''Window under cursor'']] | ||
# | # Start [[Special:myLanguage/Spectacle|Spectacle]] | ||
# | # Choose a Capture mode (1) from the following: | ||
#; | #;Current Screen (only visible on a multi-screen environment) | ||
#: | #: Everything on the single screen is captured, usually used for ''desktop screenshots''. | ||
#; | #;Full Screen | ||
#: | #:This works differently, depending on whether you have a single screen or a multi-screen environment. For single screen users it captures everything currently on the screen. Multi-screen users will see it capture all screens into a single window. | ||
#; | #;Window Under Cursor | ||
#: | #: The content of an applications or dialog window is captured. usually used for ''application screenshots''. Preferably, check the '''Include window decorations''' option (2). | ||
#; | #;Region | ||
#: | #: Only a region to be defined later is captured. | ||
# | # Click on <menuchoice>New Snapshot</menuchoice> (3). | ||
#; | #;Full Screen | ||
#; | #;Current Screen | ||
#; | #;Window Under Cursor | ||
#: | #: Click anywhere on the screen to take the snapshot. | ||
#; | #;Region: | ||
#:# | #:# Use the mouse to draw a rectangle around the region to be captured (for example around a window). | ||
#:# | #:# Strike the <keycap>Enter</keycap> key or double click in the region to take the snapshot. | ||
# | # Click on <menuchoice>Save As...</menuchoice> (4). | ||
# | # Browse to the location you want to save the image, give it a name ('''''name.png''''') and click on <menuchoice>Save</menuchoice> | ||
== Подсказки и указания == | == Подсказки и указания == | ||
* | * The <menuchoice>Snapshot delay</menuchoice> option (5) makes [[Special:myLanguage/Spectacle|Spectacle]] wait a given amount of time (given in seconds) before taking the snapshot. This can be useful in many situations, for example when taking screenshots of drop-down menus | ||
* | * It's often useful to create a separate user for taking screenshots to ensure a standard look with the default settings. | ||
* | * Use <menuchoice>Type: Color</menuchoice> in the wallpaper settings to get a white background. | ||
== Дополнительные данные == | == Дополнительные данные == | ||
* [[Special:myLanguage/ | * [[Special:myLanguage/Spectacle|Spectacle]] | ||
[[Category:Contributing]] | [[Category:Contributing]] | ||
[[Category:Needs work]] | |||
Revision as of 12:10, 7 February 2018
Вступление
Целью создания снимков окон программного обеспечения является ознакомление заинтересованных пользователей с видом и поведением программ и тем, чего ожидать от программы после ее запуска. Поэтому снимки окон должны документировать общие приемы использования среды и программ, доступ к которым пользователь может получить при условии установки стандартной конфигурации оборудования.
Наставления
- Переключите интерфейс программы на английский язык, если вы не намерены создать локализованный снимок окна.
- Сохраняйте изображения в формате PNG.
- Желательно использовать параметры по умолчанию (пиктограммы, цветовую схему, стиль, обрамления окон, установки программ и т. п.).
- Воспользуйтесь композитным режимом показа (модуль «Эффекты рабочего стола» в окне Системных параметров). Впрочем, снимки можно делать и используя видеокарты, которые не могут работать в композитном режиме.
- Старайтесь использовать шрифт "Liberation Sans" с размером символов 9 пт.
- Если на снимке будет показана часть рабочего стола, старайтесь использовать фон по умолчанию Плазмы. Если можно, добавьте поле (около 20 пикселей), чтобы тени окон не выглядели обрезанными.
- Если вы создаете локализованный снимок окна, храните его с названием, которое совпадает с названием английской версии с добавлением кода языка (так же, как вы увидите на адресе страницы).
- Если снимок окна является обновленной версией, воспользуйтесь тем же названием, которая была определена для начальной версии. (См. обновление изображения).
Приемы работы
In this example Spectacle is used, but other screen capture applications work as well.

- Start Spectacle
- Choose a Capture mode (1) from the following:
- Current Screen (only visible on a multi-screen environment)
- Everything on the single screen is captured, usually used for desktop screenshots.
- Full Screen
- This works differently, depending on whether you have a single screen or a multi-screen environment. For single screen users it captures everything currently on the screen. Multi-screen users will see it capture all screens into a single window.
- Window Under Cursor
- The content of an applications or dialog window is captured. usually used for application screenshots. Preferably, check the Include window decorations option (2).
- Region
- Only a region to be defined later is captured.
- Click on (3).
- Full Screen
- Current Screen
- Window Under Cursor
- Click anywhere on the screen to take the snapshot.
- Region
-
- Use the mouse to draw a rectangle around the region to be captured (for example around a window).
- Strike the Enter key or double click in the region to take the snapshot.
- Click on (4).
- Browse to the location you want to save the image, give it a name (name.png) and click on
Подсказки и указания
- The option (5) makes Spectacle wait a given amount of time (given in seconds) before taking the snapshot. This can be useful in many situations, for example when taking screenshots of drop-down menus
- It's often useful to create a separate user for taking screenshots to ensure a standard look with the default settings.
- Use in the wallpaper settings to get a white background.
