Kdenlive/Manual/Timeline/Editing/en: Difference between revisions
Importing a new version from external source |
Importing a new version from external source |
||
| Line 194: | Line 194: | ||
<br clear=all> | <br clear=all> | ||
===== Selection Tool ===== | ===== Selection Tool ===== | ||
Revision as of 08:10, 28 March 2018
Editing
Editing is done in the Timeline. Add a clip by dragging it from the Project Tree or the Clip Monitor. Once a clip is dropped on a track, it can be moved (drag and drop it) to another place on the same track or onto another track.
Seeking through your project
The timeline cursor shows your current position in the project. The positions of the cursors on the timeline ruler and Project Monitor are always in sync. Position can be moved in following ways:
- Keyboard shortcut: right / left arrows for one frame, Shift+ right / left for 1 second
- Clicking/dragging in the Timeline ruler or in an empty area of the timeline.
- Clicking/dragging in the Project Monitor ruler.
- Rotating the mouse wheel while the pointer is over the timeline ruler or over the Project Monitor
- Editing the timecode in the Project Monitor timecode widget
- Clicking the up or down arrows on the Project Monitor timecode widget
Cutting a clip
To cut a clip, the easiest way is to place the timeline cursor where you want to cut the clip, then select the clip (left click in it) and use the menu (default shortcut: Shift + R).
Or
Alternatively - use the Razor Tool.
Resizing a clip
A clip can be resized from its start or end by dragging its left or right edge. If you want a more precise resize, you can place the timeline cursor wherever you want the resize to end and use the menu (default shortcut: 1) or (default shortcut: 2)
To even more precisely control the length of a clip, double click it in the timeline and adjust its duration using the Clip duration dialog. You can have frame-level accuracy with this method.
You can also resize a clip by cutting it with the Razor Tool and then deleting the bit you do not want.
Removing Space Between Clips
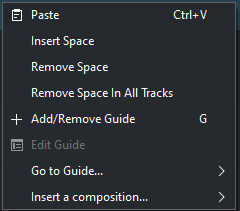
Right click in the space between the clips and choose . Be aware however that if you have clips on multiple tracks in the timeline and they are not grouped, then removing space may disturb the alignment of the clips between the different tracks — the space is only removed from the timeline where you clicked. Under this situation it may be safer to use the Spacer Tool.
Middle Tool Bar
There is a toolbar between monitors and the timeline that controls various aspects of the editor.

1. Track Compositing drop down.
1a. None
1b. Preview
1c. High Quality
2. Timeline Edit Mode Drop Down
Note with ver 17.04 this mode is selected via a dropdown rather then toggle buttons.
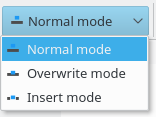
2a. Normal Mode
2b. Overwrite Mode
2c. Insert Mode
These same settings can be found under the menu.
Tool Group (one of these 3 can be active)
Active buttons are grey.
4. Razor Tool
5. Spacer Tool
6. Position indicator - displays the time point or frame number of the location of the hovering mouse. Click on the widget to change the display between time and frame number
7. Total length of the project
8. Insert Clip Zone in Timeline. See Insert & Overwrite Advanced Timeline Editing on Kdenlive Home page.
9. Overwrite Clip Zone in Timeline. See Insert & Overwrite Advanced Timeline Editing on Kdenlive Home page.
10. Extract Timeline Zone
11. Lift Timeline Zone
12. Favourite Effects
13. Start Preview Render
14. Stop Preview Render
15. Add Preview Zone
16. Remove Preview Zone
17. Remove All Preview Zones
18. Automatic Preview
19. Disable Timeline Preview
20. Manage Cached Data
Items 13-20 are covered by Timeline preview rendering article on the Kdenlive Home Page
21. Smaller Tracks (see track resizing icon)
22. Bigger Tracks (see track resizing icon)
23. Use timeline zone ![]() / Don't use timeline zone
/ Don't use timeline zone ![]() for insert ( toggles). See Insert & Overwrite Advanced Timeline Editing on Kdenlive Home page.
for insert ( toggles). See Insert & Overwrite Advanced Timeline Editing on Kdenlive Home page.
Bottom Tool Bar

24. Split Audio and Video Automatically
29. Snap
Zoom Tools
31. Zoom Out
32. Zoom Project
33. Zoom In
Button Descriptions
Track Compositing - None
When Track Compositing is set to None you will not get tracks with alpha channel information to composite with the other tracks unless an explicit composite or affine transition is added between the clips. This is the behaviour that kdenlive displayed in older ( <= ver 0.9.X).
When Track Compositing is set to None you will not get tracks with alpha channel information to composite with the other tracks unless an explicit composite or affine transition is added between the clips. This is the behaviour that kdenlive displayed in older ( <= ver 0.9.X).
Track Compositing - Preview
When track compositing is set to Preview tracks with alpha channel information will be automatically composited with the other tracks using an algorithm that is somewhat faster than the algorithm used with Track Compositing - HighQuality but which slightly degrades the colors.
Track Compositing - HighQuality
When track compositing is set to High Quality tracks with alpha channel information will be automatically composited with the other tracks using an algorithm (qtblend) that is somewhat slower than the algorithm used with Track Compositing - Preview but which retains higher fidelity colour information.
When track compositing is set to High Quality tracks with alpha channel information will be automatically composited with the other tracks using an algorithm (qtblend) that is somewhat slower than the algorithm used with Track Compositing - Preview but which retains higher fidelity colour information.
Timeline Edit Mode - Normal Mode
In this edit mode you can not drag clips on top of other clips in the same track in the timeline. You can drag them to another track in the timeline but not into the same track at the same time point as an existing clip. Contrast this to overwrite mode.
Timeline Edit Mode - Overwrite Mode
In this edit mode you can drag a clip onto a track where there is an existing clip and the incoming clip will overwrite that portion of the existing clip (or clips) covered by the incoming clip.
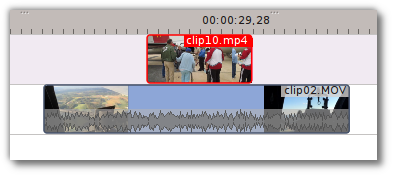
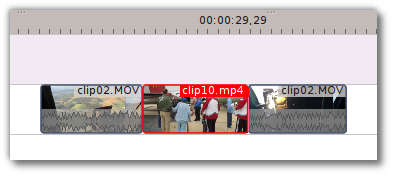
In the "After" screenshot above, you can see that the clip which was dragged from the upper track has replaced a portion of the clip on the lower track.
Timeline Edit Mode - Insert Mode
With this mode selected and you drop a selection into the time line the selection will be inserted into the time line at the point where the mouse is released. The clip that the selection is dropped on is cut and clips are moved to the right to accommodate the incoming clip.


Selection Tool
Use this to select clips in the timeline. The cursor becomes a hand when this tool is active.
Razor Tool
Use this to cut clips in the timeline. The cursor becomes a pair of scissors when this tool is active.
Spacer Tool
Use this tool (![]() ) to temporarily group separate clips and then drag them around the timeline to create or remove space between clips. Very useful. Experiment with this tool to see how it works.
) to temporarily group separate clips and then drag them around the timeline to create or remove space between clips. Very useful. Experiment with this tool to see how it works.
In the above example these clips are not grouped. However, the spacer tool groups them temporarily for you so you can move them all as a group.
Fit Zoom to Project
This will zoom the project out so that it all fits in the timeline window. This is the same function that is triggered by Timeline Menu item, .
Zoom project
The magnifying glasses zoom in or out on the timeline. The slider adjusts the zoom by large increments. These same settings are controlled by the menu items, and .
Split Audio and Video Automatically
When this is on and you drag a clip to the timeline, the audio in the clip will end up on an audio track and the video on a video track. You can achieve the same result if you select the clip, right click, . When this is off and you drag a clip onto the timeline, both the audio and video tracks are combined into one video track.
Automatic Transitions
When active any transitions added to the time line will have the automatic transition option checked by default. See Automatic Transitions
When active any transitions added to the time line will have the automatic transition option checked by default. See Automatic Transitions
Show Video Thumbnails
When on, the video clips in the timeline will contain thumbnails as well a filename. Otherwise they just have the clip filename.
When the timeline is zoomed in to the maximum, the video track will show a thumbnail for every frame in the clip. When the timeline is not on maximum zoom, the video track will show a thumbnail for the first and last frame in the clip.
Show Audio Thumbnails
When on, the audio clip will have a wave representation of the audio data as well as a filename. Otherwise they just have the clip filename.
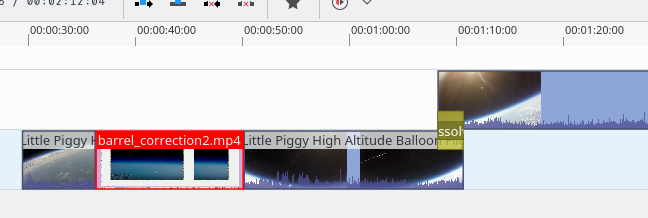
Show marker comments
This toggles on and off the display of the comments saved within markers (the text with the gold background in the example below) and within guides (the text with the purple background).
Snap
When this feature is on, dragging the beginning of one clip near to the end of another will result in the end of the first clip snapping into place to be perfectly aligned with the beginning of the second clip. As you move the two ends near to each other, as soon as they get within a certain small distance, they snap together so there is no space and no overlap. Note that this occurs even if the clips are on different tracks in the timeline.
Clips will also snap to the cursor position, markers and guides.
Cutting Footage from multiple aligned tracks - Ripple Delete
This is available on the menu under [1].
This is available on the menu under [2].
Mark In and Out points in the Project Monitor, then choose (or Ctrl-X). Kdenlive deletes all footage between the In and Out points in unlocked tracks, slides everything else back to fill the gap, and puts the playhead on the In point.


