Kdenlive/Manual/Monitors/uk: Difference between revisions
No edit summary |
No edit summary |
||
| Line 52: | Line 52: | ||
====Створення ділянок на моніторі проекту ==== | ====Створення ділянок на моніторі проекту ==== | ||
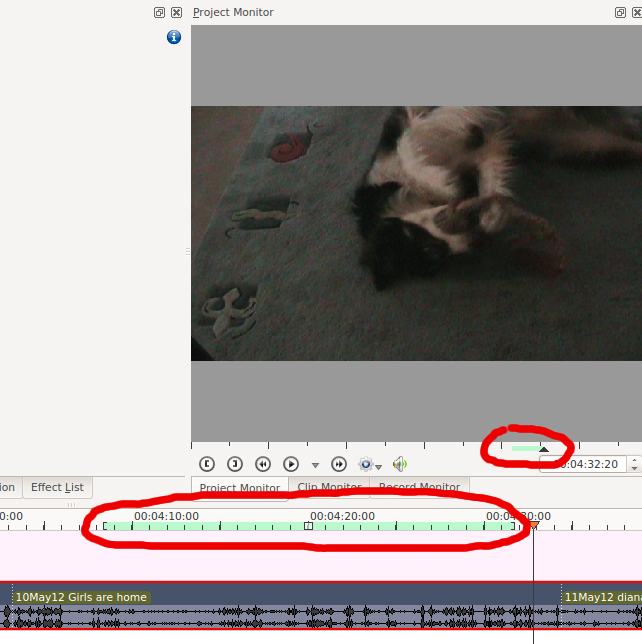
Для створення ділянок на панелі монітора проекту ви можете скористатися кнопками '''[''' і ''']''', так само, як і на моніторі кліпу. Ділянку буде показано кольоровим прямокутником на монтажному столі та під монітором проекту. | |||
[[File:Kdenlive Zone in project monitor.png]] | [[File:Kdenlive Zone in project monitor.png]] | ||
Revision as of 07:01, 10 June 2019
Монітори
У Kdenlive передбачено 2 типи віджетів-моніторів для показу ваших відеоданих: монітор кліпу і монітор проекту. На третьому моніторі, Моніторі запису, ви зможете спостерігати зображення, яке захоплює програма. Вибрати монітор можна натисканням відповідних вкладок, які розташовано у нижній частині панелі моніторів.
Зміна розмірів моніторів
Змінити розмір моніторів можна перетягуванням елемента керування зміною розмірів. Знайти нижню межу віджета доволі складно. Вам слід навести вказівник на ділянку точно між нижньою частиною вкладки моніторів та монтажним столом

Монітор кліпу
На панелі Монітор кліпу буде показано нередагований варіант кліпу, пункт якого позначено на панелі «Дерево проекту».

Віджети монітора кліпів
1) Кнопка встановлення початкової позиції зони. Натисніть її, щоб встановити «вхідну» точку.
2) Кнопка встановлення кінцевої позиції зони. Натисніть її, щоб вказати «вихідну» точку.
3) Zone duration indicator - selected by setting in and out points. Dragging the clip from the clip monitor to the timeline when there is a selected zone causes the selected zone, not the entire clip, to be copied to the timeline.
4) Position Caret - can be dragged in the clip. (In ver >=0.9.4 and with OpenGL turned on in Settings -> Configure Kdenlive -> Playback, audio will play as you drag this.)
5) Timecode widget - type a timecode here and hit Enter to go to an exact location in the clip. Timecode is in the format hours:minutes:seconds:frames (where frames will correspond to the number of frames per second in your project profile).
6) Timecode arrows - can be used to change the current position of the clip in the clip monitor.
Створення ділянок моніторі кліпів
Zones are defined regions of clips that are indictated by a colored section in the clip monitor's timeline - see item 3 above. The beginning of a zone is set by clicking [ (item 1 in the pic above). The end of a zone is set by clicking ] (item 2 in the pic above)
The Clip Monitor has a right-click (context) menu as described here.
Монітор проекту
The Project Monitor displays your project's timeline - i.e. the edited version of your video.

Віджети монітора проекту
1) The position caret. Shows the current location in the project relative to the whole project. You can click and drag this to move the position in the project.
2) The timecode widget. You can type a timecode here and press Enter to bring the Project Monitor to an exact location.
3) Timecode widget control arrows. You can move the Project Monitor one frame at a time with these.
Створення ділянок на моніторі проекту
Для створення ділянок на панелі монітора проекту ви можете скористатися кнопками [ і ], так само, як і на моніторі кліпу. Ділянку буде показано кольоровим прямокутником на монтажному столі та під монітором проекту.
Ви можете наказати Kdenlive обробляти лише позначену ділянку (див. обробка позначеної ділянки).
Контекстне меню монітора проекту
У програмі передбачено контекстне меню монітора проекту (викликається клацанням правою кнопки миші). Його опис можна знайти тут.
Монітор запису
Передбачено також Монітор запису, яким можна скористатися для попереднього перегляду захоплених даних з Firewire, карток Blackmagic або потоків FFmpeg / video4linux.
To switch to the record monitor click in the clip monitor on the “+” sign.
To switch back to the clip monitor click in the record monitor the “+” sign.
Separate Clip and Project Monitors
You can click on the Tab names that label the Monitors and drag the monitor out into its own window.
To put the monitors back into the Tabbed view - click on the monitor's title bar and drag the window on top of the other monitor window.
If the monitor has no title bar (intermittent defect) then you can not do this and you will need to reset kdenlive settings by deleting ~/.config/kdenliverc


