Archive:Kdenlive/Manual/Effects/Alpha manipulation/Rotoscoping/uk: Difference between revisions
Created page with "У попередніх версіях '''Kdenlive''' вузли можна було додавати простим клацанням між наявними вузлами...." |
Created page with "Коли ви вперше додаєте ефект ротоскопа, параметри ключового кадру будуть недоступними. Ви не зм..." |
||
| Line 42: | Line 42: | ||
[[File:Roto scoping greyed out.png]] | [[File:Roto scoping greyed out.png]] | ||
Коли ви вперше додаєте ефект ротоскопа, параметри ключового кадру будуть недоступними. Ви не зможете навіть додати новий ключовий кадр. | |||
Solution. Click in the project monitor and start drawing your rotoscope matte. Then the rotoscope keyframe options become enabled. | Solution. Click in the project monitor and start drawing your rotoscope matte. Then the rotoscope keyframe options become enabled. | ||
Revision as of 16:04, 1 August 2019
Ротоскоп
Для чого призначено «Ротоскоп»?
«В індустрії відеоефектів термін «ротоскопія» застосовують як означення методики створення вручну матування для елемента знятої дії так, щоб його можна було скомпонувати із іншим тлом.» Вікіпедія
Намалюйте ділянку на одній з відеодоріжок, і усе поза цією областю або у ній зникне, відкривши зображення відеодоріжки під основною.
Як намалювати ділянку у Kdenlive?
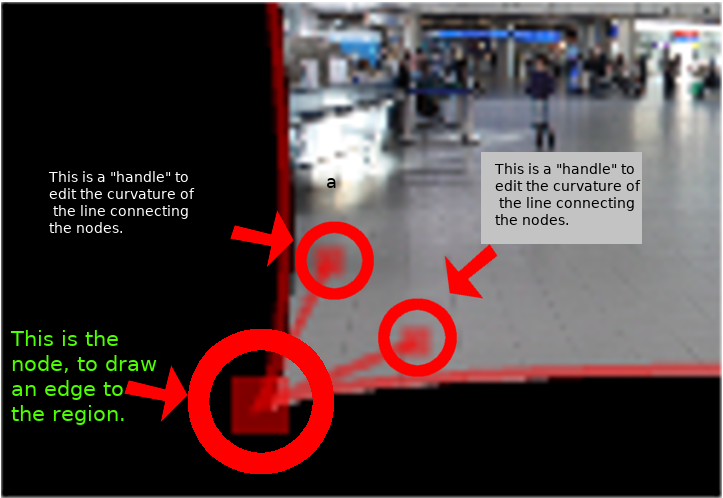
The region is drawn by adding nodes along your region. These act as edges for your rotoscope, and there is a line between each node.
The line between each node can be made into a Bézier_curve using "handles".
Add nodes to the node by left clicking the mouse.
Close the region by right clicking the mouse on one of the noedes
Change the position of the region by moving a node.
Make a line curved by dragging the control "handles". These are the two dots on the ends of the straight lines that appear on the curve (see screen shot above).

To define if it is the inside or the outside of the curve that is transparent toggle the invert checkbox.
У попередніх версіях Kdenlive вузли можна було додавати простим клацанням між наявними вузлами. Вилучати вузли можна було клацанням на них правою кнопкою миші. Втім, здається цього вже не можна робити у версіях 17.04 і 18.04.
Як пересувати маску для стеження за дією у кадрі — ключові кадри
To make the drawn mask follow the action in a clip...
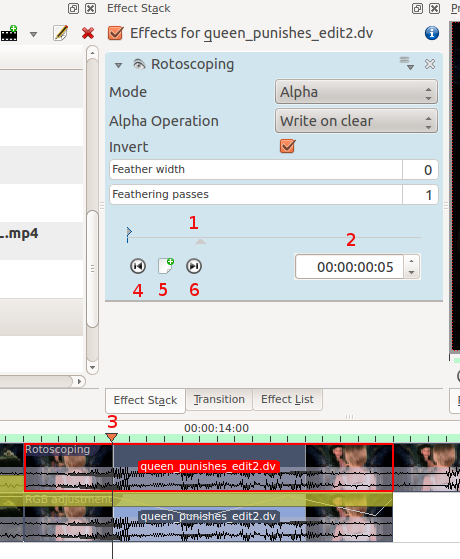
Move the position in the clip by dragging the carat on the time line (1 or 3 in screenshot below) or by using the time code control in the rotoscope effect (2 in the screenshot)
Click add key frame (5 in the screen shot).
Now adjust the position of the nodes in the curve to match the action.
Kdenlive will calculate a path to move the nodes from the position they were in the previous key frame to the position you put them in at this keyframe. So you do not have to draw a curve for every frame in the clip.
To remove a key frame move to the frame with the key frame using the Go to previous keyframe (4) or Go to next keyframe (6) and then click the red X that the add key frame (5) becomes when you are on an existing keyframe.
Цей ефект засновано на ефекті MLT FilterRotoscoping
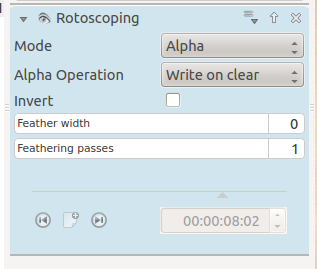
Параметри ротоскопа показано сірим
Коли ви вперше додаєте ефект ротоскопа, параметри ключового кадру будуть недоступними. Ви не зможете навіть додати новий ключовий кадр.
Solution. Click in the project monitor and start drawing your rotoscope matte. Then the rotoscope keyframe options become enabled.
Приклади
Examples of what you can do with the Rotoscoping effect.
{{#ev:youtube|h36S-awjLBk}}
{{#ev:youtube|nFv46XQUO34}}
Див. також опис ротоскопії у блозі ttil-я
Підручник із застосуванням ротоскопа
Це відео присвячено застосуванню зеленого екрана у 'Kdenlive, але у ньому також використано ротоскоп.
{{#ev:youtube|_6gxHLCFhLQ}}


