Plasma/da: Difference between revisions
(Created page with 'Der er fire værktøjer i håndtaget. Det øverste indstiller størrelsen. Træk i dette værktøj for at ændre widget'ets størrelse.') |
(Created page with 'Det næste værktøj drejer widget'et. Træk i det for at ændre orienteringen.') |
||
| Line 48: | Line 48: | ||
Der er fire værktøjer i håndtaget. Det øverste indstiller størrelsen. Træk i dette værktøj for at ændre widget'ets størrelse. | Der er fire værktøjer i håndtaget. Det øverste indstiller størrelsen. Træk i dette værktøj for at ændre widget'ets størrelse. | ||
Det næste værktøj drejer widget'et. Træk i det for at ændre orienteringen. | |||
[[Image:Handle_rotate.png|300px|center]] | [[Image:Handle_rotate.png|300px|center]] | ||
Revision as of 06:50, 30 July 2010
Template:I18n/Language Navigation Bar

En introduktion: hvad Plasma er, og hvad den gør
Plasma er skrivebordsbrugerfladen for KDE SC 4 med startmenuen, skrivebordet og skrivebordspanelet (ofte kaldet opgavelinjen, selvom denne kun er en del af panelet).
Plasma i overblik
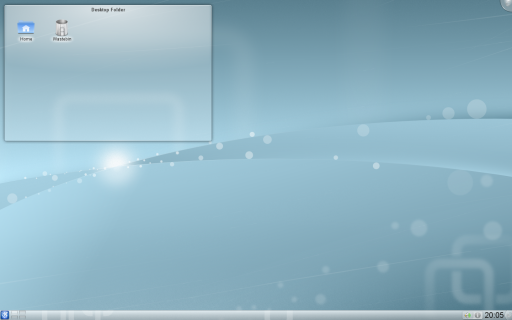
Et typisk Plasma skrivebord ser sådan ud:

Et Plasma skrivebords tre nøglekomponenter er:
- Panelet, også kendt som opgavelinjen, som indeholder startmenuen, listen af tasks (programmer), ur and systembakken;
- Skrivebordet, arealet hvor widgets pg ikoner er placeret;
- Plasma værktøjskassen, som findes i det øverste, højre hjørne af skærmen. Der er også en i højre side af panelet.
Hvordan du finder rundt i Plasma
Du kan bruge Plasme på samme måde som andre styresystemers skriveborde: applikationer kan startes fra startmenuen (K Menuen), kørende applikationer vises i opgavelinjen, ikoner i systembakken giver forskellige informationer og så videre.
En vigtig del af Plasma er de såkaldte widgets. Widgets er skrivebordets enkelte dele; de omfatter blandt andet startmenuen, ikoner, systembakke, ur... Widgets kan findes på selve skrivebordet eller indsættes i et panel. Paneler og skriveborde er faktisk selv en slags widgets, som er beregnet til at indeholde andre widgets (i Plasma kaldes de Containments).
Hvad betyder det for brugen af skrivebordet? Plasma har nogle nye funktioner i forhold til traditionelle skriveborde. Vi har allerede nævnt Plasmas værktæjskasser, undertiden kaldet "cashew'erne": de er en måde at påvirke og indstille Plasma. Klikker du på dem, så dukker der en menu op på skærmen med en række valgmuligheder: du kan tilføje widgets til dit panel eller skrivebord, ændre størrelse, tilføje eller fjerne paneler med mere.
Skrivebordet og ikoner
Som du måske bemærkede på skærmbilledet er der ingen ikoner placeret direkte på skrivebordet. I stedet er de placeret i en beholder kendt som en Mappevisning. Selvom der er mange tekniske grunde til at gøre det på den måde, så kan Mappevisninger fungere fuldstændigt som erstatninger for skrivebordet (faktisk viser de mappen Skrivebord som standard). Du kan trække ikoner til dem, klippe, kopiere, indsætte, omdøbe filer og lave nye mapper og filer.
Der er to vigtige forskelle til det sædvanlige skrivebord:
- Du kan have mere end en Mappevisning af selve skrivebordet;
- Du kan indstille Mappevisninger til at vise andre mapper (både lokale og på netværket).
Ud over Mappevisninger kan du lægge alle mulige andre slags widgets på skrivebordet, som for eksempel vejrudsigts widgets, notat widgets, fil-overvågere... Der er ingen grænser for, hvordan du kan tilpasse dit skrivebord.
Widgets overalt
I KDE SC 4.x understøtter Plasma ikke blot widgets skrevet specielt til Plasma (også kendt som Plasmoider) men også widgets fra andre kilder som fx Google Gadgets og Dashboard widgets fra Mac OSX. Flere widgets findes og installeres let ved hjælp af Hent smarte nye ting.
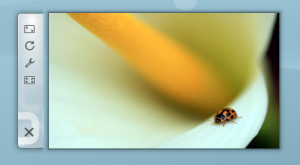
Widgets, som er lagt ned i panelet har som regel en Opsætnings menu, mens dem på skrivebordet kan indstilles fra 'håndtaget', som dukker op på den ene side af widget'et når musen holdes svævende over det. Ved at trække i en fri del af håndtaget kan du flytte widget'et til den ønskede position.

Der er fire værktøjer i håndtaget. Det øverste indstiller størrelsen. Træk i dette værktøj for at ændre widget'ets størrelse.
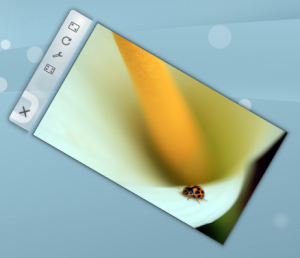
Det næste værktøj drejer widget'et. Træk i det for at ændre orienteringen.

The third is the wrench or spanner which allows you to configure that particular widget's settings.
Finally, the forth tool is used on some widgets like the Picture Frame. If you use the Picture Frame widget for example, it will open the image viewer.
Some of our favourite widgets are discussed on the Plasma Widgets page
Start menus etc.
The Panel

The panel can be configured by clicking on the toolbox on the right of the panel which puts the panel into configure mode. This lets you configure the panel to fit your needs.
Panel Alignment: Allows the alignment of the panel to be set in three pre-set positions.
Always Visible: Keeps the panel visible at all times, even when windows are maximised.
Auto Hide: Hides the panel off screen until the mouse is placed near the screen edge.
Windows can cover: This allows windows to cover the panel and if maximised, will cover the panel.
Windows go below: This allows windows to go below the panel, even when maximised.
Maximise Panel: Makes the panel fit to the screen edges, if it has been resized.
Remove this panel: Removes the current panel.
Lock Widgets: Locks the panel and widgets in position.
Add Spacer: Allows you to add a spacer into the panel giving space between the items in it.
Add Widgets: Allows widgets to be added to the panel.
Height: Allows the panel height to be adjusted.
Screen Edge: Allows you to drag the panel to any of the four edges of the screen.

The arrows on the edge, just below the main settings allow the panel's size to be adjusted. Dragging the arrow makes the panel smaller or larger. Dragging the arrow pointing down, moves the panel's position.
Advanced usage
Special cases not covered here
Activities and the Zooming User Interface (ZUI)
KDE Plasma has brought a lot of new features to the modern linux desktop, however many people are only using a fraction of the desktop's full potential. One of the most useful and underused features is the plasma activities. The basic idea behind is that your desktop space is limited to how many widgets it can hold. A user will want to use a lot of widgets but doesn't want their desktop to be cluttered. The answer to this problem is activities; they allow you to specialize each desktop to whatever task you need to accomplish. To make a new activity you have to click on the toolbox in the upper right hand corner, from there click zoom out. The desktop will zoom out then click add new activity under the small desktop. It will make a new desktop right next to it. Now go click the zoom in button under the new desktop. With this desktop you can add whatever widgets to this desktop and it will not affect the other desktop.
Activities and Virtual Desktops
Virtual desktops, the ability to have a separate sets of windows on separate desktops, can tie in with Activities. You can have a different activity on each virtual desktop. In Plasma Desktop 4.4, this can be configured by entering System Settings and navigating to Desktop -> Multiple Desktops, and checking "Different Activity for Each Desktop".
In Plasma Desktop 4.3, You configure this by zooming out and choosing "configure Plasma". Then select "use a different activity on each desktop" and zoom in again.
Use Cases
A user likes web comics so they add their favorite web comics via the comics widget. The user now has a full desktop activity dedicated to their favorite web comics. Now the user is happy with the web comics, but the user now has to go to work, so the user creates a activity with the folder view widgets set to the folders of the projects the user is currently working on. After work the user goes home and works on a side project of writing romance novels. The user always gains inspiration by looking at pictures of the user's significant other. The user now creates a new Activity but now puts pictures frame widgets with pictures of the user's significant other. The user also has a folder view of the romance novel project folder. Now no matter what the user is doing the user has a custom tailored activity to match it.
Go to this blog to read a few tips on using activities.
Hints and Tips
The Taskbar
Accessing the Taskbar Settings Menu: Click the panel toolbox (aka cashew), then right-click on the taskbar. From there you can access the Taskbar Settings dialog. The following settings are particularly useful:
- Grouping and Sorting: Grouping can be by program name, manually, or not at all. (You can also choose to only enable grouping if the taskbar is full.) Similarly, Sorting defaults to alphabetically, but it can also be by desktop, manually, or not sorted.
- Only Show Tasks from the Current Desktop: A checkbox on the Filters section.
- Have More than One Row on the Taskbar: If you use many applications at one time you may find it advantageous to set Maximum Rows and then Force Row Settings.
- Showing or Hiding Tooltips: A simple checkbox in the Appearance section of the General page.
Tweaking Plasma
- Learn how to add a sidebar with clock and news
- Customize your Plasma by mixing multiple Plasma themes
Further information
- The Plasma FAQ
- Plasma HowTo - short screencasts
- Glossary
- Some of our favourite plamoids - why not add yours?
- Here's how to install more Plasmas widgets
- Learn the versatility of KRunner
| Back to the Introduction page |
