KAddressBook/Tutorials/How to add a new contact?/da: Difference between revisions
(Created page with "En af de basale funktioner i en adressebog er at tilføje nye kontakter.") |
(Created page with "{{Warning/da|Du skal have mindst én adressebog for at kunne oprette en ny kontakt. Gå til '''Special:myLanguage/KAddressBook/Tutorials/How to create a new address book?|Hv...") |
||
| Line 3: | Line 3: | ||
En af de basale funktioner i en adressebog er at tilføje nye kontakter. | En af de basale funktioner i en adressebog er at tilføje nye kontakter. | ||
{{Warning| | {{Warning/da|Du skal have mindst én adressebog for at kunne oprette en ny kontakt. Gå til '''[[Special:myLanguage/KAddressBook/Tutorials/How to create a new address book?|Hvordan opretter man en ny adressebog?]]''' for at lære, hvordan man opretter en ny adressebog.}} | ||
First click on <menuchoice>+ New Contact</menuchoice> button, this will open a form in a popup. | First click on <menuchoice>+ New Contact</menuchoice> button, this will open a form in a popup. | ||
Revision as of 07:40, 31 October 2022
En af de basale funktioner i en adressebog er at tilføje nye kontakter.

Advarsel
Du skal have mindst én adressebog for at kunne oprette en ny kontakt. Gå til Hvordan opretter man en ny adressebog? for at lære, hvordan man opretter en ny adressebog.
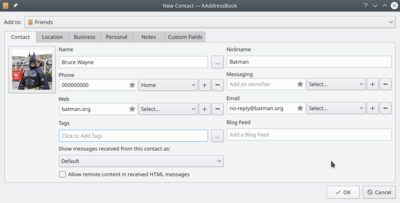
First click on button, this will open a form in a popup.

In the popup, fill out the form with the information that you want to save. At the top of the form, you can select the address book, you want to add the contact.
Note
You can add more than one phone number, website, and email. Just click on the button and select a category.

More information can be added. For this, navigate between the tabs: , , , , .
Note
To add location information you need to install the kdepim-addons package first.
When you are done, confirm the contact creating by clicking on .
