Amarok/QuickStartGuide/Playlists/da: Difference between revisions
Created page with 'Der er fire måder at tilføje musik til spillelisten i ''spillelistepanelet''.' |
Created page with 'Vælg noget af din musik i indholdsbrowseren og træk det til højre. Hvis du trækker det over ''kontekstpanelet'' vil du se ''popup-dropperen'', også kendt som PUD. Billedet o...' |
||
| Line 16: | Line 16: | ||
[[File:addingmusic.png|thumb|center]] | [[File:addingmusic.png|thumb|center]] | ||
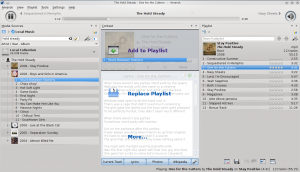
# | # Vælg noget af din musik i indholdsbrowseren og træk det til højre. Hvis du trækker det over ''kontekstpanelet'' vil du se ''popup-dropperen'', også kendt som PUD. Billedet ovenfor viser, hvordan PUD virker. PUD giver dig tre muligheder: <menuchoice>Føj til spilleliste</menuchoice>, <menuchoice>Erstat spilleliste</menuchoice> og <menuchoice>Mere...</menuchoice>. Den mulighed, som er fremhævet med en grå baggrund (<menuchoice>Føj til spilleliste</menuchoice> i dette billede) er aktiv. Slipper du albummet her, så bliver det føjet til spillelisten i ''spillelistepanelet''. Vælg en af de andre muligheder for at gøre noget andet med det valgte album. Trækker du det over <menuchoice>Mere...</menuchoice>, så kommer der en ny menu med flere valgmuligheder frem i PUD. | ||
# Drag your selection all the way onto the ''Playlist pane'' on the right-hand side of the Amarok screen. | # Drag your selection all the way onto the ''Playlist pane'' on the right-hand side of the Amarok screen. | ||
# <keycap>Double-click</keycap> the album/track you wish to transfer to the playlist. | # <keycap>Double-click</keycap> the album/track you wish to transfer to the playlist. | ||
Revision as of 11:26, 22 August 2010
Spillelister
Panelet Spillelister
Når du har lavet en musiksamling, så vil du nok gerne lytte til den. Lav derfor en spilleliste, som indeholder de spor, som du gerne vil høre i panelet Spilleliste. Det er her du afspiller din musik og hører streams og podcasts. Du kan sortere din spilleliste efter titel, album, kunstner, genre og meget andet. For eksempel kan du sortere sporene først efter år, så efter kunstner og så videre.
Søgefeltet lader dig søge eller filtrere dine spor. De to store grå pile oven over spillelistepanelet lader dig springe til det næste eller forrige spor som matcher søgningen. Svensknøgleikonet til højre lader dig filtrere dine spor efter kunstner, album etc. Spillelistepanelets layout kan ændres ved hjælp af menuen .
Tilføj musik til en spilleliste
Der er fire måder at tilføje musik til spillelisten i spillelistepanelet.

- Vælg noget af din musik i indholdsbrowseren og træk det til højre. Hvis du trækker det over kontekstpanelet vil du se popup-dropperen, også kendt som PUD. Billedet ovenfor viser, hvordan PUD virker. PUD giver dig tre muligheder: , og . Den mulighed, som er fremhævet med en grå baggrund ( i dette billede) er aktiv. Slipper du albummet her, så bliver det føjet til spillelisten i spillelistepanelet. Vælg en af de andre muligheder for at gøre noget andet med det valgte album. Trækker du det over , så kommer der en ny menu med flere valgmuligheder frem i PUD.
- Drag your selection all the way onto the Playlist pane on the right-hand side of the Amarok screen.
- Double-click the album/track you wish to transfer to the playlist.
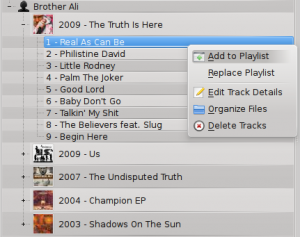
- Right-click the album or track. In your right-click menu, you'll find similar choices. The image below shows the context menu that appears after an item (Brother Ali - Real As Can Be in this case) has been right-clicked. Select .

Using the Toolbar
The Toolbar at the top of the Amarok screen provides a simple interface to control the playing of music in the playlist. Click the round icon on the left to start your music playing, and click it again to pause. On the right is the volume and mute control: click on the center of the icon to mute. Use your mouse scroll wheel to control the volume, or drag/click your mouse on the outside ring of the volume icon. Once a track or stream begins to play, the artist/album name/track title slowly alternates in bold in the center. On the right is the next track, which you can click to start it playing immediately. Once a track has played it will be on the left, so you can click on the title to go back to it. The progress bar in the middle of the Toolbar indicates the time elapsed (left hand) and time remaining (right hand) for the track that is currently playing. If you'd rather see a more traditional toolbar, you can select from the menu.

Manipulating playlists
The most important manipulation you will probably perform on your playlist is to delete albums or tracks, to rearrange the displayed items for each track or to rearrange the display order of tracks.
Removing a track
You can remove any track or album from your playlist by:
- Right-click on the item in the playlist and choose the option .
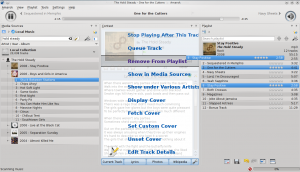
- Drag the item to be deleted over the Context pane to activate PUD. Several options will appear over the Context pane. Drag the item to the area marked . See the image below that shows a track being dragged onto the option in PUD.
- Selecting the track or tracks and use your Delete key. Multiple tracks can be selected using Shift or Ctrl.

You can undo your delete by pressing Ctrl+Z or by clicking the appropriate arrow in the Playlist Toolbar at the bottom of the Playlist pane (see below).
Using the Playlist tools at the bottom
At the bottom of the Playlist pane are six icons:
These buttons provide convenient alternatives to several keyboard actions.
Saving and retrieving your favourite playlists
The diskette icon (shown in the table above), at the bottom of your Playlist pane, allows you to save the current Amarok playlist. This enables you to recall a particular selection of music from your collection at any time. Playlists only contain pointers to the music you selected, not the music itself. So if your playlist is pointing to music on an external device, it must be connected and mounted, otherwise the music cannot be played. There are three places to store playlists:
- outside Amarok on your computer file system,
- in your Amarok playlist database
- on an portable media device.
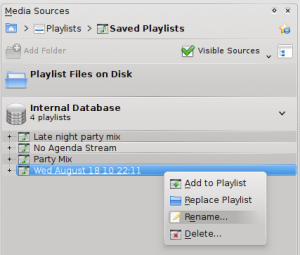
Clicking the diskette icon at the bottom of the Playlist pane stores your playlist in the Amarok playlist database. By default, your saved playlist has a name composed of the date and time when you saved it (see image below). By right-clicking the playlist name, you can rename it to something more suitable. Right-clicking on a playlist name also allows you to add it to your existing playlist in the Playlist pane, or to replace your existing playlist.

