Digikam/Color Labels and Picks/da: Difference between revisions
Importing a new version from external source |
Importing a new version from external source |
||
| Line 9: | Line 9: | ||
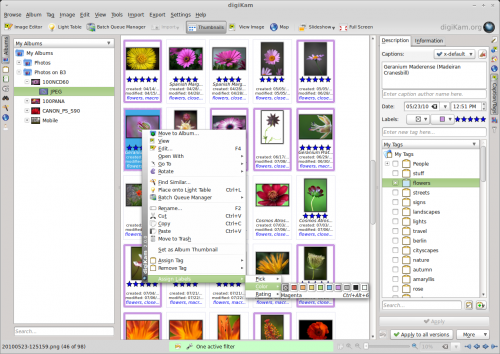
For at tilføje et mærke til et individuelt foto højreklikker du på det, vælger <menuchoice>Tildel mærke -> Farve</menuchoice> og vælger den farve, som du ønsker. Hvert farvemærke har sin egen tastaturgenvej, så du kan hurtigt mærke fotos ved hjælp at tastaturet. For eksempel taster du <keycap>Ctrl + Alt + 6</keycap> for at tildele det magenta mærke. For hurtigt at fjerne et farvemærke fra et billede taster du <keycap>Ctrl + Alt + 0</keycap>. Funktionen Udvalg fungerer på en lignende måde: du kan tildele et af tre udvalg - <menuchoice>Venter</menuchoice>, <menuchoice>Accepteret</menuchoice> og <menuchoice>Afvist</menuchoice> - til ethvert foto i '''digiKam''' ved hjælp af kontekstmenuen <menuchoice>Tildel mærke -> Udvalg</menuchoice> eller ved at bruge en tastaturgenvej. | |||
How exactly you choose to use both features depends on your specific photographic workflow. If you submit your photos to agencies or a stock site, the Picks feature can help you to keep tabs on the status of each submitted photo. Color Labels can come in handy in several situations. For example, you can use color codes to triage incoming photos, color marking photos by their relevance. You can also use color labels to specify the privacy level for each photo, with the red labels assigned to private shots, yellow for snaps that can be shared with family and friends, and green for public photos. In short, with a little imagination you can turn Color Labels and Picks into a powerful and flexible tool for keeping tabs on your photos. | How exactly you choose to use both features depends on your specific photographic workflow. If you submit your photos to agencies or a stock site, the Picks feature can help you to keep tabs on the status of each submitted photo. Color Labels can come in handy in several situations. For example, you can use color codes to triage incoming photos, color marking photos by their relevance. You can also use color labels to specify the privacy level for each photo, with the red labels assigned to private shots, yellow for snaps that can be shared with family and friends, and green for public photos. In short, with a little imagination you can turn Color Labels and Picks into a powerful and flexible tool for keeping tabs on your photos. | ||
Revision as of 08:31, 1 April 2011
Nye funktioner i digiKam 2: Farvelabels og Udvalg
Fra Dmitri Popovs blog, 22. Marts 2011
Ud over talrige forbedringer, så har digiKam 2.0 også nogle helt nye funktioner, herunder Farvemærker og Udvalg. Som navnet antyder, så er Farvemærker er funktion, som lader dig tildele farvekoder til dine foto.

For at tilføje et mærke til et individuelt foto højreklikker du på det, vælger og vælger den farve, som du ønsker. Hvert farvemærke har sin egen tastaturgenvej, så du kan hurtigt mærke fotos ved hjælp at tastaturet. For eksempel taster du Ctrl + Alt + 6 for at tildele det magenta mærke. For hurtigt at fjerne et farvemærke fra et billede taster du Ctrl + Alt + 0. Funktionen Udvalg fungerer på en lignende måde: du kan tildele et af tre udvalg - , og - til ethvert foto i digiKam ved hjælp af kontekstmenuen eller ved at bruge en tastaturgenvej.
How exactly you choose to use both features depends on your specific photographic workflow. If you submit your photos to agencies or a stock site, the Picks feature can help you to keep tabs on the status of each submitted photo. Color Labels can come in handy in several situations. For example, you can use color codes to triage incoming photos, color marking photos by their relevance. You can also use color labels to specify the privacy level for each photo, with the red labels assigned to private shots, yellow for snaps that can be shared with family and friends, and green for public photos. In short, with a little imagination you can turn Color Labels and Picks into a powerful and flexible tool for keeping tabs on your photos.
