Digikam/Calendars/it: Difference between revisions
Importing a new version from external source |
Importing a new version from external source |
||
| Line 22: | Line 22: | ||
Qui puoi modificare le impostazioni. | |||
; | ;Dimensioni della carta: | ||
: | :puoi scegliere tra la dimensione standard A4 e US Letter. | ||
; | ;Posizione dell'immagine: | ||
: | :imposta dove devono comparire le immagini nel calendario. | ||
; | ;Disegna linee sul calendario: | ||
: | :significa che puoi disattivare o attivare le linee. | ||
; | ;Rapporto tra immagine e testo: | ||
: | :aumenta o diminuisce la dimensione dell'immagine a seconda del rapporto, sposta il cursore e l'anteprima verrà aggiornata. | ||
; | ;Imposta il carattere: | ||
: | :scegli un carattere predefinito da utilizzare. | ||
When you have completed this click <menuchoice>Next</menuchoice> in the wizard and you will be greeted with this window: | When you have completed this click <menuchoice>Next</menuchoice> in the wizard and you will be greeted with this window: | ||
Revision as of 09:15, 23 April 2011
Creare calendari utilizzando digiKam
Trascritto dal blog di Mohamed Malik, 18 febbraio 2011
Sai che puoi creare calendari utilizzando digiKam? È molto semplice e facile da fare. Per prima cosa devi selezionare alcune foto, preferibilmente 12 foto in modo che queste corrispondano ai 12 mesi nel calendario.

Dopo aver selezionato le immagini vai su .
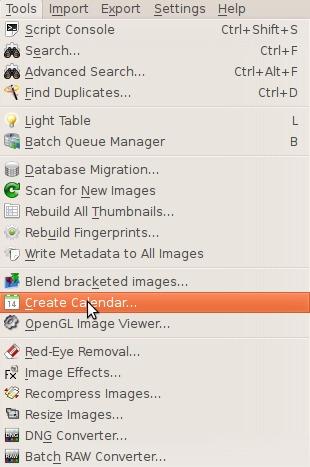
Facendo questo apparirà questa finestra:
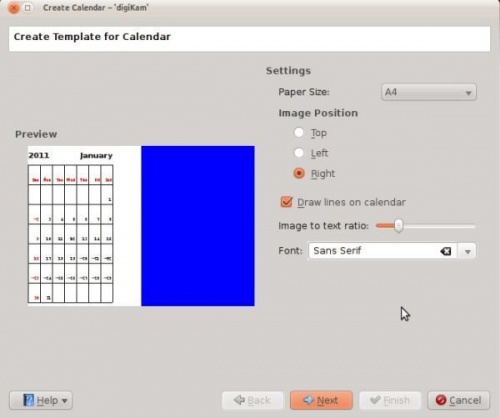
Qui puoi modificare le impostazioni.
- Dimensioni della carta
- puoi scegliere tra la dimensione standard A4 e US Letter.
- Posizione dell'immagine
- imposta dove devono comparire le immagini nel calendario.
- Disegna linee sul calendario
- significa che puoi disattivare o attivare le linee.
- Rapporto tra immagine e testo
- aumenta o diminuisce la dimensione dell'immagine a seconda del rapporto, sposta il cursore e l'anteprima verrà aggiornata.
- Imposta il carattere
- scegli un carattere predefinito da utilizzare.
When you have completed this click in the wizard and you will be greeted with this window:
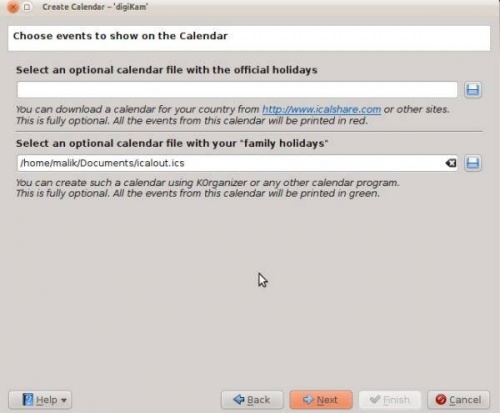
The website iCalshare has many great templates that can be used. They are free to use and download. All you need to do is register an account with them. It includes templates which contain much information on public holidays and events of many countries. I searched this website for Maldives, however I didn’t find anything about my country here so I skipped this.
If you are using KOrganizer to organise your daily work and if you have marked special days like birthdays of friends and relatives you could really use this feature. And it is a very simple process. Open up KOrganizer, go to and save the calendar file on to your computer. Then select the folder button on the window from the current screenshot and show it to the file manager and select . This will add that to your calendar. Then press in the wizard. And you will see this window.
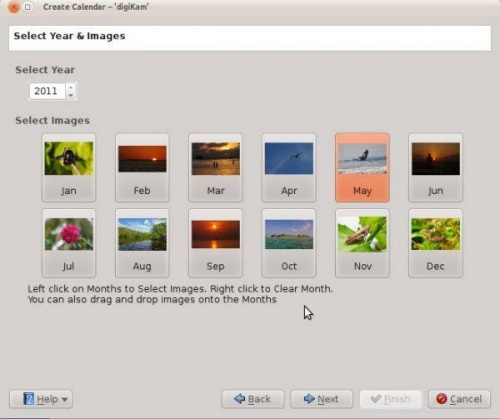
Here you need to select the year and images. Since this is 2011 I have chosen 2011 and if you still want to change any images you still have the option to do it. Left click to change the image and the file manager will pop up show it the new image and press . If you need to clear an image give it a right click and the image will be cleared. And you can add any other image that you may prefer. When you are done press .
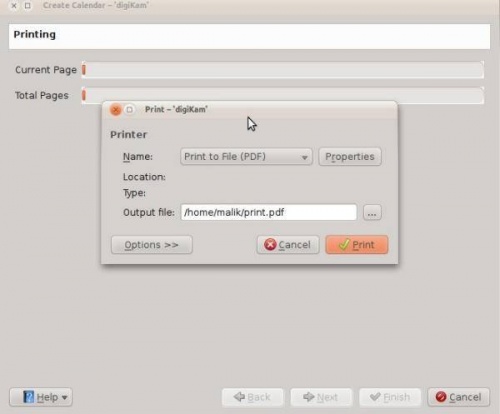
When you are done press and it will generate a 12 page PDF file exactly like a calendar.
You can either send it directly to your printer or print to a PDF file. However according to my personal opinion it will be a wise decision to print to PDF first so that you can see what you have created. If you need to change the printer properties press . You will be able to change the page layout (portrait, landscape) and the units of measurements (cm, inches, px, etc.). By default the output file will be made in your home folder. If you need to change the location press the button on the right and specify manually.
