KDevelop4/Manual/Working with version control systems/uk: Difference between revisions
(Created page with "{{Prevnext2
| prevpage=Special:MyLanguage/KDevelop4/Manual/Debugging_programs | nextpage=Special:MyLanguage/KDevelop4/Manual/Customizing KDevelop
| prevtext=Зневаджув...") |
(Created page with "Category:Розробка/uk") |
||
| Line 28: | Line 28: | ||
}} | }} | ||
[[Category: | [[Category:Розробка/uk]] | ||
Revision as of 09:09, 20 May 2011
Робота з системами керування версіями
If you are working with larger projects, chances are that the source code is managed by a version control system such as subversion or git. The following description is written with subversion in view but will be equally true if you use git or any other supported version control system.
First not that if the directory in which a project is located is under version control,KDevelop will automatically notice. In other words: It is not necessary that you tell KDevelop to check out a copy itself when setting up your project; it is ok to point KDevelop at a directory into which you have previously checked out a copy from the repository. If you have such a directory under version control, open the tool view. There are then a number of things you can do:
- If your directory has become outdated, you can update it from the repository: Click on the project name with the right mouse button, go to the menu and select . This will bring all files that belong to this project up to date with respect to the repository.
- If you want to restrict this action to individual subdirectories or files, then expand the tree view of this project to the level you want and right click on a subdirectory or file name, then do the same as above.

- If you've edited one or more files, expand the view of this project to the directory in which these files are located and right click on the directory. This gives you a menu item that offers you different choices. Choose to see the differences between the version you have edited and the version in the repository you had previously checked out (the revision "base"). The resulting view will show the "diffs" for all files in this directory.
- If you only edited a single file, you can also get the menu for this file by simply right clicking on the corresponding file name in the project view. Even simpler, just right clicking into the view in which you have opened this file will also give you this menu option.
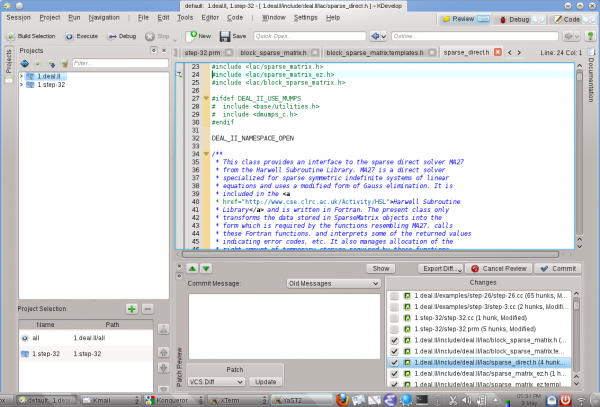
- If you want to check in one or more edited files, right click either on an individual file, subdirectory, or whole project and select . This will get you into mode, the third mode besides and as you can see in the top right corner of the KDevelopRmain window. The picture on the right shows you how this looks. In mode, the top part shows you diffs for the entire subdirectory/project and each individual changed file with changes highlighted (see the various tabs on this part of the window). By default, all changed files are in the changeset you are about to commit, but you can unselect some of the files if their modifications are unrelated to what you want to commit. For example, in the example on the right I have unselected
step-32.ccandstep-32.prmbecause the changes in these files have nothing to do with the other ones I made to this project and I don't yet want to check them in yet (I may later want to do so in a separate commit). After reviewing the changes you can enter a commit message into the text box and hit on the right to send things off.
- As with seeing differences, if you want to check in a single file you can also just right click into the editor window to get the menu item.
