Digikam/Metadata/it: Difference between revisions
Importing a new version from external source |
Importing a new version from external source |
||
| Line 1: | Line 1: | ||
<languages /> | <languages /> | ||
== | ==Lavorare con le informazioni aggiuntive delle foto in digiKam== | ||
Trascritto dal blog di Dmitri Popov, 22 febbraio 2011 | |||
Inside each digital photo hides metadata in the [http://en.wikipedia.org/wiki/Exif EXIF], [http://en.wikipedia.org/wiki/IPTC_Information_Interchange_Model IPTC], or [http://en.wikipedia.org/wiki/Extensible_Metadata_Platform XMP] formats, and '''digiKam''' provides tools for viewing and editing this useful information. | Inside each digital photo hides metadata in the [http://en.wikipedia.org/wiki/Exif EXIF], [http://en.wikipedia.org/wiki/IPTC_Information_Interchange_Model IPTC], or [http://en.wikipedia.org/wiki/Extensible_Metadata_Platform XMP] formats, and '''digiKam''' provides tools for viewing and editing this useful information. | ||
Revision as of 14:47, 7 June 2011
Lavorare con le informazioni aggiuntive delle foto in digiKam
Trascritto dal blog di Dmitri Popov, 22 febbraio 2011
Inside each digital photo hides metadata in the EXIF, IPTC, or XMP formats, and digiKam provides tools for viewing and editing this useful information.
For starters, digiKam’s main window features the dedicated Metadata sidebar which lets you view EXIF, Makernote, IPTC, and XMP metadata. You can switch between concise and full views as well as print the metadata, save them as a file, and copy them into the clipboard.
You can use the sidebar to edit basic metadata such as caption (i.e., the photo’s title), author, date and time as well as assign the photo ratings and tags. The section of the sidebar allows you to enter additional information about the photo such as licensing terms, location, and contact info. Since digiKam supports templates, you don’t have to enter this information manually. You can apply an existing template to the photo by selecting it from the drop-down list. To create a template on the fly, press the button next to the drop-down list.

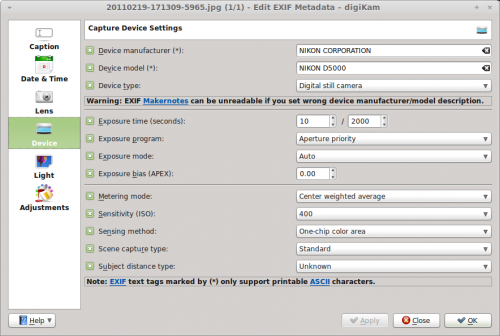
digiKam offers metadata editing tools, too. To edit, for example, EXIF metadata, choose . The metadata editor conveniently organizes all metadata into sections, making it easier to find and edit specific entries. For example, to edit hardware-related information, switch to the section. Here you can modify device manufacturer, device model, exposure-related settings, and other information.
Using the command, you can copy EXIF metadata from one photo to another. This feature can come in handy when you use an image editing application that strips all metadata from the edited photo. If you keep the original photo, you can easily copy the EXIF metadata from it into the tweaked photo.
Want to strip all EXIF metadata off the photo? digiKam’s got you covered: choose the command, and digiKam scrubs the metadata off the photo.
In addition to EXIF, digiKam supports the IPTC and XMP formats, so you can perform the described actions on metadata stored in these formats.

