Digikam/Calendars/ca: Difference between revisions
Created page with "Aquí seleccionareu l'any i les imatges. Ja que estem en 2011 he triat el 2011 i si voleu canviar alguna de les imatges encara teniu l'oportunitat de fer-ho. Feu clic esquerra pe..." |
Created page with "Una vegada ho hagueu fet tot premeu <menuchoice>Imprimeix</menuchoice> i es generarà un PDF de 12 pàgines exactament com un calendari." |
||
| Line 54: | Line 54: | ||
Una vegada ho hagueu fet tot premeu <menuchoice>Imprimeix</menuchoice> i es generarà un PDF de 12 pàgines exactament com un calendari. | |||
You can either send it directly to your printer or print to a PDF file. However according to my personal opinion it will be a wise decision to print to PDF first so that you can see what you have created. If you need to change the printer properties press <menuchoice>Properties</menuchoice>. You will be able to change the page layout (portrait, landscape) and the units of measurements (cm, inches, px, etc.). By default the output file will be made in your home folder. If you need to change the location press the button on the right and specify manually. | You can either send it directly to your printer or print to a PDF file. However according to my personal opinion it will be a wise decision to print to PDF first so that you can see what you have created. If you need to change the printer properties press <menuchoice>Properties</menuchoice>. You will be able to change the page layout (portrait, landscape) and the units of measurements (cm, inches, px, etc.). By default the output file will be made in your home folder. If you need to change the location press the button on the right and specify manually. | ||
Revision as of 19:52, 25 February 2012
Crear calendaris utilitzant digiKam
Transcrit des de l'article d'en Mohamed Malik, el 18 de febrer de 2011
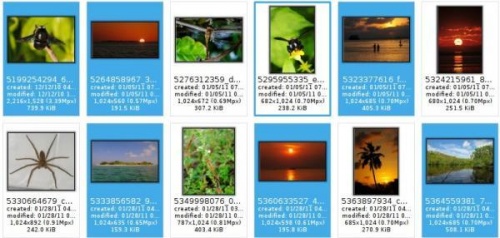
Sabíeu que podeu crear calendaris utilitzant digiKam? És molt senzill i fàcil de fer. En primer lloc haureu de seleccionar algunes fotos, preferiblement 12, de manera que aquestes es corresponguin amb els 12 mesos al calendari.
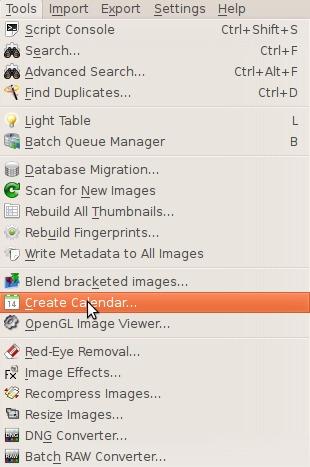
Una vegada seleccionades, aneu a .
Us apareixerà aquesta finestra:
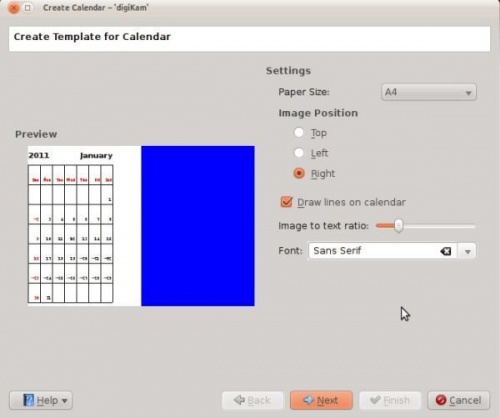
Aquí podreu canviar els ajustaments.
- Mida del paper
- Teniu dues opcions: A4 i carta US.
- Posició de la imatge
- Indica en quina posició voleu que apareguin les imatges al calendari.
- Dibuixa línies en el calendari
- Significa que podeu activar o desactivar si apareixeran les línies.
- Relació entre imatge i text
- Augmenta o disminueix la grandària de la imatge d'acord a la proporció, moveu el deslliçador i la vista prèvia canviarà a mesura que ho ajusteu.
- Tipus de lletra
- Tria el tipus de lletra que desitgeu utilitzar.
Una vegada completat aquest pas feu clic a a l'assistent i veureu aquesta finestra:
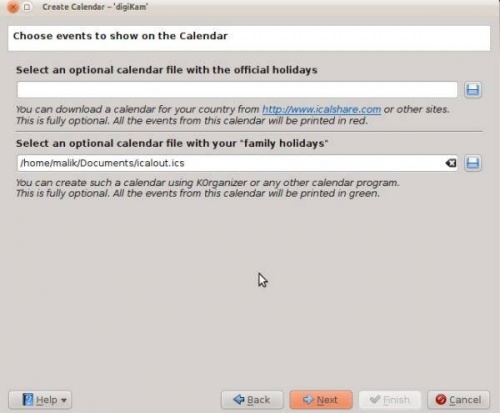
El lloc web iCalshare ofereix genials plantilles que podeu utilitzar. Són lliures per usar i descarregar. Tot el que haureu de fer és registrar un compte. S'inclouen plantilles que contenen informació sobre festius i esdeveniments públics de molts països. Hi he cercat dades per les Maldives, en no trobar res pel meu país, he omés aquest pas.
Si utilitzeu KOrganizer per organitzar el vostre treball diari i heu marcat dies especials com aniversaris d'amics i familiars podeu utilitzar aquesta característica. És un procés molt senzill. Obriu KOrganizer, aneu a i deseu el fitxer de calendari a l'ordinador. Després seleccioneu el botó de carpeta en la finestra de la captura de pantalla actual i us apareixerà el gestor de fitxers per indicar la ubicació i seleccioneu . Això ho afegirà al vostre calendari. Després premeu en l'assistent. A continuació veureu la següent finestra.
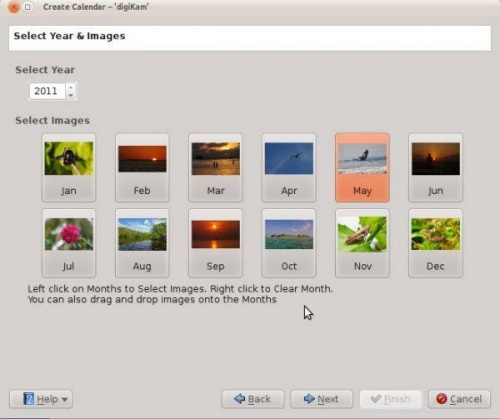
Aquí seleccionareu l'any i les imatges. Ja que estem en 2011 he triat el 2011 i si voleu canviar alguna de les imatges encara teniu l'oportunitat de fer-ho. Feu clic esquerra per canviar la imatge i s'obrirà un gestor de fitxers, des d'on indicareu la nova imatge i premeu . Si necessiteu eliminar una imatge feu clic dret i la imatge serà eliminada, de manera que podreu afegir-hi qualsevol altra de la vostra preferència. Quan acabeu premeu .
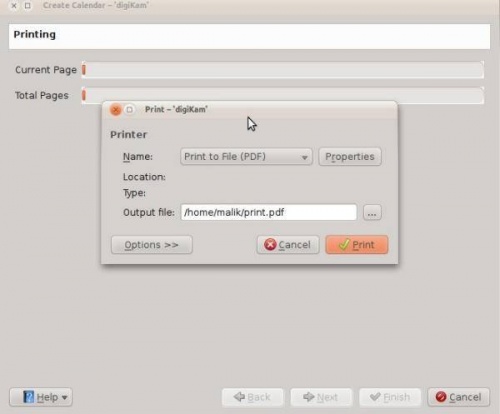
Una vegada ho hagueu fet tot premeu i es generarà un PDF de 12 pàgines exactament com un calendari.
You can either send it directly to your printer or print to a PDF file. However according to my personal opinion it will be a wise decision to print to PDF first so that you can see what you have created. If you need to change the printer properties press . You will be able to change the page layout (portrait, landscape) and the units of measurements (cm, inches, px, etc.). By default the output file will be made in your home folder. If you need to change the location press the button on the right and specify manually.
