Digikam/Noise Reduction/ca: Difference between revisions
Created page with "Category:Graphics Category:Fotografia/ca Category:Tutorials" |
Created page with "{{Tip/ca|1=En Matthias Welwarsky va afegir: «El que més m'agrada de l'eina reducció de soroll és que puc aplicar valors per separat a la reducció de la luminància i cromin..." |
||
| Line 42: | Line 42: | ||
[[Image:Digikam_Noise_After2.jpeg|center|500px|thumb|Copyright M.Malik]] | [[Image:Digikam_Noise_After2.jpeg|center|500px|thumb|Copyright M.Malik]] | ||
{{Tip|1=Matthias Welwarsky | {{Tip/ca|1=En Matthias Welwarsky va afegir: «El que més m'agrada de l'eina reducció de soroll és que puc aplicar valors per separat a la reducció de la luminància i crominància. Això ajuda molt en la preservació dels detalls mentre que dóna una impressió d'omogeneitat del color. El soroll de luminància es converteix en gra i taques de color que són eliminats.»}} | ||
[[Category:Graphics]] | [[Category:Graphics]] | ||
[[Category:Fotografia/ca]] | [[Category:Fotografia/ca]] | ||
[[Category:Tutorials]] | [[Category:Tutorials]] | ||
Revision as of 17:35, 21 March 2012
Reduir el soroll utilitzant digiKam
Transcrit des de l'article d'en Mohamed Malik, el 12 de febrer de 2011
All DSLR cameras noise up to some extent. This is most true for entry level and consumer level DSLR cameras even when these cameras have very good ISO performance up to something like ISO 800.
I use a Nikon D3000 and its ISO performance is good up to ISO 800. ISO 1600 is good and it can be used in smaller sizes. However ISO 3200 images are very grainy and noise reduction has to be applied.
If you are using digiKam it has a great noise reduction tool. Double click the image where you want to reduce noise and give a right click -> . You can even press F4 on the keyboard and it will do the same thing.
After this you will be presented with the editor view.
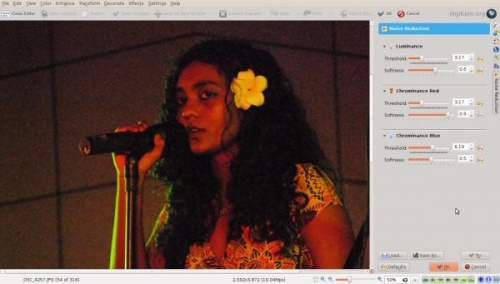
From here go to and you will be presented with this window.

Choose from the settings or you can choose your own settings. Here is a picture of before and after from my tests. They are much more usable and better looking after the noise reduction has been applied.
Before Noise Reduction Was Applied:

After Noise Reduction Was Applied:

Here is another picture in which the noise reduction was applied:

After:


