Digikam/Versioning/ca: Difference between revisions
Created page with "Quan retoqueu fotos al '''digiKam''', probablement voldreu mantenir intactes els originals. I aquí és on la característica ''Versionat'' pot venir com anell a la mà. Us perm..." |
Created page with "La manera en la que funciona el versionat és molt senzilla. Quan estigueu llest per desar una versió modificada d'una foto, premeu el botó <menuchoice>Desa com a una versió n..." |
||
| Line 5: | Line 5: | ||
Quan retoqueu fotos al '''digiKam''', probablement voldreu mantenir intactes els originals. I aquí és on la característica ''Versionat'' pot venir com anell a la mà. Us permet desar cada versió editada d'una foto original com una imatge completament separada amb una llista de totes les accions realitzades. | Quan retoqueu fotos al '''digiKam''', probablement voldreu mantenir intactes els originals. I aquí és on la característica ''Versionat'' pot venir com anell a la mà. Us permet desar cada versió editada d'una foto original com una imatge completament separada amb una llista de totes les accions realitzades. | ||
La manera en la que funciona el versionat és molt senzilla. Quan estigueu llest per desar una versió modificada d'una foto, premeu el botó <menuchoice>Desa com a una versió nova</menuchoice>. Això desarà la versió editada com una imatge separada. Tingueu en compte que si esteu treballant amb un fitxer RAW, totes les versions es convertiran automàticament en un dels formats gràfics suportats. Per omissió, és JPEG, però el podeu canviar a un altre format compatible. Per fer-ho, escolliu <menuchoice>Arranjament -> Configura digiKam</menuchoice>, canvieu a la secció <menuchoice>Edició d'imatges</menuchoice>, i seleccioneu el format desitjat des de la llista desplegable <menuchoice>Desa els fitxers com a</menuchoice>. Per ometre la configuració global, podeu desar una sola versió en un format diferent fent clic al triangle i escollint el format que voleu des del menú <menuchoice>Desa en el format</menuchoice>. | |||
By default, each version is automatically saved in the same album as the original, so you can end up with multiple thumbnails of the same photo in the album. But '''digiKam''' provides an elegant solution to the problem: you can combine the original and all its versions into a single group. To do this, select the original and its versions, right-click on the selection and choose the <menuchoice>Group Selected Here</menuchoice> command. This combines all the selected photos as one neat bundle, and an icon in the lower-right corner of the thumbnail displays the number of images in the group. Alternatively, you can save the version in a separate album: click on the triangle next to the <menuchoice>Save As New Version</menuchoice> button, select the <menuchoice>Save New Version as</menuchoice> command, and pick the destination folder. | By default, each version is automatically saved in the same album as the original, so you can end up with multiple thumbnails of the same photo in the album. But '''digiKam''' provides an elegant solution to the problem: you can combine the original and all its versions into a single group. To do this, select the original and its versions, right-click on the selection and choose the <menuchoice>Group Selected Here</menuchoice> command. This combines all the selected photos as one neat bundle, and an icon in the lower-right corner of the thumbnail displays the number of images in the group. Alternatively, you can save the version in a separate album: click on the triangle next to the <menuchoice>Save As New Version</menuchoice> button, select the <menuchoice>Save New Version as</menuchoice> command, and pick the destination folder. | ||
Revision as of 15:38, 24 March 2012
Versions al digiKam 2
Transcrit des de l'article d'en Dmitri Popov, el 28 de març de 2011
Quan retoqueu fotos al digiKam, probablement voldreu mantenir intactes els originals. I aquí és on la característica Versionat pot venir com anell a la mà. Us permet desar cada versió editada d'una foto original com una imatge completament separada amb una llista de totes les accions realitzades.
La manera en la que funciona el versionat és molt senzilla. Quan estigueu llest per desar una versió modificada d'una foto, premeu el botó . Això desarà la versió editada com una imatge separada. Tingueu en compte que si esteu treballant amb un fitxer RAW, totes les versions es convertiran automàticament en un dels formats gràfics suportats. Per omissió, és JPEG, però el podeu canviar a un altre format compatible. Per fer-ho, escolliu , canvieu a la secció , i seleccioneu el format desitjat des de la llista desplegable . Per ometre la configuració global, podeu desar una sola versió en un format diferent fent clic al triangle i escollint el format que voleu des del menú .
By default, each version is automatically saved in the same album as the original, so you can end up with multiple thumbnails of the same photo in the album. But digiKam provides an elegant solution to the problem: you can combine the original and all its versions into a single group. To do this, select the original and its versions, right-click on the selection and choose the command. This combines all the selected photos as one neat bundle, and an icon in the lower-right corner of the thumbnail displays the number of images in the group. Alternatively, you can save the version in a separate album: click on the triangle next to the button, select the command, and pick the destination folder.

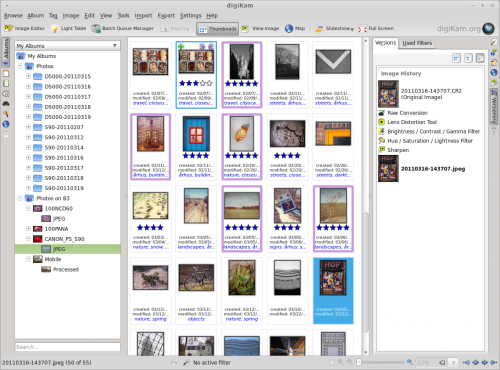
To view all versions of a photo, select the original in its album, and expand the right . You should then see all versions of the selected photo with a complete list of editing actions.
